# Intro to GUIBO
GUIBO empowers specialist tour operators and travel agencies to deliver exceptional, personalized travel experiences through intelligent automation.
### Who is GUIBO for?
* **Tour Operator**: Upgrade your products with digital travel experiences for travelers and agencies
* **Travel Agency**: Combine publishing automation with protecting your customer relationship.
* **Hybrids**: Profit from the complete toolkit for creating, selling and reselling travel products
### Core Principles
We operate on four core principles working together to reduce manual effort while enhancing travel experiences.
1. **Personalized traveler experience**\
Tour provider travelers expect both a cared-for experience and state-of-the-art digital experience. That's exactly what GUIBO is built for.
2. **Automated publishing**\
GUIBO integrates with your booking system to automatically create personalized travel documents, eliminating manual processes.
3. **Centralized content management**\
Maintain content once, publish everywhere: Consistent content on all channels (tour guide app, roadbook, website), eliminating maintenance work work.
4. **Automated B2B connectivity**\
Reselling partnerships drive success for both operators and agencies. GUIBO makes collaborating with reselling partners simpler than ever before.
### Core Capabilities
Component
Enables you to...
Tour Guide App
Provide personalized itineraries with a state-of-the-art experiences
Notify travelers easily and at any time
Roadbook
Generate high quality Roadbooks for your products
Automate high resolution mapsheets
Release Page
Provide travelers with a single point of entry to all docs they need
Automate personalized publishing at scale
API
Create personalized Release Pages from your booking system
Integrate content from your existing IT systems to GUIBO
B2B Network
Automate rebranding for agencies
Find new reselling partners with 60+ tour providers, 5,000+ bike & hike products
Content Management
Manage products, routes, POIs and content with the GUIBO web-portal
Simplify and automate product maintenance with reusable libraries
# Getting started
Step by step guide on how to get started with GUIBO as a new customer.
This guide will help you get started with GUIBO. For an overview of GUIBO's capabilities, please refer to the [Intro to GUIBO](/) page.
{% stepper %}
{% step %}
#### [Initial account setup ➔ ](/get-started/getting-started/initial-account-setup)
Brand name, logo, languages and color for customized travel docs.
{% endstep %}
{% step %}
#### [Prepare library ➔ ](/get-started/getting-started/prepare-library)
Import some data (route, POI, text) for your first guidebook.
{% endstep %}
{% step %}
#### [Create your first guidebook](/get-started/getting-started/create-your-first-guidebook)[ ➔ ](/get-started/getting-started/create-your-first-guidebook)
Assemble your imported data and create your first guidebook that represents one of your products.
{% endstep %}
{% step %}
#### [Publish for travelers ➔ ](/get-started/getting-started/publish-to-travelers)
Create a release to publish your guidebook via release page and tour guide.
{% endstep %}
{% endstepper %}
# Initial account setup
* Register for a new GUIBO account by [clicking here](https://www.guibo.travel/register).
* [Login](https://www.guibo.travel/login) into your GUIBO account.
* Add **account name.**
* Account ➔ Account Settings ➔ account name\
Add your company's name as account name. It will be visible for customers and partners.
* Add your **company logo**
* Account ➔ Account Settings ➔ Logo \
Make sure to add a logo with transparent background.
* Add your brand's main **color**
* Account ➔ Account Settings ➔ color \
This color is used to make the travel documents look like yours. Make sure that the color is clearly visible on a white background.
* Add **content languages** in which you want to provide your travel docs.
* Account ➔ Account Settings ➔ languages \
Enter the language code (e.g., "EN" for English, "DE" for German, "NL" for Dutch)
* Add the email address where you want to receive feedback sent by your travelers via the GUIBO app.
* Account ➔ Account Settings ➔ App Settings ➔ Feedback mail address
* Add your **Feedbackmailadress** you want to use to recieve Network requests from your business partners sent via App.
* Account ➔ Account Settings ➔ App settings
* Add the email address where you want to receive notifications about new shares and connection requests from your business partners via the [GUIBO Network](https://docs.guibo.travel/publishing/b2b-network).
* Account ➔ Account Settings ➔ **Network Settings** ➔ Contact email for network notifications
# Prepare library
After setting up your account, the next step is to prepare your content libraries. In GUIBO, libraries are reusable content collections that serve as the foundation for all your guidebooks.
## **Why Libraries matter**
Libraries are the foundation for scaling your content and operations.
**Maintain once, update everywhere** \
Create content once in a library and reuse it across multiple guidebooks. Any update you make is automatically reflected in all connected guidebooks. No manual rework needed.
**Personalize bookings with library content**\
Libraries provide standardized building blocks such as accommodations, additional stages, POIs, and descriptions that can be reused and adapted for each individual booking. This allows you to deliver personalized travel experiences without duplicating or rebuilding content.
### Geo Libraries
These contain location-based assets like routes and points of interest:
* **Routes Libraries**: Store GPX tracks and paths that travelers will follow
* **POIs Libraries**: Store points of interest like attractions, accommodations, and services
### Text Libraries
These contain text-based content:
* **Text Libraries**: Store general information pages, descriptions, images and other text content
## Step 1: Create route library
1. Click the **+** button in the **Geodata** section
2. Enter a name for your library (e.g., "Routes", "Hiking Routes", "Cycling routes", "Austria routes")
3. Click **Create**
4. Add a route to your created library
1. Open your new library
2. Click the orange **+ button** (upper left corner)
* **Upload GPX** to import an existing GPX file, or
* **Create Route Manually** to draw a route on the map
3. Add a basic description to your route
## **Step 2: Create POI library**
1. Click the **+** button in the **Geodata** section
2. Enter a name for your library (e.g., "POIs", "Accommodation", "Sightseeing")
3. Click **Create**
4. Add a POI to your created library
1. Open your new library
2. Click the orange **+ button** (upper left corner)
* **POI: Search & Import** to add google places, or
* **POI: Drop manually** to drop a new POI anywhere you want, or
* **POI: AI Extractors** to extract POIs from continuous text
3. Add a basic description to your POI
## Step 3: Create text library
1. Click the **+** button in the **Text Pages** section
2. Enter a name for your library (e.g. "General Information", "Text Pages Spain")
3. Click **Create**
4. Add a Text Page to Your Text Library
1. In your Text library, go to **Text Pages**
2. Click **Add Text Page**
3. Create a simple "Welcome" or "Arrival Information" page
4. Add basic text content using the editor
## Next Steps
Your libraries now contain some content for your first guidebook. In the next step, [Create your first guidebook](/get-started/getting-started/create-your-first-guidebook), you'll assemble this content into a complete travel product.
***
**Tip**: When creating a new library, think about its purpose and what type of content it will contain. The clear separation between geographic and text libraries helps maintain organization as your content grows.
# Guidebook structures
Every guidebook follows one of two structures — itinerary-based or collection-based. Your choice shapes how you build content and how it appears in the app.
Every guidebook follows one of two structures. Your choice determines **how you build content** — and how accommodations and content appear in the Tour Guide App.
## How is your trip structured?
Outdoor stay with restaurant, route & activity tips
Accommodations in the app
Accommodation list +
Per day as check-in / check-out
Accommodation list only
### Itinerary-based guidebooks
The guidebook is divided into **stages** — one stage is typically one day's program. This is the standard for multi-day trips with a set program.
It covers two variants:
* **Point-to-point** — a different destination, and usually a different hotel, each day.
* **Star trips** — day-trip suggestions from a single base; the same hotel every night.
Days can also exist **without a program** — for example, extra nights booked at a destination.
### Collection-based guidebooks
The guidebook holds **categories of curated assets** — e.g. restaurant tips, hiking routes, or other activities. This is the standard for **location stays** with no daily itinerary, just recommendations for the surrounding area.
Travelers browse by category instead of following a day-by-day plan.
### What this means for accommodations
The structure decides how hotels reach the traveler:
* **Itinerary-based** — GUIBO places the right hotel on each day automatically, using destination points. Travelers see a **check-in and check-out** hotel per day, plus the full list.
* **Collection-based** — there are no travel days, so the per-day display is switched off. Every hotel still appears in the accommodation list.
[Click here](broken://pages/dCpXCx6xVKUTP5vue8ZG) for more information on personalized accommodations.
# Create your first guidebook
This guide will walk you through creating your first guidebook in GUIBO. A guidebook represents a travel product that can be published to travelers or to the [B2B network](https://docs.guibo.travel/publishing/b2b-network).
**Prerequisites Before creating a guidebook, you should have:**
* [Set up your account](https://docs.guibo.travel/get-started/getting-started/initial-account-setup) and configured languages
* [Created at least one library](https://docs.guibo.travel/get-started/getting-started/prepare-library) for routes, POIs, Destination Points, Transfers and text content
* Decide which [guidebook structure](/get-started/getting-started/guidebook-structures) fits your products best
## Step 1: Create a New Guidebook
1. From the main dashboard, click the + button in the Guidebooks section
2. Enter a Title for your guidebook in your primary language
## Step 2: Set Up the itinerary in the guidebook
1. Navigate to Content section and click on "Edit"
2. Navigate to Tour itinerary and click on "Add Stage"
3. Enter the stage name in all languages. \
**Best practice:** Choose as title "*From City1 to Village2*"\
Note that we recommend avoiding the use of “Day xx” in stage titles:
\
Stages without a fixed day reference can be easily reused across different trip durations, so personalized releases don’t require any changes to stage names.
## Step 3: Add destination markers to stages
1. **Create a dedicated destination library** to maintain unique destination points across all guidebooks.
2. Open your guidebook and click **Edit Content** to access the content builder.
3. Click the **map icon** to view all existing destination points from your libraries.
4. **Import an existing destination point** by clicking the relevant map icon.
5. To **create a new destination point:**
* Click the respective stage on the left
* Click **Add Item → Add Markers**
* Set the destination point on the map
* Save it to your destination library
{% hint style="danger" %}
Manage all destinations for all guidebooks in **one shared library**. Linking from a single library (instead of re-creating destinations per stage) ensures that the matching algorithm can work correctly.
{% endhint %}
## Step 4: Import/Create Routes
1. Open the stage and click "Add item" and choose either to:
* Import from Library by using full text search or map
* Upload GPX to import an existing track
* Create Route Manually to draw it on the map
2. Save the route in a library to reuse it in the next guidebook
## Step 5: Import/Create POIs
1. Open the stage and click "Add item" and choose either:
* Connect full library to the guidebook.
* Search & Import POIs from Google Places
* Create POIs manually
2. Save in a library if you want to reuse it in the next guidebook\
\
*Note:* Only POIs are imported that **are close to the respective routes** of your guidebook according to the settings you entered under your Account > Data Management.
The **Georeference Settings** define how far a Point of Interest (POI) may be located from a route to be considered relevant to that route.
Different maximum distances can be configured depending on the activity type:
* **Walking activities:** Default maximum distance: **1.5 km**
* **Cycling activities:** Default maximum distance: **2.5 km**
* **Motorized vehicle activities:** Default maximum distance: **15 km**
All POIs within the configured distance from a route are determined as relevant.
#### Where these settings apply
The configured distances affect:
1. **Automatic POI selection from connected libraries**\
When a POI library is connected to a Guidebook for automatic POI selection, only POIs within the configured distance are selected.
2. **POIs displayed along routes**\
The distance determines which POIs are considered to be located along a route.
3. **Manual POI imports from libraries**\
When POIs are manually imported from a library, the system automatically selects POIs based on the configured distance.
PDF: Note that if you add a POI that is outside the range of your settings, these will be displayed as "In the vicinity".
## Step 6: Things to Know
1. Navigate to "Things to Know"
2. Click on "Add item"
3. Create a new text page or import one from your library. \
**Best practice**: Add information that is not geolocated, like a "Packlist"
## Step 7: Organize Content Structure
1. Move stages, routes, POIs, text pages or destination points via drag & drop
## Step 8: Preview Your Guidebook
1. Navigate to the Guidebook start view and go to the section "Channels"
2. Click on the Settings icon in the line "Smartphone App"
3. Use the Test Release Code with your [test device](https://docs.guibo.travel/faq/how-can-i-test-my-guidebooks-on-the-smarthone) to preview the content in the GUIBO or your White Label App
## Step 9: Mark as Ready to Publish
1. Activate the channels you want to use (App, PDF, GPX)
2. Change the status from "In preparation" to "Approved"
3. Your guidebook is now ready to be published to travelers
# Publish to travelers
After creating your guidebook, the final step is to publish it to your travelers. In GUIBO, this is done through the release system, which creates personalized access for your travelers.
## Understanding releases
A release is a traveler-specific instance of your guidebook that:
* Provides access to your content for a specific time period
* Contains personalized information tailored to a specific booking (like booked hotels,...)
* Offers multiple delivery channels (app, PDF roadbook, GPX files, push notifications)
* Is accessed through a unique download code
## Step 1: Prepare your guidebook for publishing
1. Navigate to your guidebook
2. Verify that all content is complete and accurate
3. Change the status from "In preparation" to "Approved"
* Only guidebooks with "Approved" status can be published to travelers
* This status change prevents incomplete content from reaching travelers
## Step 2: Access the release dashboard
1. From the main navigation, go to the **Release Dashboard**
2. This is your central hub for managing all traveler-specific releases
## Step 3: Create a new release
1. Click the orange **+** button to create a new release
2. Enter the required information:
* **Set download code:** Unique identifier travelers will use to access their content in the app, typically matching your booking reference.
* **Select Guidebook**: Select which approved guidebook to publish for this specific booking.
* **Set traveller's language**: Define the language for the PDF roadbook/booklet and release page interface.
* **Set number of smartphone devices:** Specify how many devices can use this download code (usually matches number of travelers).
* **Define release period:** Set the timeframe during which travelers can access the content.
* **Define Seller (Optional):** Select an agency to rebrand the travel docs to the agency's look and feel.
3. Save the release
## Step 4: Personalize the release (optional)
If needed, you can personalize the release with booking-specific information:
1. Select the release on the left side.
2. Choose from the following options to personalize your release:
1. **Documents**\
Add any PDF document to the release. These are then available via the release page and via the tour guide app.
2. **Accommodation**\
Add specific hotels to this release. After adding the hotel you can specify arrival and departure dates.
3. **Add content**\
Click Actions ➔ Add content to add any POI, route or text page to this specific release.
4. **Modify guidebook content**\
Click Actions ➔ Modify guibdeook content to edit any content for this specific release.
## Step 5: Preview and share with travelers
1. Click the **"Traveller's page" link** to preview the release page as single point of access for travelers
2. **Share this link** (e.g. via E-Mail) with your travelers to provide all travel docs with a single link
## Next Steps
You now have an understanding about the most important GUIBO. Now you can:
* Create more comprehensive content
* Build additional guidebooks
* Explore advanced features like [B2B Network](/publishing/b2b-network), [External Content Integration](/content-management/integrate-external-content) or our [Developer Overview](/developers/overview).
***
**Tip**: Test your releases before sending them to travelers. Download the GUIBO (or White Lapel) App on your test device and open the release using the traveler’s download code to experience the guidebook exactly as your travelers will see it.
You can use the customer’s release code on a test device without affecting the release:
* The download does not count toward the maximum number of devices
* No traveler fee will be charged for the test download
# Support
Support Guide for Tour Operators and GUIBO End Users
It is important that as a tour operators, you take traveler feedback seriously and respond appropriately. This is the only way to effectively resolve issues, maintain customer satisfaction, and continuously improve product quality. Handling feedback properly is essential for identifying the right solution quickly and efficiently. To achieve this, traveler reports should be analyzed and classified accordingly.
1. **identify user errors:**
* [Make sure that all permissions in the device settings are are activated.](/faq/navigation-issues)
* Ask the customer which screen they are on and what function they expect to find on it.
* **Ask the customer to provide screenshots of the malfunction!!!**
If the issue is caused by user error, explain the correct usage of the feature to the customer and guide them accordingly. It is also recommended to create an internal document to help analyze and interpret customer behavior at the end of the season. Based on these insights, you may improve your own documentation or forward relevant feature requests and improvement suggestions to us.
-> If no user error can be detected, then go to point two:
2. **check configuration problem in the Guidebook in the GUIBO backend:**
* Check the guidebook in the backend. Make sure that:
* [x] All approvals under App & PDF are enables
* [x] the geodata are correctly created and configured accordingly
* If the booking is personalized, check the configuration options on the release dashboard / download releases of the corresponding booking copy.
If there is a configuration issue, make the necessary adjustments in the backend to solve the problem.
3. **Recognize technical problem and create tickets:**
* if there is a technical problem, create and fill out a ticket. Complete the "App Issue Form" on the Schneider Geo Help Desk.
* Please be sure to quote the booking number so that we can investigate the problem.
* Ask the customer to provide a screenshot of the error in order to analyse the analyse the problem in more detail.
# Updates
What's new in GUIBO
## What’s New: Introducing the GUIBO Notification Center
August 11th, 2026
Managing your daily operations on GUIBO just got cleaner, faster, and more organized. As our platform has grown, so has the volume of update emails filling your inbox. To help you focus on what matters most without missing critical updates, we are excited to launch the all-new GUIBO Notification Center.
### 📥 All Your Updates in One Central Hub
You no longer need to search through your email inbox to find status updates or message histories. The Notification Center centralizes every incoming update directly within the GUIBO platform.
* Partner Communications: Real-time notes, inquiries, and updates sent directly by your business partners.
* System & Platform Alerts: Crucial operational updates, system maintenance alerts, and automated workflow notifications.
### 🛠 Key Capabilities
#### 1. Unified Inbox
Access all past and current notifications directly inside your GUIBO dashboard anytime. Never worry about an important partner message landing in your email spam folder again.
#### 2. Category-Based Filtering
Easily sort through your messages by type. Whether you need to view only partner notes or quickly check system alerts, built-in filters allow you to pinpoint exact details in seconds.
#### 3. Granular Email Controls
You stay in complete control of how and where you receive alerts:
* **Per-Type Delivery Preferences**: Choose exactly which message categories should trigger an email alert and which ones should stay strictly in-app.
* **Dedicated Email Addresses**: Assign specific email addresses to different notification types (e.g., direct partner inquiries to your ops team, platform system updates to your admin email).
### ⚙️ How to Get Started
1. **Access the Notification Center**: Click the new **Bell Icon** in the top navigation bar of your GUIBO dashboard.
* Clicking the bell opens a quick-view drop-down featuring your **10 most recent notifications**.
* To open the full view, click the **Expand Icon** at the top or bottom of the panel to launch the main Notification Center hub.
2. **Filter Messages**: Use the pills at the top left of the panel to sort by message type or partner.
3. **Customize Email Preferences:** Head to Account Settings > Notification Preferences to toggle email alerts on or off for specific categories and assign your preferred recipient email addresses.
*This feature is now live for all GUIBO users across all account tiers.*
### 🗺️ TourMaps Update: Auto-Zoom & Elevation Profiles
July 31st, 2026
We’ve rolled out some powerful updates to our TourMaps feature and the StageSwitcher to make tracking and analyzing your routes smoother and more interactive.
#### 🔍 Auto-Zoom on Active Stages
Navigating between stages is now completely seamless. Whenever you switch or activate a stage, the map will automatically zoom and adjust its focus to fit the entire stage route perfectly onto your screen. No more manual scrolling or pinching to find your route.
#### 📈 Instant Elevation Profiles on Click
Get immediate insights into the terrain. Now, simply click on any route within TourMaps to instantly open its elevation profile. This interactive chart allows you to visualize the climbs, drops, and overall topography of the route at a glance, helping you plan and analyze with precision.
#### 💡 Quick Tip
Try switching through a few stages in a row—the TourMaps view will dynamically glide and adapt to each new route in real-time!
### 🚀 New (Beta): Automated Hotel Import from PDF via GUIBO AI
July 28th, 2026
Manually creating accommodations is now a thing of the past! You can now upload hotel list PDFs directly within the Release Dashboard. Our GUIBO AI Service automatically scans the document, extracts the relevant data, and creates the accommodations including their respective check-in and check-out dates.
Smart Duplicate Detection: To keep your database clean, the GUIBO algorithm automatically uses geo-coordinates to check if a hotel POI already exists. If a match is found, it will be intelligently reused instead of creating a duplicate.
📋 Prerequisites for a Smooth Import:
* Dates per Entry: Each accommodation entry in the PDF must include a check-in and check-out date.
* Default Library Setup: The hotel POIs are stored in your default accommodation library. You can easily define this library in your Account Settings under the Data Management section.
> #### 🧪 Beta Phase & Pricing Notice
>
> This feature is currently in Beta, and we would love to hear your feedback to help us refine it!
>
> During the beta period, this service is completely free to use. After the beta phase concludes, billing will be based on the AI tokens used.
## Smarter accommodations and modernized route editor
June 8th, 2026
Two improvements ship today: more control over how accommodations appear in the app, and a redesigned route editor that is faster and more precise.
### 1. Fine-grained control over accommodations
You can now decide how accommodations are presented in the app — at **account**, **guidebook**, and **release** level. Show check-in and check-out hotels on each travel day, or switch them off for collection-style guidebooks (when stages are not day based); travelers always find every hotel in the app's accommodation overview.
Per booking, you can add any tailor-made accommodation:
* **Extra night at an existing stay** — just works, nothing to do.
* **Extra hotel in a new location** (e.g. an arrival or departure night elsewhere) — mark it as outside the trip plan so it skips stage matching and won't displace your mapped hotels. It still appears in the accommodation overview.
You can also assign hotels to stages manually and review changes in the new audit log.
Learn how it works in the Personalized Accommodation guide: [Click here](broken://pages/dCpXCx6xVKUTP5vue8ZG).
### 2. Modernized route editor
Editing routes is now more direct, and every route figure updates instantly as you work.
**Edit routes**
* **Move the start or end point** anytime with a single click.
* **Place control points** anywhere along the route and drag them to reshape it.
* **Change one section only:** set two control points to mark it, then a third to adjust the part in between — the rest of the route stays untouched.
* **Add and manage optional segments (detours)** more easily.
**Figures update instantly**
Every change refreshes automatically:
* Elevation profile, total ascent and descent
* Estimated duration (walking or cycling time, by route type)
* **Path surface** — now available
## Arrive Happy with Last Mile Navigation! 🏨
May 14th, 2026
Tired of travelers getting lost just as they’re ready to check in? Our new Last Mile Navigation feature for the 2026 season bridges the gap between the trail and the hotel.
When your guests get close to their destination, the GUIBO App (and all white-label versions) now offers to route them directly to their doorstep. No more switching apps or searching for addresses—just a seamless transition from the route to a well-deserved rest.
GUIBO Blog
Or see here more detailed documentation about GUIBO's turn by turn navigation features:
* [Turn by turn navigation in general](/publishing/tour-guide-app/turn-by-turn-navigation)
* [First mile and back to route navigation to curated route](/publishing/tour-guide-app/turn-by-turn-navigation/first-mile-navigation)
* [Last mile navigation](/publishing/tour-guide-app/turn-by-turn-navigation/last-mile-navigation)
## Streamlined Communication & Partner Chats about guidebook updates
April 29th, 2026
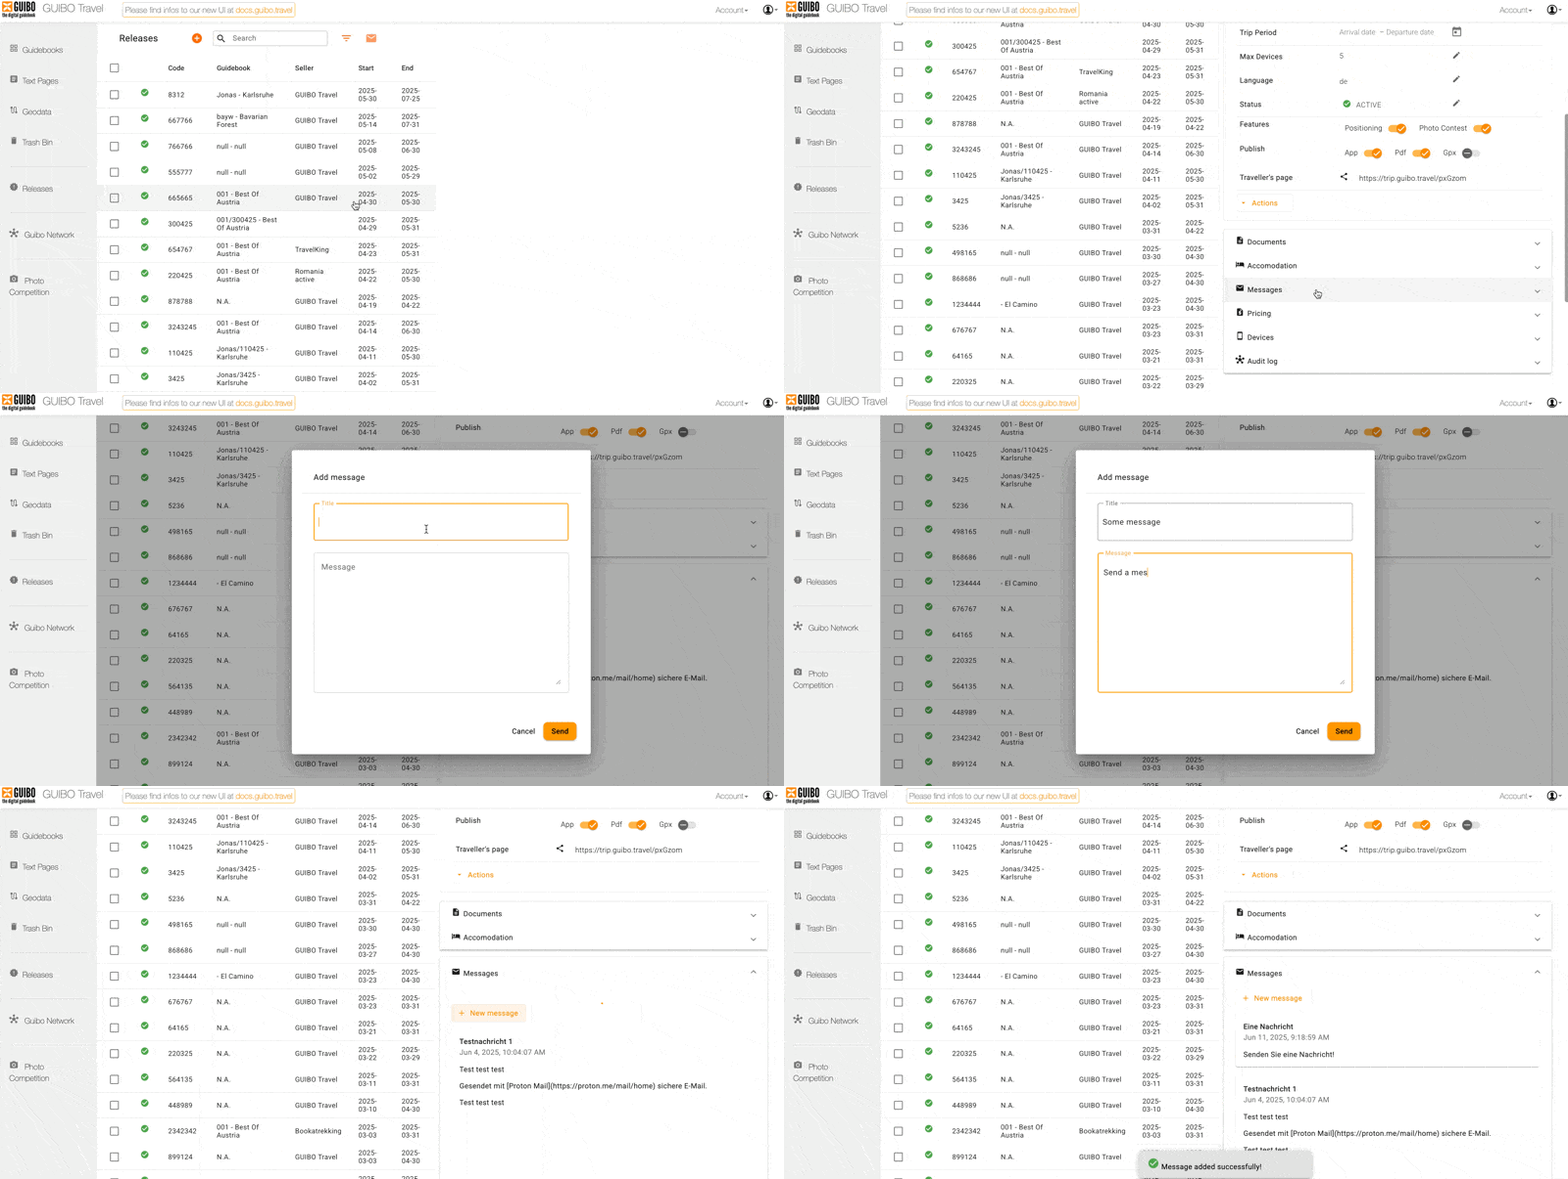
We’ve redesigned how you interact with your partners about guidebook changes! To give you more control over who sees what, we have separated Internal Comments from Partner Communications and introduced new ways to reach your B2B contacts.
#### 📍 Where to find it
You can find these new communication sections directly on the Guidebook Overview page. Simply open any guidebook, and you will see the updated layout at the bottom of the overview.
#### 🔒 Internal vs. External Clarity
* Internal comments: Keep your internal team notes private. This section is now visually distinct to ensure your internal discussions stay within your organization.
* Partner messages: A dedicated space for all B2B communication regarding the guidebook.
#### 💬 New B2B Messaging Options
In the "Partnernachrichten" section, you now have two powerful ways to communicate:
1. Broadcast-Updates: Need to share an update with everyone? Send a single message that reaches every partner who has access to this guidebook simultaneously.
2. Direct Chats: Prefer a 1-to-1 conversation? Select a specific partner from your list to start a private, direct discussion.
***
#### Why this matters
This update reduces noise and ensures that your messages always reach the right audience—whether it's a private internal note, a general announcement to all partners, or a specific detail for just one collaborator.
## 2026 Season Kickoff: Enhanced Mobile Experience for Your Guests
April 22nd, 2026
We are excited to announce the official launch of our mobile apps for the **2026 travel season**. This update focuses on increasing guest autonomy and streamlining communication between your operations team and your travelers.
#### Release Status
* **GUIBO App:** The 2026 version is now live in all stores.
* **Whitelabel Apps**: All custom-branded partner apps have been submitted and are currently in the final review stage with the Apple App Store and Google Play Store. They will become available for your guests over the next few days.
***
#### Key Improvements for the 2026 Season
We’ve introduced several high-impact features designed to reduce support requests and enhance the premium feel of your brand:
* **Modernized User Interface:** A cleaner, more intuitive layout that aligns with modern mobile standards, ensuring your travelers have a professional digital touchpoint.
* **End-to-End Daily Agenda:** The new Day View provides a comprehensive timeline for your guests. It covers the full daily loop—from morning hotel checkout to evening check-in—including integrated last-mile navigation to ensure they find their way to the hotel effortlessly.
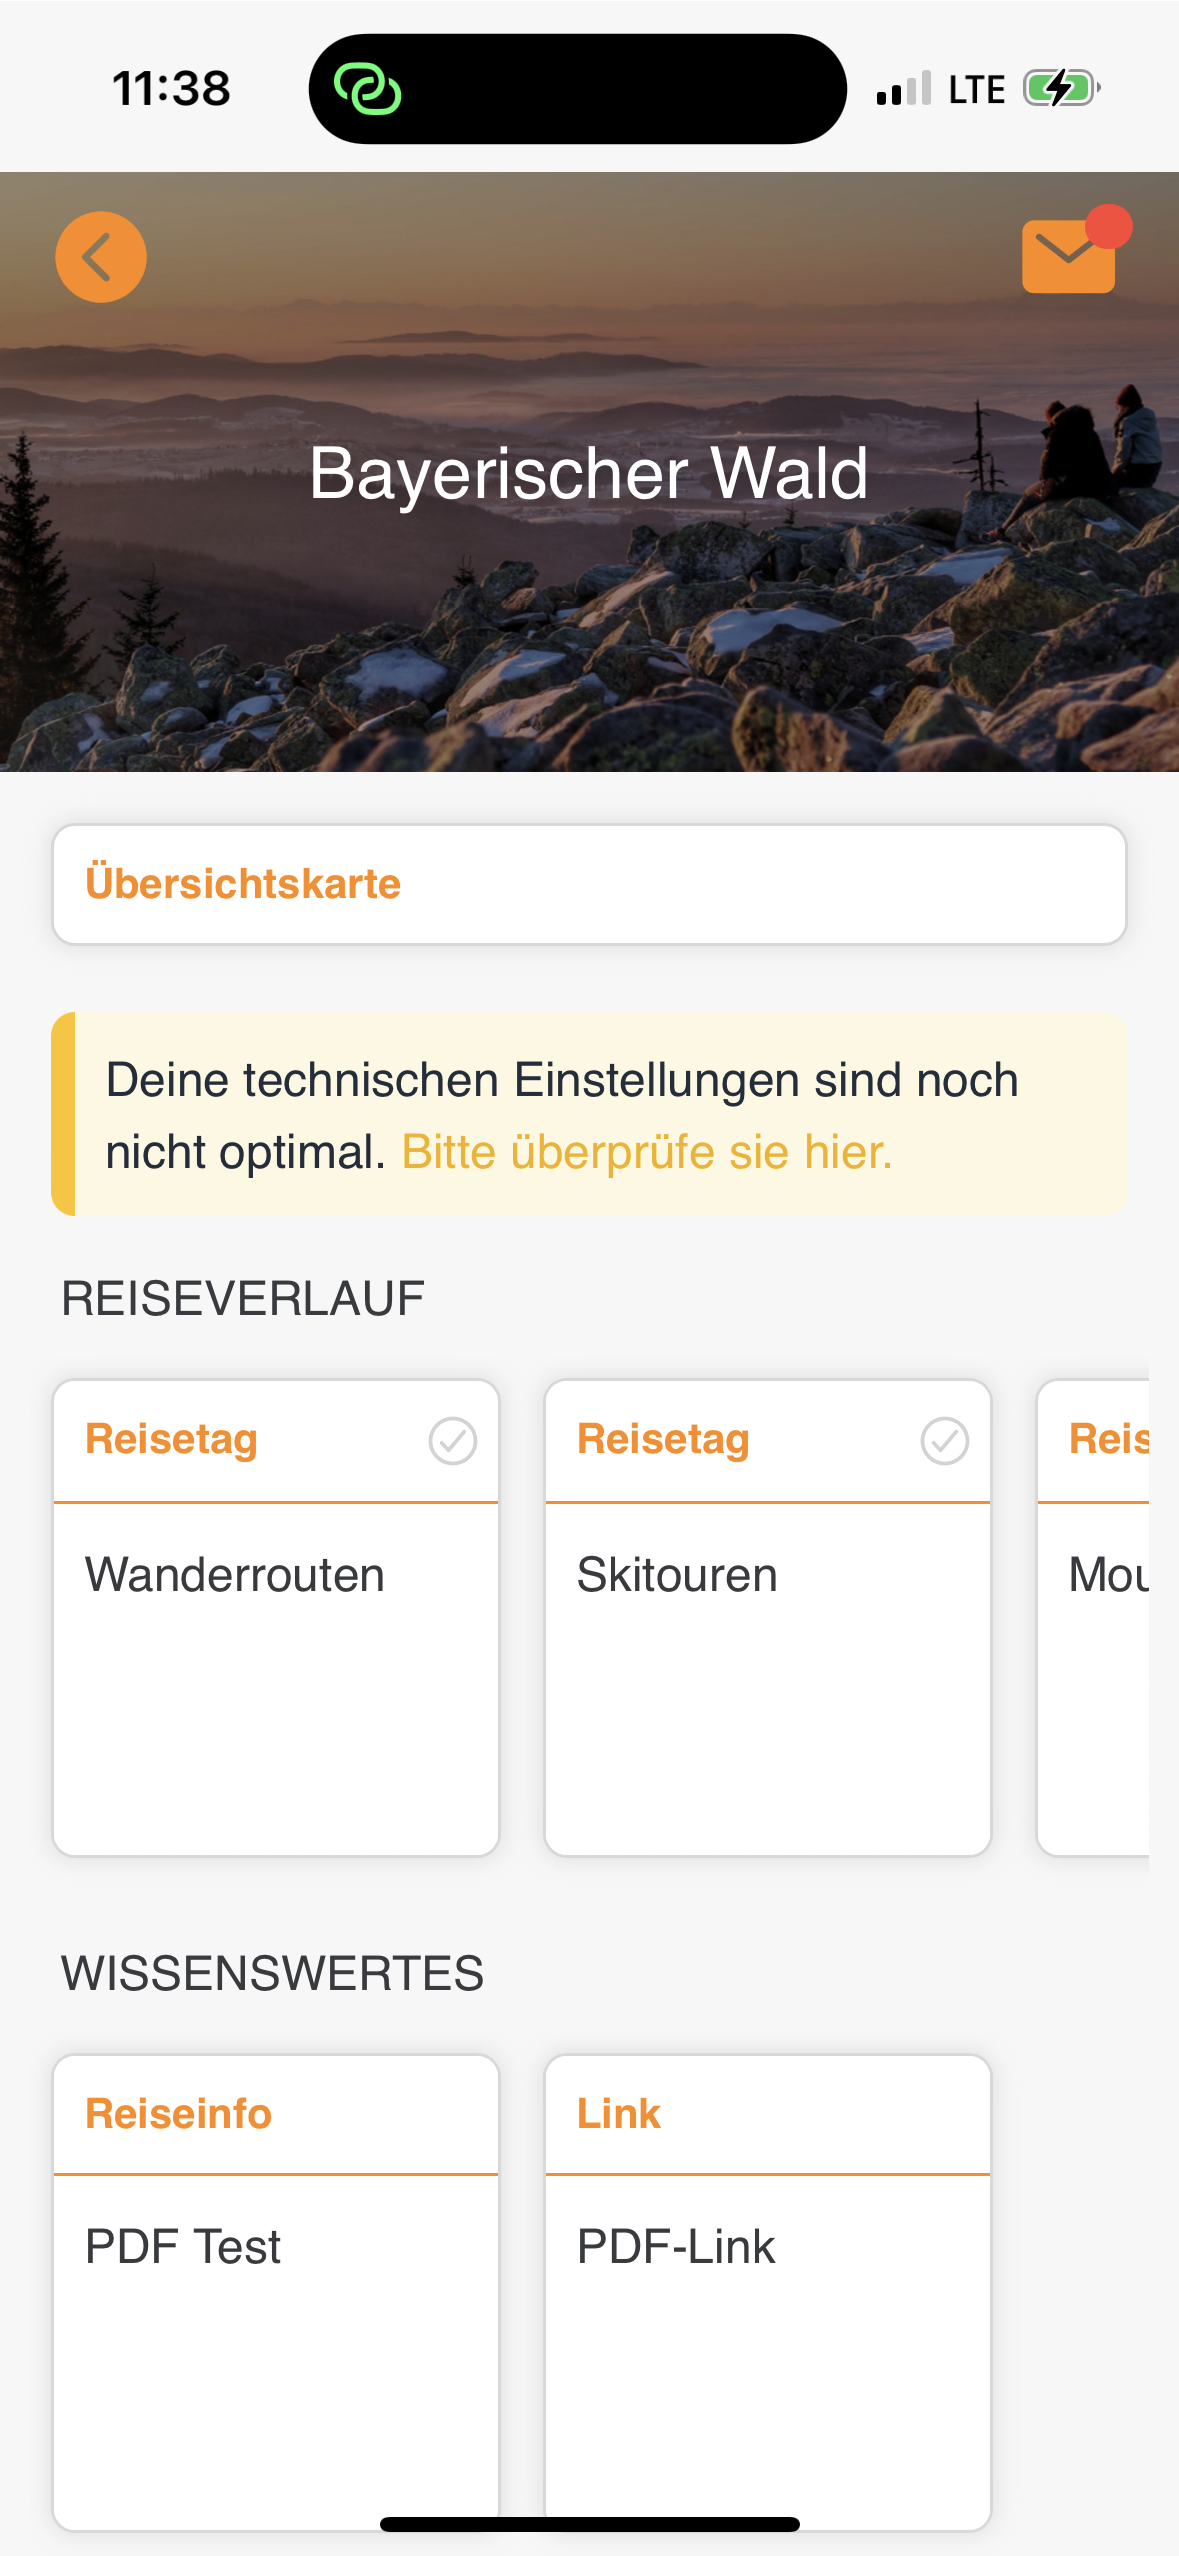
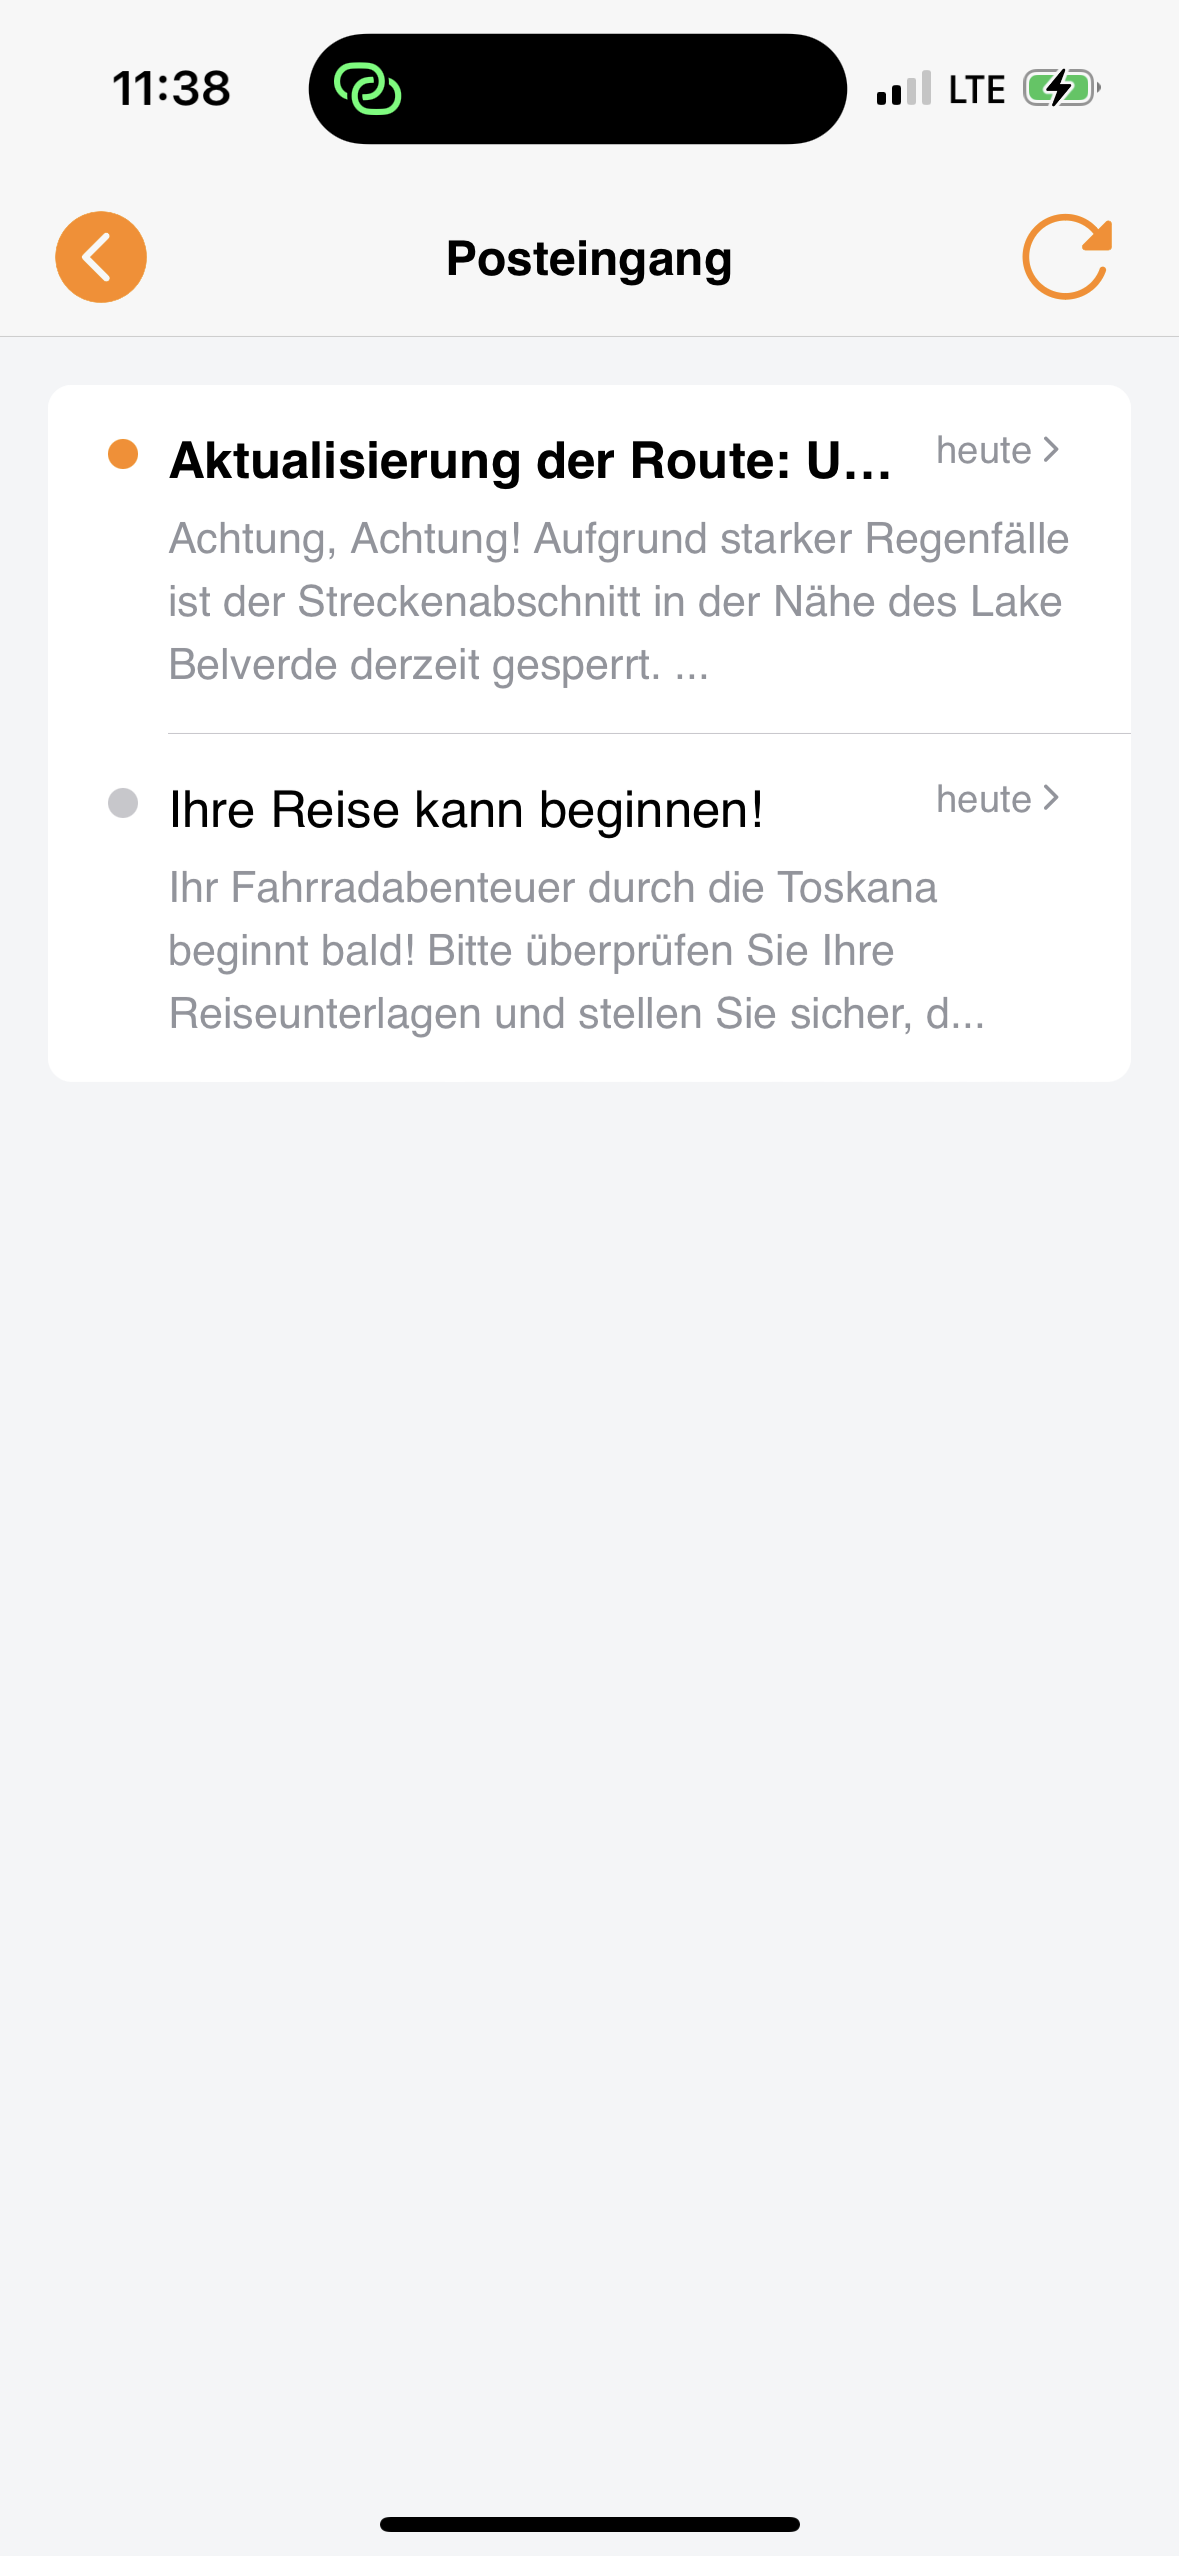
* **Extended Guest Engagement:** The Message Inbox is now prominently featured on the start page. This allows travelers to stay in contact with you and access important historical communications even after their trip has concluded, perfect for post-trip feedback or future bookings.
***
#### What This Means for You
As your whitelabel app clears review, your guests will receive these updates automatically. We recommend notifying your staff of the new Day View logic so they can better assist any travelers with questions during the transition.
**Here’s to a successful and seamless 2026 season!**
{% hint style="info" %}
**Last Mile Pricing**
Last Mile is in free beta until the end of May. After that, it remains an optional add-on with an adjusted traveler fee.
{% endhint %}
## B2B Release Chat
April 10, 2026
This new feature introduces a dedicated communication channel directly within each Guidebook Release. The B2B Chat allows tour operators and resellers to collaborate in real-time, ensuring that every guidebook is perfectly tailored to the traveler's needs before it is sent to the traveller.
Previously, clarifications regarding specific bookings often happened via external email or phone calls, leading to fragmented information. The B2B Chat centralizes these conversations, linking them directly to the relevant release.
## Spring 2026 App Update
April 4, 2026
The Spring Update brings a major step forward for the traveler experience. Last Mile Navigation guides travelers from the route to their accommodation with a single tap, and Background Voice Navigation now runs with the screen off — including off-route alerts. GPX sharing lets power users export routes to Garmin, Komoot, and others. The day view has been restructured so each day reads naturally: wake-up hotel → stages and POIs → destination hotel. Check out the details below.
**Added**
* Added Last Mile Navigation with dynamic hotel icon and proximity trigger
* Added Background Voice Navigation with off-route alerts when screen is off
* Added in-app GPX sharing to Garmin, Wahoo, Komoot, Ride with GPS, and more
* Added cycling node network (Knotenpunkte) display on cycling routes
* Added booking comment field on accommodation pages
* Added Tour Guide exclusive content, hidden from regular traveler releases
* Added Text Page Swiper for seamless pre-trip reading
**Improved**
* Improved day view structure: start hotel → stages/POIs → end hotel
* Improved Homescreen with auto-selected day images from route content
* Improved PDF handling with on-demand loading for faster guidebook downloads
All features are available now in the GUIBO App. White label apps will be rolled out stepwise following quality assurance over the coming weeks.
{% hint style="info" %}
Want early access to upcoming features? Learn more about our [Power Users Program](https://docs.guibo.travel/whats-new/readme/power-users-program).
{% endhint %}
## Smarter Guidebook Personalization — Accommodations Now Stay Connected to Your Master Guidebook
March 9, 2026
We've updated how accommodations connect to guidebooks — making it easier to deliver a personalized guidebook per booking without the maintenance overhead.
Please check the GUIBO Blog for a full explanation:
## A faster way to manage geo content — plus better PDF handling for travelers
Februray 5, 2026
Today we’re rolling out an update that makes working with geo content quicker, clearer, and more consistent across the platform.
You’ll notice refreshed editing experiences for Routes, POIs, and Destinations, along with several smaller usability improvements that help you get things done with fewer clicks.\
\
Please check the GUIBO Blog for a quick intro:
## New Guidebook Management Interface. Now with B2B Comments.
January 5, 2026
Today, we’re rolling out a redesigned Guidebook Management Interface that makes working with guidebooks faster, clearer, and more collaborative than ever. Please check the GUIBO Blog for more information:
## Itinerary builder update: text page drag & drop + direct PDF visibility settings
October 9, 2025
Today we’re rolling out a new update for our itinerary builder. We’ve also improved the GUIBO user management. Please check our new GUIBO Blog for more information:
## New itinerary builder & new guidebook B2B sharing
September 28, 2025
Today we’re releasing our new itinerary builder as well as new B2B sharing features. Please check our new GUIBO Blog for more information:
## :map: Map Engine Update - Trail Networks & Performance
August 20, 2025
Major improvements to our mapping infrastructure rolling out across all products. Now available for all library maps.
### What's New
* **Waymarked trails** for hiking and cycling available as map overlays
* **Numbered-node cycle networks** ("Knotenpunkte") now supported
* **Faster download times** for guidebook app downlaods
* **Improved map detail** at different zoom levels
* **Modern look & feel** with updated map styling
* **Better text readability** for map labels and annotations
These improvements are already available in libraries and will be deployed to the guidebook editor, tour guide app, and roadbook generation over the coming months.
## 🚀 GUIBO TourMaps for your webshop – now live! 🚀
July 28, 2025
Designed for mulit-day bike, hike & boat tours 🚴♂️🥾⛴️
{% embed url="" %}
𝗦𝗧𝗔𝗧𝗜𝗖 𝗠𝗔𝗣𝗦 𝗮𝗿𝗲 𝗸𝗶𝗹𝗹𝗶𝗻𝗴 𝗺𝗼𝗱𝗲𝗿𝗻 𝘄𝗲𝗯𝘀𝗵𝗼𝗽 𝗲𝘅𝗽𝗲𝗿𝗶𝗲𝗻𝗰𝗲𝘀
❌ Outdated look & clunky on mobile\
❌ Manual updates & re-brandings season-by-season\
❌ No way to personalize static maps
𝗚𝗨𝗜𝗕𝗢 𝗧𝗼𝘂𝗿𝗠𝗮𝗽𝘀 𝗳𝗶𝘅 𝘁𝗵𝗮𝘁 – 𝗵𝗲𝗿𝗲’𝘀 𝗵𝗼𝘄:
✨ 𝗠𝗼𝗱𝗲𝗿𝗻 𝗱𝗲𝘀𝗶𝗴𝗻 → Intuitive, interactive, mobile-ready\
🔄 𝗔𝘂𝘁𝗼-𝘀𝘆𝗻𝗰 → Always up-to-date with your product data\
🎨 𝗔𝘂𝘁𝗼-𝗿𝗲𝗯𝗿𝗮𝗻𝗱𝗶𝗻𝗴 → Share with resellers, fully branded\
🌐 𝗘𝗮𝘀𝘆 𝗶𝗻𝘁𝗲𝗴𝗿𝗮𝘁𝗶𝗼𝗻 → Easy to embed in any webshop
👉 Feel free to try them out – updates will follow to give your webshop visitors more context and boost your conversion rate.
## Advanced release filtering combined with batch push notifications
June 11, 2025
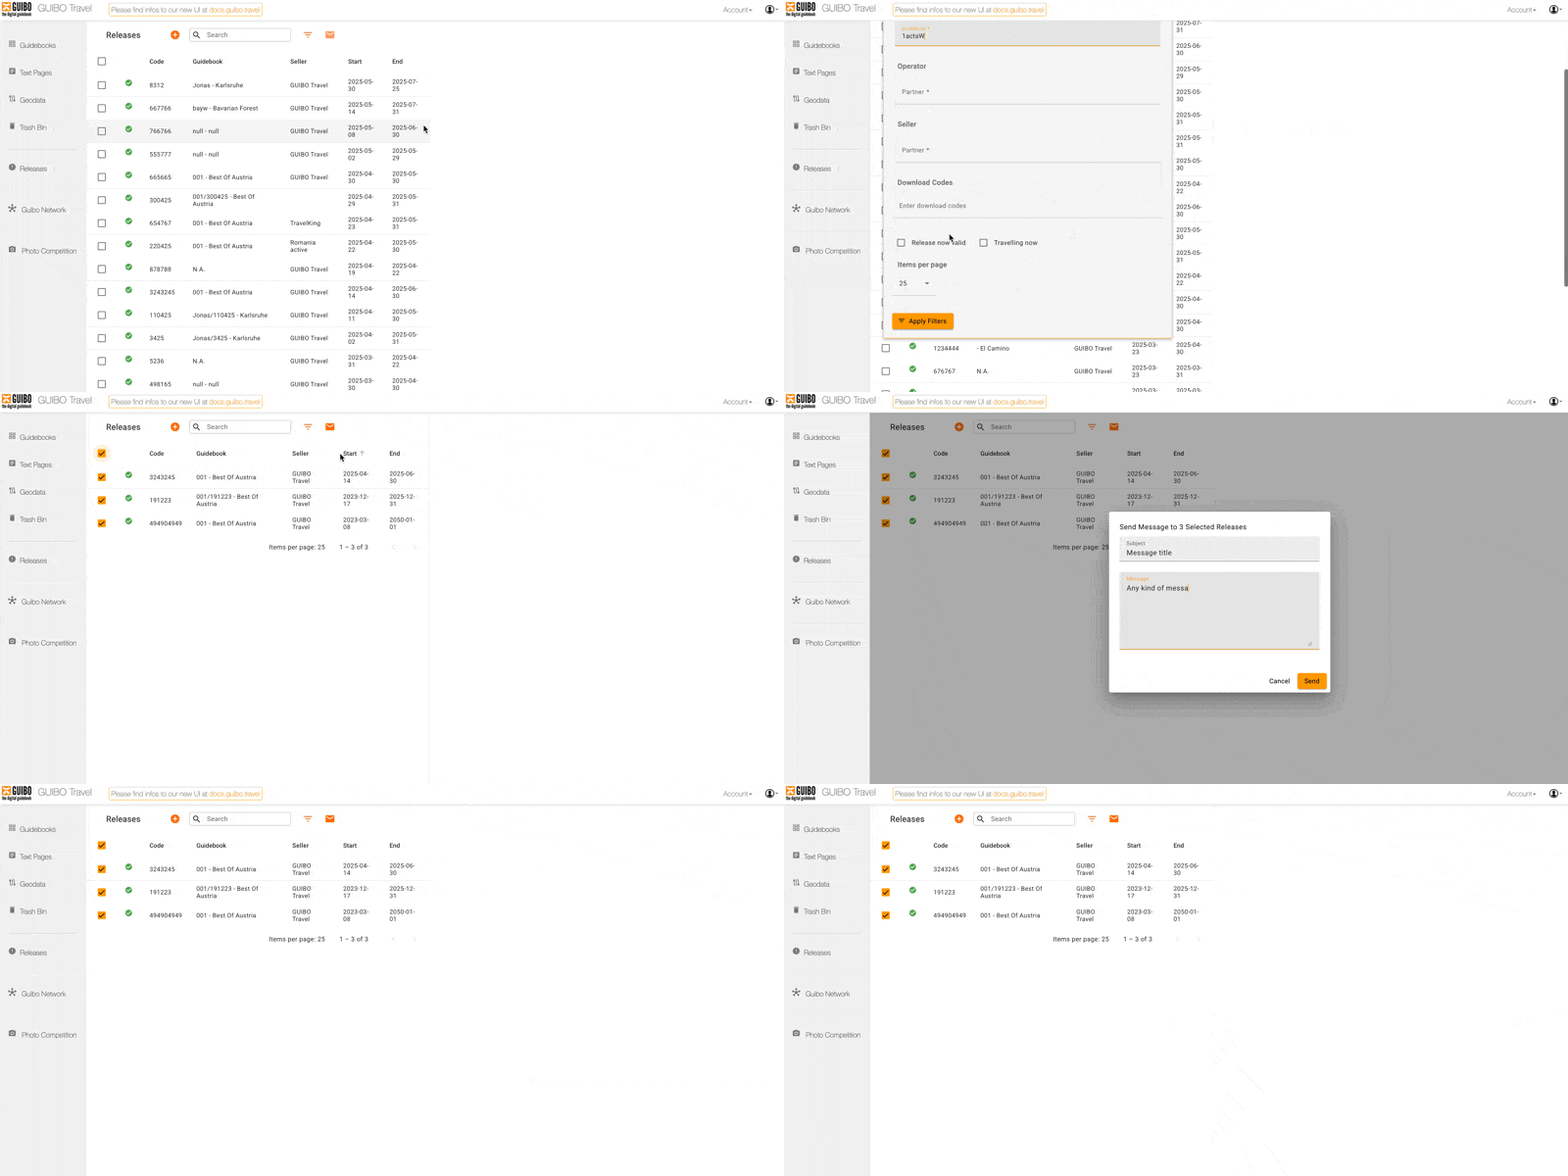
**Send targeted messages to the right travelers instantly!** Our Push Notifications feature now includes powerful filtering to reach specific groups with precision.
### What's New?
**Advanced Targeting Filters** let you message exactly the right audience:
* **Multiple releases** - Batch messaging with smart filters
* **Active travelers only** - Target people currently on trips
* **Specific guidebooks** - Send destination-specific updates
* **Custom download codes** - Reach particular tour groups
Send targeted messages to filtered groups of releases
Perfect for traveler updates at scale without the need for direct contact data (e.g. seller/agency travelers). Learn more in our [Push Notifications guide](/publishing/tour-guide-app/push-notifications).
## B2B Network: Important update for seller download codes
May 19, 2025
**Starting May 22nd, we're improving how download codes work for shared releases.** A "shared release" is when another account (self-managed partner account or "real" account) is set as a seller for one specific release.
#### What's changing?
Previously, when sharing a release with an agency/reseller, the operator's download code was used for both accounts. This occasionally caused conflicts when the same code was already used in the agency/reseller's account.
**Now, shared releases will have two distinct download codes:**
* **Tour Operator Download Code**: No change here - continues to work as before, set by the operator (typically the operator booking reference)
* **Seller Download Code**: Automatically generated by GUIBO or explicitly defined by the operator either when creating the release or by modifying it later in the Release Dashboard
#### Key benefits
* **Eliminates conflicts** between operator and agency/reseller accounts
* **Maintains unique identifiers** in both systems
* **Enables customization** to match your agency/reseller partners' booking references
#### What you need to know
* **No action required** if you use release links (recommended approach) - they always contain the correct codes
* **If you manually provide download codes** to travelers, always use the Seller ID and Seller Download Code (same as presented on the release page).
#### Customizing Seller Download Codes
You can set your own seller download codes:
1. **When creating via API**: Include the seller download code in your API call
2. **After creation**: Modify the seller download code in the Release Dashboard
For complete details on how operator and seller download codes are handled, [click here](https://docs.guibo.travel/whats-new/pages/oAyJWw1xoBD5yZG7a3xN#id-2.5-heres-how-tour-operator-and-seller-download-codes-are-managed).
## New photo competition feature launches! 📸
May 16, 2025
We're excited to announce our new **Photo Competition** feature, designed to engage travelers and help you build an authentic visual library of your travel products!
### What's New?
The Photo Competition feature creates an engaging way for travelers to share their experiences while building your marketing asset library:
* **Simple in-app participation** allows travelers to easily submit photos directly from the Tour Guide App
* **Fully customizable messaging** for contest instructions, terms, and prize information
* **Account-wide toggle** to enable/disable across all releases
* **Per-release control** for flexible implementation
As AI-driven marketing tools become increasingly important, having a large collection of authentic traveler photos gives you a competitive advantage when creating promotional materials.
Learn how to set up and manage your photo competitions in our [detailed documentation](/publishing/tour-guide-app/photo-competition).
## We tuned our Webshop Maps 🚀
May 8, 2025
Great news for your webshop experience! We've significantly improved the loading performance for our interactive maps, making your customers' browsing experience smoother and more engaging than ever.
### What's New?
Our engineering team has optimized the data loading process, resulting in:
* **50% faster loading times** for all interactive maps
* **Extremely high availability** for your webshops
Available right now! All existing webshops have been automatically upgraded to the new performance standard - no action required on your part!
Webshop Maps Loading Demo
### GUIBO Webshop Maps: Did you know?
* **Interactive & Branded:** Embed customizable maps in your webshop that reflect your brand identity
* **Self-updating:** Maps update automatically with the latest information - no more manual map maintenance!
* **Seamless Sharing:** Operators and agencies can share webshop maps with partners via the GUIBO Network, complete with rebranding!
* **Unified Experience Coming Soon even for non-GUIBO partners:** For your partners outside the GUIBO network, we're developing a solution to ensure all your maps have a consistent look and feel
## Partner Management: Moved to Guibo Network
April 22, 2025
* All your partners are now listed within the **Guibo Network → My network**
* Partners with theare **verified Guibo accounts**
* **Self-managed partners** are not verified
* Click on the orange plus button (see below) to **invite partners** or to **create self-managed partner accounts**
Inviting Partners Demo
## New support service: Add destinations and arrival categories at scale
February 19, 2025
This week, we're launching a support service to create destination POIs and arrival categories for your guidebooks at scale. This will reduce your manual workload in order to benefit from our new personalized accommodation feature with automated day/stage category matching.
### How to add arrival categories for multiple guidebooks
1. **Submit your request**\
Open a support ticket with a request to add arrival day/stage categories.
2. **Specify guidebooks**\
In your ticket provide the name of your destination library and provide either:
* A list of specific guidebook internal IDs that need arrival categories, or
* Simply write "all" to apply this to every guidebook in your account.
3. **What GUIBO will do**
1. Create a new arrival day/stage category as the first category.
2. Add a destination POI at the start of the first route in the second category.
3. In case such a destination POI already exists nearby anywhere in the guidebook, GUIBO will move it to the current category instead of creating a new one.
### How to add destinations for multiple guidebooks
1. **Submit your request**\
Open a support ticket with a request to add destinations.
2. **Specify guidebooks**
In your ticket provide the name of your destination library and provide either:
* A list of specific guidebook internal IDs that need destinations, or
* Simply write "all" to apply this to every guidebook in your account.
3. **What GUIBO will do**
1. For all categories without any destination POI, GUIBO will try to add a destination based on a complex algorithm analyzing the routes within the guidebook.
2. In case such a destination POI already exists nearby anywhere in the guidebook, GUIBO will move it to the current category instead of creating a new one.
3. GUIBO will provide you a list with all categories where it is not possible to create destinations algorithmically (e.g. missing transfer route within category).
## Personalized Accommodation for Season 2025
January 17, 2025 (updated February 13, 2025)
We're excited to announce new personalization features coming to the GUIBO Tour Guide App, along with integration details to help you prepare your booking system for the 2025 season.
Travelers want to know exactly what to expect from their accommodation, both before and during their trip. That's why we've enhanced the GUIBO Tour Guide App to provide more detailed information about accommodation and trip dates.
### What exactly is personalized accommodation?
When creating a release in GUIBO, you can add booking related information to accommodation POIs:
* **arrival date:** The arrival date for this accommodation
* **departure date:** The departure date for this accommodation
* **comment:** Any booking specific comments (e.g. breakfast included, 3 adults)
### What does this look like in the app?
There will be an updated app interface in the coming weeks:
1. New prominent button "accommodation" at the top of the home screen with an overview list for all accommodations including arrival and departure dates
2. Optional: start & end accommodation POI as part of each day/stage category
### Automated day/stage category mapping
In case you want your hotels to be placed as start & end accommodation within the day/stage categories, you must ensure:
1. Each day/stage category has a destination POI\
(Add POI → Display → Icon → destination)
2. There is a day/stage category for the arrival day with a destination
This is required to minimize data integration costs and to allow for automated release generation, even for hotel variations and non-standard bookings (e.g. additional nights). Based on the distance to the destination POIs (< 5km), GUIBO assigns all start & end accommodation POIs to the right day/stage category.
### Update API-Integration
#### 1. Release arrival and departure dates
Update your API integration to include booking dates for the overall trip when creating releases:
```json
...
"arrivaldate":"2025-01-22",
"departuredate": "2025-01-25"
...
```
#### 2. Accommodation details
Provide the arrival date, departure date as well as any comment or description along with the accommodation POI as follows.
```json
...
"additionalAssets": [
{
...
"arrivalDate":"2025-09-05",
"departureDate":"2025-09-06",
"comment":"A generous breakfast buffet is included"
}
```
Click here for an end-to-end example:[Release | Create guidebook release](/developers/releases-api/release-or-create-guidebook-release#b-create-download-permission-with-customization)
## 🚀 Modernized GUIBO Web Portal & launch of GUIBO Network 🚀
December 8, 2024
Two major updates, one goal: simplicity and efficiency.
We’ve revamped the **GUIBO web portal** with modernized UI technologies, making the interface more intuitive. This upgrade also allows us to implement future innovations faster and more flexibly.
In addition, we’re excited to announce the **GUIBO Network** (Beta) – a powerful new feature that enables tour operators and agencies at GUIBO for seamless reselling.
### 1. New web portal navigation
Click the buttons for a quick walkthrough of the new release dashboard. Make sure your sound is turned on!
{% @arcade/embed flowId="n6GB2MB68vcQssHm96vp" url="" %}
### 2. New release dashboard
Click the buttons for a quick walkthrough of the new release dashboard. Please note: no audio is included!
{% @arcade/embed flowId="f6a0O5NZpsSJJ5bpLzf2" url="" %}
### 3. Launch of the GUIBO Network!
And finally, check out the first version of the GUIBO Network. Share demo releases to showcase your products and connect with tour operators and agencies to automate re-branded sharing of booking-specific releases.
{% @arcade/embed flowId="ep5brsWmGUfaiWymCyjt" url="" %}
## 🚀 GUIBO AI is Here! 🚀
September 25, 2024
We’re thrilled to introduce 𝗣𝗢𝗜 𝗘𝘅𝘁𝗿𝗮𝗰𝘁𝗼𝗿 - our first AI service:
𝗪𝗵𝗮𝘁 𝗱𝗼𝗲𝘀 𝗶𝘁 𝗱𝗼? It simplifies your workflow by extracting Points of Interest (POIs) from any unstructured text:
𝟭. 🗺 𝗖𝗼𝗽𝘆 𝘁𝗲𝘅𝘁 𝗳𝗿𝗼𝗺 𝗮 𝗺𝗮𝗽 → Paste into POI Extractor → Import. \
𝟮. 📒 𝗖𝗼𝗽𝘆 𝘁𝗲𝘅𝘁 𝗳𝗿𝗼𝗺 𝗮𝗻 𝗶𝘁𝗶𝗻𝗲𝗿𝗮𝗿𝘆 → Paste into POI Extractor → Import. \
𝟯. 🏨 𝗖𝗼𝗽𝘆 𝘁𝗲𝘅𝘁 𝗳𝗿𝗼𝗺 𝗲.𝗴. 𝗮 𝗵𝗼𝘁𝗲𝗹 𝗹𝗶𝘀𝘁 → Paste into POI Extractor → Import.
{% embed url="" %}
GUIBO AI POI Ectractor Demo Video
{% endembed %}
## Reseller download permissions via Webportal
April 15, 2024
We are happy to announce, that you can now add resellers to specific bookings via our webportal. Until now, this was only possible via API.
With GUIBO's reselling capabilities, you can connect with other GUBO accounts and simply add them as a reseller for specific bookings. This will
1. **rebrand the travel docs** (Weblink, App, Booklet) to the reseller's look and feel on the fly, and
2. **make this release visible in your reseller's account** - always in the latest version for the specific booking
If you want to learn more, [click here](/publishing/b2b-network).
Select a reseller for specific download permissions
## App updates for season 2024 - March 27, 2023
March 27, 2024
For the upcoming season, we have implemented numerous updates in our travel guide app for your travelers. In addition to many minor changes and bug fixes, we have simplified the user experience for all target groups in particular. And because pictures say more than words, take a look here:
More intuitive navigation
Dedicated navigation buttons for more a more intuitive traveler experience for navigation.
* **Intuitive "Start" & "Stop" button** for route navigation (when available for the route)
* **"Center" Button** to always center the map at your location
Simpler route progress for distance & elevation
More intuitive presentation the traveler's route progress.
* **Route progress for distance and elevation** immediately at a glance
* Updated look & feel for the "Data" view for routes
* Real-time updates
Note for cyclists
Based on the feedback from our customers, we have recognized that some travelers expect to navigate using only sounds with a smartphone in their pocket. This cannot work well, for example, because the ambient noises are often too loud.
* **Added note for cyclists** with the recommendation to use a smartphone holder
More intuitive technical advice
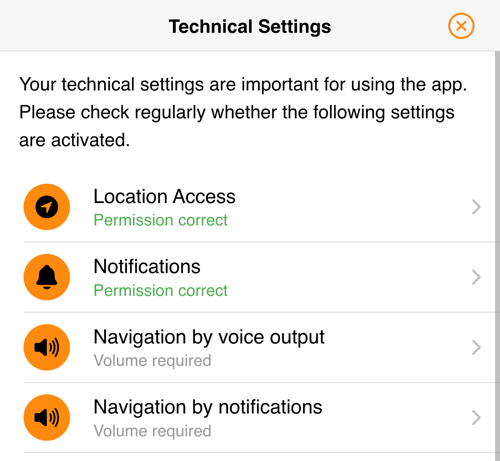
Incorrect smartphone settings are very often the cause of misbehavior. We have added a new page to make it easy to check the technical settings.
* New "**check technical settings**" page helpful in case of misbehavior
* Accessible via the "Technical help" menu
* With our new check, the most important settings can be reviewed
* Access to location services
* Access to notification services
* Correct volume, mute and notification settings
Updated notifications
We have **updated our notification implementation** to better recognize when to switch on the screen.
* Notifications for all turn-by-turn directions (\~25 meters for hiking, \~75 meter for cycling)
* Notification when route left (\~100 meters away from route)
# Power Users Program
GUIBO Power Users: Early access program for tour operators and agencies to test new features, provide prioritized feedback, and improve travel experiences through collaborative app development.
### What Are Power Users?
Power Users are select users who gain early access to the latest GUIBO features before general release. This exclusive program allows you to test new functionalities, provide valuable feedback, and directly influence the app's development.
### Becoming a Power User
Power Users are typically experienced partners from tour operators who:
* Have regular interaction with the GUIBO platform
* Are interested in innovative travel technology
* Want to shape better travel experiences for their customers
* Can provide consistent, quality feedback
If you're interested in becoming a Power User and gaining early access to new features, please open a ticket through our support system.
### Providing Valuable Feedback
The quality of feedback significantly impacts how effectively we can address issues. While we review all submissions, our ability to implement improvements depends on the information provided.
### Feedback Prioritization
When submitting feedback, please use this prioritization scale:
* **Highest**: Critical bug blocking core functionality
* **High**: Significant issue that substantially limits usage
* **Medium**: Relevant problem with acceptable workarounds
* **Low**: Minor issues with minimal impact
* **Lowest**: Cosmetic bugs or improvement suggestions
A realistic classification from your end customers' perspective helps us understand the true impact of issues.
### Effective Bug Reporting
The most actionable feedback includes:
* Exact steps to reproduce the bug
* Detailed description in the ticket
* A video demonstrating the bug (when possible)
Bugs that can be consistently reproduced receive priority attention. While non-reproducible issues may be reported, they are considerably more challenging to investigate and resolve.
# Overview
With GUIBO's centralized content management tour operators maintain product updates only once but publish across multiple channels: Tour Guide App, Roadbook PDF, TourMaps for Webshop, API, B2B Network
## **Overview**
GUIBO is built on one idea: **create your content once as reusable building blocks, then assemble it into travel itineraries.** Update a building block in one place, and every itinerary using it updates automatically — ready to publish across the Tour Guide App, Roadbook PDF, TourMaps, API, and B2B Network.
Five terms describe everything in GUIBO content management:
Term
What it is
Building block
A reusable piece of content: a route, POI, text page, or destination
Library
A collection that stores building blocks for reuse across itineraries
Guidebook Template
A complete, reusable travel itinerary — building blocks arranged in sequence by stages
Stage
A step in the itinerary (e.g. one day) that puts building blocks in order
Release
One booking — a guidebook generated from the template with booking-specific details added
{% hint style="info" %}
**Building blocks are the pieces. Libraries and guidebooks are the containers that hold them.** Keep that one distinction in mind and the rest of GUIBO falls into place.
{% endhint %}
### Building blocks
Building blocks are the reusable pieces of content you assemble into guidebook templates. They come in two families: **geo assets** (anything on the map) and **text pages**.
#### Geo assets
| Geo asset | Description | Used for |
| ---------------------- | ---------------------------------------------------------------------------------------------- | ------------------------------------------------- |
| **Route** | A path from A to B with turn-by-turn navigation for biking and hiking. | App navigation, roadbook mapsheets, overview maps |
| **Point of Interest** | Anything travelers care about along the way — hotel, sight, restaurant, monument. | Tour Guide App, roadbook |
| **Transfer route** | An orientation-only path, not meant for turn-by-turn navigation (bus, train, boat, ferry). | Overview maps |
| **Destination marker** | Marks where a stage ends and anchors booking-specific accommodations. Managed as a map marker. | Stage destinations, accommodation assignment |
#### Text pages
Text pages hold structured information — descriptions, tips, arrival instructions, FAQs — with headings, images, and links. Use them for anything that isn't tied to a specific point on the map.
### Libraries
A **library** is where you store building blocks so you can reuse them across many guidebook templates. Instead of rebuilding the same route or hotel in every itinerary, you maintain it once in a library and reference it wherever it's needed.
{% hint style="info" %}
**Maintain once, update everywhere.** Change a building block in its library and every guidebook template that references it updates automatically — no manual rework.
{% endhint %}
Two library types match the two building-block families:
Library type
Stores
Geo library
Routes, POIs, transfer routes, destination points
Text library
Text pages and their images
Create as many libraries as you need to stay organized — for example, one for hiking routes, one for cycling routes, and one for hotels.
#### Bringing library content into a guidebook template
Guidebook templates pull building blocks from libraries in two ways:
| Method | Used for | How it works |
| ----------------------- | -------- | ------------------------------------------------------------------------------- |
| **Manual referencing** | Routes | Pick specific building blocks from a library and import them into a stage |
| **Dynamic referencing** | POIs | Connect a POI library — GUIBO automatically pulls in every POI near your routes |
Both methods create **references, not copies**. The guidebook template always reads the current version from the library.
### Guidebook templates
A **guidebook template** is one complete travel itinerary. It holds your building blocks — stored directly in the template or referenced from libraries — and arranges them in sequence using **stages** (for example, one stage per day). The stage order is what turns a set of routes and POIs into a day-by-day trip.
A guidebook template on its own isn't tied to any booking. That happens at release.
See [Create your first guidebook](https://docs.guibo.travel/get-started/getting-started/create-your-first-guidebook) for a step-by-step walkthrough.
### From template to traveler
To deliver an itinerary for a specific booking, you publish a **release**. The release generates a guidebook from the template and adds the booking-specific details on top — accommodations, travel dates, and documents. One booking always results in one release.
Where your building blocks live — in GUIBO, in another system, or a mix — is your choice. See [Integrate External Content](/content-management/integrate-external-content) to find the right setup, and How to publish to turn templates into releases.
# Language & Translation
Managing Guidebooks in Multiple Languages in GUIBO
GUIBO provides comprehensive multilingual support, allowing you to create content in multiple languages and deliver personalized travel experiences to international travelers. This guide explains how to set up, manage, and use language features in GUIBO.
## Change Webportal Language
Configure the language for the GUIBO administration interface:
* You can switch the GUIBO interface language using the language selector in the top-right corner.
* This affects the system interface only, not your content.
* Available interface languages include English, German, and other supported languages.
## Setup Content languages
GUIBO offers a two-tier approach to content language management, giving you flexibility to configure languages both globally and for specific products.
### Account-level content languages
Define languages that will be available across your entire account for all guidebooks:
1. Navigate to **Account Settings.**
2. In the language section, add the languages you need for all guidebooks.
3. Enter the language code (e.g., "EN" for English, "DE" for German, "NL" for Dutch).
4. Save your changes.
> **Example:** If you set English (en), German (de), and French (fr) as account languages, these will be available for all guidebooks in your account.
### Guidebook-specific languages
In addition to account languages, you can add languages specific to individual guidebooks:
1. Open the guidebook you want to customize.
2. Navigate to the guidebook settings.
3. Add additional languages that will only apply to this specific guidebook.
4. Save your changes.
> **Example:** With account languages set as English (en), German (de), and French (fr), you could add Spanish (es) to a specific guidebook targeting Spanish-speaking travelers. This guidebook would then have four available languages, while others would maintain the three account languages.
## Creating Multilingual Content
### Content Creation Workflow
When creating content in GUIBO, you'll see language tabs for each configured language:
1. Create your content in your primary language first.
2. Switch to other language tabs to add translated versions.
3. Each language tab operates independently, allowing for customized content per language.
### Managing Languages in Libraries
All content types support multiple languages:
* **Routes**: Descriptions, navigation instructions, and other text can be maintained in multiple languages.
* **POIs**: Names, descriptions, and additional information can be translated.
* **Text Pages**: Create fully translated versions of all text content.
### Language Tabs in Editors
When editing content (routes, POIs, text pages), you'll see tabs for each configured language:
* Content in each tab is independent.
* Required fields must be filled in for at least your primary language.
* Secondary languages can be completed when needed.
### Automatic Translation
GUIBO offers automatic translation to help you quickly translate content:
1. Create content in your primary language.
2. Use the translation feature to automatically translate to other languages.
3. Review and adjust the translated content as needed.
> **Note:** Our integrated translation service is powered by DeepL - the leading translation provider. However, we recommend reviewing your translations for accuracy.
### Glossary for automatic translation
Account ➔ Account Settings ➔ Language Settings
The Translation Glossary allows you to customize how GUIBO's automatic translation handles specific words or phrases. When you define terms in the glossary, they will always be translated according to your specifications, overriding the standard DeepL translations.
## Language Handling in Publishing
### Tour Guide App
* The GUIBO app automatically detects the traveler's device language.
* Content is displayed in the traveler's language if available.
* If content isn't available in the traveler's language, it falls back to your primary language.
### PDF Roadbook
* When creating a release, you can select which language the PDF roadbook will be generated in.
* The language setting for the release only affects the PDF, not the app content.
#### Release Page
* The release page interface respects the traveler's language preferences.
* Content displayed on the release page will appear in the language selected during release creation.
## Best Practices for multilingual content
### Translation Workflow
1. **Complete Your Primary Language First**: Fully develop content in your main language.
2. **Use automatic translation**: Use GUIBO's built-in translation to translate your content at once.
3. **Review and Refine**: Have fluent speakers review important content.
4. **Maintain Consistency**: Ensure navigation instructions and critical information are clear in all languages.
### Prioritizing Languages
* Focus on languages most important to your travelers.
* Start with essential content (safety information, navigation instructions).
* Gradually expand to additional languages based on your market needs.
### Testing Multilingual Content
* Preview your content in the GUIBO app in different languages.
* Check PDF outputs in various languages.
* Verify special characters and language-specific formatting display correctly.
### Language Strategy by Market
* Use account-level languages for your core markets.
* Add guidebook-specific languages for specialized products.
### Navigation Instructions
* Keep navigation instructions clear and precise in all languages.
* Be mindful of direction terminology differences across languages.
# Integrate External Content
Already managing content in another system? Decide which integration approach fits your setup so you only have one single point of truth for your data.
## Single point of truth for all your data
You don't have to manage content in GUIBO. If you already maintain trip data elsewhere — routes in a mapping tool, hotels in a booking system, whole itineraries in a trip builder — GUIBO works with that in order to support the single point of truth concept for all your data.
In order to find your best integration setup, you need to understand on how you want to create releases in GUIBO. A **release** is one set of travel documents published for one booking — delivered to travelers via a Trip Link. Every booking in GUIBO results in one release.
### Choose your setup: where are itineraries assembled?
There are two ways to integrate external content. The deciding question is where you are assembling your itineraries based on building blocks.
* Do you assemble itineraries **in GUIBO**?
* Or does your own system — a trip builder — **already assemble** them from building blocks?
The more individual itineraries you orchestrate in your own system, the more the second option pays off.
### Option 1: Assemble itineraries in GUIBO (template-based)
You build itineraries in GUIBO with guidebook templates based on your building blocks. Each booking turns a guidebook template into a booking specific release.
**Best when** you have standard products for which all bookings have more or less the same itienrary with variations in accommodations only.
### Option 2: Let your system deliver itineraries (on-demand)
Your trip builder sends the full itinerary per booking, and GUIBO generates the guidebook automatically — no pre-existing guidebook templates.
**Best when** you already orchestrate itineraries based on reusable building blocks in an existing itinerary builder.
### Compare: template-based vs. on-demand
| Dimension | Template-based | On-demand |
| ---------------------------- | -------------------------------------------------- | ---------------------------------------------------------------------------------------------------------- |
| **Itineraries assembled in** | GUIBO | Your own system |
| **Per-booking automation** | Hotels & dates automatic; itinerary changes manual | Entire itinerary automatic |
| **Roadbook PDF** | **✓** | **✗** |
| **TourMaps** | **✓** |
✗ Possible with parent guidebook templates based on static itineraries
|
| **IT dependency** | Lower | Higher |
| **Best fit** | You assemble & control itineraries in GUIBO | You already orchestrate itineraries elsewhere |
### Decide: which setup fits you?
If you're unsure, **start with template-based**. It's the lower-risk path: you keep full output, stay in control, and learn what you actually need — and you can move high-volume or fully individual itineraries to on-demand later.
Choose **on-demand** when you already orchestrate many itineraries based on building blocks in your own trip builder and want to avoid rebuilding them in GUIBO.
## Next Steps
| Your situation | Next step |
| ---------------------------------------------------------------------------- | ---------------------------------------------------------------------------------------------------------------------------------------------------------------------- |
| Itinerary managed in GUIBO with guidebook templates | [Integrate external content when using guidebook-templates to create releases from](/content-management/integrate-external-content/when-using-template-based-releases) |
| Itinerary managed in your external system and releases are created on-demand | [Integrate external content when using on-demand releases to directly create release](/content-management/integrate-external-content/when-using-on-demand-releases) |
# When using template based releases
How to integrate external content when your itinerary is defined in GUIBO — so your external system stays the single source of truth.
## When to use this
You manage routes, POIs, or text content in a third-party system and want to use that data as building blocks in GUIBO to manage your guidebooks.
Continue reading [here](/content-management/integrate-external-content/when-using-on-demand-releases), when you are not only managing assets in a third party system but also managing the trip structure on a booking level in another system (so you do not need to manage guidebooks in GUIBO).
Your situation
What to do
Routes managed in another geo system
Sync routes into a GUIBO library via API
Hotels/POIs managed in a booking system
Sync POIs into a GUIBO library via API
Text content managed in a CMS
Sync text pages into a GUIBO library via API
Some content external, some in GUIBO
Libraries managed in GUIBO and synced libraries work side by side — libraries behave identically regardless of how they were filled
All content managed in GUIBO
No integration needed
## How it works
Your external content is synced into GUIBO libraries. These libraries feed into your guidebooks — just like manually managed content.
```
External system → Sync → GUIBO libraries → Guidebooks → Personlaized Releases (per booking)
```
## Step 1: Sync your content into libraries
Set up a nightly sync that pushes routes, POIs, and text pages from your external system into GUIBO libraries.
See [Set up library sync](/content-management/integrate-external-content/set-up-library-sync) for the complete setup.
## Step 2: Build guidebooks from synced libraries
Guidebooks pull content from libraries through two methods:
Method
Used for
How it works
Manual referencing
Routes
Import specific routes from a library into each day/stage category
Dynamic referencing
POIs
Connect a POI library to a guidebook — GUIBO automatically imports all POIs near the routes
Both methods create **references, not copies**. The guidebook always reads the current version from the library.
Typical setup per guidebook:
1. Create day/stage categories (Day 1, Day 2, …)
2. Import routes per category via **manual referencing** from your routes library
3. Connect your POI libraries — GUIBO pulls relevant POIs via **dynamic referencing**
See [Create your first guidebook](/get-started/getting-started/create-your-first-guidebook) for the step-by-step walkthrough.
### What happens when content changes in an external system
Because guidebooks reference library content, every change in a library is automatically reflected in all connected guidebooks:
What changes in the library
What happens in guidebooks
Route updated
All guidebooks referencing that route show the updated version
POI added
Dynamically referenced guidebooks pick up the new POI if it is near a route
POI removed
Dynamically referenced guidebooks no longer show the removed POI
POI updated
All guidebooks referencing that POI show the updated version
Text page updated
All guidebooks referencing that text page show the updated version
No manual updates to individual guidebooks required.
## Step 3: Create releases per booking
Once your guidebooks are set up, create releases per booking — via the web portal or automated via API.
See [How to publish](/publishing/how-to-publish/how-to-publish) for the API documentation.
# When using on-demand releases
How to integrate external content when the itinerary is managed in your external system — so your external system stays the single source of truth.
## When to use this
Your external system controls the complete trip structure per booking. No guidebooks in GUIBO needed — each release is created from a single API call.
Continue reading [here](/content-management/integrate-external-content/when-using-template-based-releases), when you manage routes, POIs, or text content in a third-party system but want to use that data as building blocks in GUIBO to manage your guidebooks.
## How it works
Your booking or trip planning system already knows the full itinerary — which routes, which hotels, which stages. When a booking is confirmed, your system sends this information to GUIBO. GUIBO then generates a booking based release in one step. There is no need to set up or maintain guidebooks in GUIBO — everything is driven by your external system.
Itinerary data can grow to several hundred megabytes when routes, POI images, and text content are sent inline for every booking. In order to improve reliability, save costs and energy, we recommend to sync assets (e.g. routes, POIs) which are reused across many bookings into libraries. Referencing them by ID reduces each API request to a fraction of that size.
### Two options for content delivery
| Option | How it works | When to use |
| ------------------------------------------ | ------------------------------------------------------------------------------------------ | ---------------------------------------------------------------------------- |
| **Send all content inline** | Routes, POIs, text pages are included directly in the API payload per release | Content is unique per booking, or data volumes are small |
| **Reference content from GUIBO libraries** | The API payload references assets by ID from synced libraries — GUIBO resolves the content | Reusable content (routes, POIs, images) is large and repeats across bookings |
**Example:** Instead of sending a 50 MB route inline for every booking, sync the route once into a library and reference it:
```json
"libraryReference": {
"libraryCustomId": "MY_ROUTES_LIB",
"customId": "RT_233"
}
```
## Setup with library references
1. [Set up library sync](/content-management/integrate-external-content/set-up-library-sync) — sync reusable content from your external system into GUIBO libraries
2. Use `libraryReference` in your on-demand release payloads to reference the synced assets
## Next step
See [Create on-demand release](/developers/releases-api/release-or-create-guidebook-release/create-on-demand-release) for the complete API reference, including inline and library reference examples.
# Set up library sync
How to sync routes, POIs, and text pages from a third-party system into GUIBO libraries — so your external system stays the single source of truth.
## How it works
Your external system pushes data into GUIBO libraries via the [Content API](/developers/content-api). Once synced, the libraries work exactly like manually managed ones — they can be imported into guidebooks or referenced in on-demand releases.
## 1. Create libraries in GUIBO
Set up your library structure. We recommend to organize libraries by type (routes, POI, textpages) and data source. For example:
* **Routes GUIBO** — routes maintained in GUIBO
* **Routes MY GEO CMS** — four routes synched from GEO CMS
* **POI MY GEO CMS**— sights, restaurants, services
* **Accommodations MY BOOKING SYSTEM** — hotels, guesthouses
* **Text pages GUIBO** — info pages, FAQs, arrival instructions managed in GUIBO
## 2. Use custom IDs consistently
Every asset in GUIBO can carry a custom ID (`customId` in the API). Assign the same ID that your source system already uses. This is what allows the sync to identify and update assets in GUIBO directly.
## 3. Implement the sync
Your developer or system provider sets up a sync job (typically nightly) that pushes data into the libraries.
**The sync should follow an update-first approach** for each asset in the source system:
1. Try to **update** the asset in GUIBO with your custom ID
2. If not found → **create** it as a new asset
This ensures that every sync run both **updates all existing assets** and **adds new ones** — GUIBO always reflects the current state of the source system.
The Content API provides separate endpoints for creating and updating each content type. For example, POIs:
Operation
Method
Endpoint
Create
POST
/content/geodata/poi
Update
PUT
/content/geodata/poi/{account}/{libraryId}/{id}
See the [Content API](/developers/content-api) for all endpoints.
# How to publish?
Publishing in GUIBO means delivering content — maintained once — to travelers across every channel, from a single point of truth.
GUIBO's leading principle is **single point of truth**: content is maintained **once** and published everywhere. This strictly avoids manual content duplication — the main driver of channel-by-channel and season-by-season maintenance work.
Publishing therefore means **how to deliver that content across all required channels** — without ever maintaining it twice.
GUIBO can even publish content that is maintained in an **external system**, so your existing tools stay the single point of truth. See [Integrate External Content](/content-management/integrate-external-content).
#### Publishing channel overview
Interactive overview maps for website embedding — guidebook-level, not booking-specific.
## **What's next?**
Travel documents are delivered to travelers through **Releases** — one is created in GUIBO for each booking. See [Releases](/publishing/how-to-publish/how-to-publish).
# Releases
Every booking gets a release — the container for the guidebook, accommodations, documents, and access settings.
## What is a release?
A **release** is the booking-specific unit of publishing in GUIBO: every booking gets its own release, and this page explains what it contains and which settings control traveler access.
### Release components
Component
Contents
Guidebook
The full itinerary data — every part of it can be customized per booking.
Accommodation bookings
The booked accommodations with arrival date, departure date, and booking-specific comments.
PDF attachments
Booking-related PDF documents (e.g. vouchers, tickets) delivered to travelers via the Trip Link and in the Tour Guide App.
Metadata
All settings that control access — see below.
### Release creation types
#### Template-based releases
The release is created from a pre-existing guidebook in GUIBO. Booking-specific data is added during release creation: **accommodation bookings**, **PDF attachments**, and any other guidebook customization.
Create template-based releases via:
* **Web portal** — manually, by users
* **API** — automated, typically triggered from a booking system
#### On-demand releases
The release is created without a pre-existing guidebook — the guidebook is defined dynamically as part of the release creation. Source content can be provided from external systems or from GUIBO libraries.
On-demand releases are created via **API only**.
#### Which create type fits my setup?
Choose **template-based** when all bookings of a product share the same itinerary — the guidebook serves as the template, and only accommodations and documents vary per booking.
Choose **on-demand** when the itinerary differs from booking to booking, e.g. tailor-made trips assembled in an external trip builder. See Integrate External Content for a full comparison.
### Release metadata
Field
Description
ID
Unique ID of the release
Guidebook
Name of the guidebook attached to this release
Operator
GUIBO account operating this booking
Operator Code
Traveler download code for the operator — typically the operator's booking number
Seller
GUIBO account selling this booking
Seller Code
Traveler download code for the seller — typically the seller's booking number
Download period
Time window during which the traveler has access to the guidebook
Max devices
Maximum number of devices that can download the guidebook via the Tour Guide App — typically the number of travelers
Language
Language of the release
Status
Status of the release. A release is downloadable only while status is active.
Publishing App
Traveler download option for the Tour Guide App
Publishing PDF
Traveler download option for the Roadbook PDF via Trip Link
Publishing GPX
Traveler download option for GPX files via Trip Link
Trip Link
The traveler's link to access all booking-related trip information
## Next step
Continue with [Create a release](/publishing/how-to-publish/create-releases) to see how releases are created — manually or automated per booking.
A **release** is the booking-specific unit of publishing in GUIBO: every booking gets its own release, and this page explains what it contains and how it is created.
## What a release consists of
Component
Contents
Guidebook
The full itinerary data — every part of it can be customized per booking.
Accommodation bookings
The booked accommodations with arrival date, departure date, and booking-specific comments.
PDF attachments
Booking-related PDF documents (e.g. vouchers, tickets) delivered to travelers via the Trip Link and in the Tour Guide App.
## How releases are created
### Template-based releases
The release is created from a pre-existing guidebook. Booking-specific data is added during release creation: **accommodation bookings**, **PDF attachments**, and any other guidebook customization.
Create template-based releases via:
* **Web portal** — manually, by users
* **API** — automated, typically triggered from a booking system
### On-demand releases
The release is created without a pre-existing guidebook — the guidebook is defined dynamically as part of the release creation. Source content can come from external systems or from GUIBO libraries.
On-demand releases are created via **API only**.
### Which creation method fits my setup?
Choose **template-based** when all bookings of a product share the same itinerary — the guidebook serves as the template, and only accommodations and documents vary per booking.
Choose **on-demand** when the itinerary differs from booking to booking, e.g. tailor-made trips assembled in an external trip builder. See Integrate External Content for a full comparison.
### Related pages
* How to publish — publishing channels and methods
* Trip Link — the traveler's central access point
* Releases API — automate release creation
A **release** is a traveler-specific instance of your guidebook that:
* Represents a single booking
* Contains personalized information for specific travelers
* Provides access through multiple delivery channels
* Is active during a defined time period
* Is accessed via unique download codes
### Publishing Channels
Each release automatically generates content across multiple channels:
Channel
Description
Availability
Trip Link
Central access point with unique web link for this release
Always included
Tour Guide App
Mobile app with offline maps, navigation, and real-time updates
Always included
Roadbook PDF
Print-ready travel document with maps and itinerary details
Optional
B2B Network
Share releases with resellers so they can forward a re-branded Trip Link to the traveler
Optional
TourMaps
Interactive maps for webshop integration (guidebook-level, not booking-specific)
Always available
### Publishing Methods
#### Manual Publishing
Create releases individually through the GUIBO web portal:
1. Navigate to **Release Dashboard**
2. Click the orange **+** button
3. Enter booking details
4. Optionally add personalized content
5. Share the Trip Link with travelers
**Best for:** Small operations, testing, or individual bookings
#### API Publishing
Automate release creation from your booking system:
* **100% automated** publishing process
* **Real-time** release generation
* **Personalized** content per booking
* **Scalable** for high booking volumes
**Best for:** Integration with booking systems, high-volume operations
Learn more: [Releases API](/developers/releases-api)
### Release Types
#### Guidebook-based Releases
Create releases from existing guidebooks:
* **Guidebook** serves as product template
* **Updated seasonally** in GUIBO
* **Personalized per booking** (accommodations, documents, dates)
* **Same structure** for all bookings of this product
**Best for:** Standardized tours with consistent itineraries
Learn more: [Release | Create guidebook release](/developers/releases-api/release-or-create-guidebook-release) (via API)
#### On-demand Releases
Generate complete guidebook and release simultaneously via API:
* **Fully dynamic** guidebook structure
* **Created per booking** from JSON payload
* **No pre-existing** guidebook required
* **Maximum flexibility** for unique itineraries
**Best for:** Tailor-made trips, highly variable tours, third-party system integration
Learn more: [Create on-demand release](/developers/releases-api/release-or-create-guidebook-release/create-on-demand-release)
### Personalization Options
All releases support booking-specific customization:
* **Accommodations** with arrival/departure dates and comments
* **Additional documents** (vouchers, tickets, confirmations)
* **Custom content** (POIs, routes, text pages)
* **Modified content** from the base guidebook
Learn more: [Personalized Accommodation](broken://pages/dCpXCx6xVKUTP5vue8ZG), [Release | Create guidebook release](/developers/releases-api/release-or-create-guidebook-release) (via API)
### Canceling a Release
A Release cannot be deleted. However, you can cancel a release in the release dashboard by changing the status from ACTIVE to CANCELED, provided that the download period has not yet started. Please note that the code will remain blocked and cannot be reassigned.
# Create releases
Create releases from guidebook templates or on-demand via API, personalize them per booking, and cancel when needed.
This page shows the two ways to define release content, how release creation is triggered, and how to personalize or cancel a release.
## Template-based releases vs on-demand releases
{% columns %}
{% column %}
### Template-based releases
The release is created from a pre-existing guidebook in GUIBO. Booking-specific data is added during release creation: accommodation bookings, PDF attachments, and any other guidebook customization.
#### When to choose?
Choose **template-based** when all bookings of a product share the same itinerary — the guidebook serves as the template, and only accommodations and documents vary per booking.
#### Creating template based releases
* **Web portal** — manually, by users in the release dashboad
* **API** — automated, typically triggered from a booking system. Click here for the [release API](/developers/releases-api) here.
{% endcolumn %}
{% column %}
### On-demand releases
The release is created without a pre-existing guidebook — the guidebook is defined dynamically as part of the release creation. Source content can be provided from external systems or from GUIBO libraries.
#### **When to choose?**
Choose **on-demand** when the itinerary differs from booking to booking, e.g. tailor-made trips assembled in an external trip builder. See Integrate External Content for a full comparison.
#### **Creating on-demand releases**
* **API** — automated, typically triggered from a booking system. Click here for the [on-demand API](/developers/releases-api/release-or-create-guidebook-release/create-on-demand-release).
{% endcolumn %}
{% endcolumns %}
## Personalizing template-based releases
Releases are always booking specific with booking related content. See the table below to understand all available options:
Content type
Personalization options
Guidebook
You can modify the guidebook of template-based releases which creates a guidebook copy in order to make changes for one booking only.
Customizing on-demand releases is typically not required as all content is booking-specific already.
PDF Documents
Attach any PDF Documents to a release and decide how travelers can access: Via Tour Guide App and/or Trip Link.
Accommodation Bookings
Add any accommodation bookings to a release with a POI, arrival/departure date and booking comments.
Roadbook PDF
Roadbook PDFs are available only for template-based releases. Any customizations made to a guidebook are not reflected in the Roadbook PDF. Roadbook PDFs are currently unavailable for on-demand releases.
GPX Download
Choose whether you want to offer GPX files via Trip Link for download to your travelers. The GPX files reflect the routes included in the release’s guidebook.
## Cancel a release
A release cannot be deleted. Cancel it in the **Release Dashboard** by changing `Status` from **active** to **canceled** — possible only before the download period starts.
{% hint style="info" icon="triangle-exclamation" %}
The download code of a canceled release remains blocked and cannot be reassigned.
{% endhint %}
### Next step
Share the [Trip Link](/publishing/trip-link) with your travelers — their central access point to all travel documents.
# Trip Link
Trip Link provides travelers with one personalized URL to access all travel documents: Tour Guide App, Roadbook PDF, GPX files, and booking attachments.
### What is a Trip Link?
A **Trip Link** is a unique URL generated for each booking. It gives travelers access to all their travel documents in one place — personalized and always up to date.
| Content | Description |
| ------------------ | ------------------------------------------- |
| **Tour Guide App** | Download link with pre-filled access codes |
| **Roadbook PDF** | Print-ready travel document |
| **GPX Files** | Route files for external navigation devices |
| **Documents** | Vouchers, tickets, and other attachments |
{% hint style="info" %}
Trip Links stay up-to-date automatically. When the release is updated, travelers see the changes immediately.
{% endhint %}
### How Trip Links Are Created
In GUIBO, each booking is represented by a **release**. When a tour operator creates a release, GUIBO automatically generates a Trip Link. All Trip Links are accessible in your **Release Dashboard**.
### Sharing Trip Links with Resellers
Every release has an assigned **operator** and an assigned **seller**. When you set a seller other than yourself, the Trip Link is automatically rebranded to match the seller's look and feel.
| Reseller Scenario | What to Do |
| ----------------------------------------- | -------------------------------------------------------------------------------------------------------------------------------- |
| **Reseller has a GUIBO account** | Set them as seller — done. They receive an email notification and see the release in their Dashboard. |
| **Reseller is not on GUIBO yet** | Send them an invitation to create a free GUIBO account for seamless collaboration. |
| **Reseller doesn't want a GUIBO account** | Set yourself as seller or create a self-managed brand for rebranded Trip Links and send the Trip Link manually to your reseller. |
{% hint style="info" %}
**Recommended:** Invite your resellers to create a free GUIBO account. This eliminates manual link sharing and ensures automatic notifications for every new booking.
{% endhint %}
### Learn More
* [How to publish?](/publishing/how-to-publish/how-to-publish)
* [B2B Network](/publishing/b2b-network)
# Tour Guide App
GUIBO's Tour Guide App provides personalized travel docs with bike and hike navigation to travelers.
GUIBO's Tour Guide App provides travelers with turn-by-turn navigation, points of interest information, and real-time updates. The white-label solution is available in both Apple and Android stores with your branding.
# Personalized Accommodation
Booking-specific accommodation details per release, shown to travelers in the Tour Guide App.
Each release can carry **booking-specific accommodation details**. Travelers see them in the Tour Guide App in two ways: In the accommodation list as well as within the stages as check-in and check-out accommodation.
## Add booking specific accommodations to your releases
{% tabs %}
{% tab title="Web portal" %}
1. Go to the **Release Dashboard** and open the release.
2. At the bottom right, open the **Accommodation** tab.
3. Add or review the accommodations for this release.
4. Provide **arrival date**, **departure date**
5. Optionally, provide any **booking comment**
How to add accommodations in the release dashboard
{% endtab %}
{% tab title="API" %}
#### **1. Trip arrival and departure dates**
Include booking dates for the overall trip when creating the release:
```json
...
"arrivaldate":"2025-01-22",
"departuredate": "2025-01-25"
...
```
#### **2. Accommodation details**
Provide arrival date, departure date, and any comment along with the accommodation POI:
```json
...
"accommodation": [
{
"externalId":"HPO1",
"libraryExternalId":"HOTELS",
"arrivalDate":"2025-09-05",
"departureDate":"2025-09-06",
"comment":"A generous breakfast buffet is included"
}
]
```
See the developer area or [click here](/developers/releases-api/release-or-create-guidebook-release#b-create-download-permission-with-customization) for an end-to-end example on how to create a release with booking specific accommodation information via API.
{% endtab %}
{% endtabs %}
## What travelers see
{% columns %}
{% column %}
#### Accommodation List
Personalized accommodation list easily accessible from the trip's home screen.
**All accommodations are shown here.**
Accommodation List in the Tour Guide App
{% endcolumn %}
{% column %}
#### Within Stages
Check-in and check-out accommodation within each day-by-day stage.
[**Click here on how to configure**](/publishing/tour-guide-app/personalized-accommodation/stage-matching)
Check-in & check-out accommodations per day
{% endcolumn %}
{% endcolumns %}
### Choose your layout
How hotels appear in the app depends on **how your stages are structured**. Find your case below:
Your stages are…
Hotels shown on each stage?
Travel days — a different hotel each night (classic point-to-point tour)
Yes — each day shows its check-in and check-out hotel
Travel days — the same hotel every night (a "star" trip from one base)
Yes — each day shows the hotel, so travelers have everything for that day in one place
Curated collections, not days — restaurants, routes, experiences
No — hotels appear only under the Accommodation list in the app
When your stages are travel days, GUIBO places the right hotel on each day automatically, using **destination points** in the guidebook (set these up below). When they are curated collections, you simply switch the per-stage display off — travelers still get every hotel in the app's accommodation overview.
# Stage Matching
All accommodations are visible in the accommodation list. In addition, accommodations can be shown as check-in and check-out items within a stage as part of the program. This only makes sense if your guidebook structure is itinerary based ([click here for more information](/get-started/getting-started/guidebook-structures)). If your guidebooks are structured collection based, [click here](#hide-accommodations-from-within-stages) to disable accommodation display within stages at the account level.
Check-in & check-out accommodations per day
## How stage matching works
Itinerary-based stages must have destination markers, which can be any point on the map.
When accommodations are added to a release, **GUIBO matches each accommodation to the stage with the closest destination marker**. Each hotel then appears at the end of its stage as a check-in item and at the start of the next stage as a check-out item.
For this to work, the guidebook needs:
1. A destination marker in every day or stage category. Stages without a destination marker will be ignored.
2. Usually, an arrival stage with its own destination marker for the first night.
[Click here](/get-started/getting-started/create-your-first-guidebook#step-3-add-destination-markers-to-stages) on how to add destination markers.
### When the stage matching is not working as expected
In some cases, automated stage matching may not work correctly — for example:
* The correct accommodation is not the closest one.
* An accommodation is missing.
* Two different accommodations need to be assigned to one stage.
* There is no destination marker within 50 km of this accommodation.
* No destination marker was found within 50 km for one or more accommodations.
When this happens, GUIBO disables the release and sends a “Manual review required” email. The user is then asked to check the accommodation matching manually and correct it if needed.
The matching can be reviewed in the release dashboard via the overview map and the “Accommodations” tab on the right side.
After reviewing the matching, the user can activate the release again. This can be done after fixing the issue, such as adding a missing destination marker, or if the user confirms that the matching is already correct and no changes are needed.
#### How to match accommodations manually
Override the automatic result for a single hotel:
1. Open the **accommodation** on the Release Dashboard.
2. Set **Check-in stage** — the stage where the hotel appears as start accommodation.
3. Set **Check-out stage** — the stage where it appears as end accommodation.
## Hide accommodations from within stages
Choose if you want to **show hotels in stage timeline.** A toggle decides whether hotels show on each stage:
* **On** — Show accommodations as check-in/out items as you have structured your guidebooks as day-by-day stage program
* **Off** — Do not show accommodations as check-in/out items as you have structured your guidebooks not as day-by-day stage programs but e.g. as curated collections of specific assets.
You can decide to hide or show check-in/out accommodations within stages on different levels per account, per guidebook, or per single release:
# Turn by turn Navigation
How the Tour Guide App handles navigation for outdoor travelers — curated routes, dynamic first and last mile, GPX export, and tour-guide mode.
GUIBO is not a navigation app — it is an all-in-one tour guide app, designed to give travelers an upgraded experience for your outdoor trips: pre-trip discovery, the daily agenda, accommodations, documents, communication, points of interest, curated routes and post trip traveler relationship.
For routes, the app provides full in-app turn-by-turn navigation for hiking and cycling — text and voice cues, off-route alarm, and dynamic routing to and from the route. For travelers who prefer the tools they already know, the app also supports seamless GPX sharing with Garmin, Wahoo, and similar devices, and hands off to external map apps for car navigation to points of interest. The underlying principle is straightforward: a good trip means letting each traveler use what works best for them.
**The tour operator controls all of this.** Each navigation feature is configured per Guidebook. That includes GPX export — some operators choose not to expose it, to protect their curated routes.
**What this article covers:**
1. [Turn-by-turn navigation for curated routes](#id-1.-turn-by-turn-navigation-for-curated-routes)
2. [Dynamic routing: first mile, back-to-route, last mile](#id-2.-dynamic-routing-first-mile-back-to-route-last-mile)
3. [GPX export to Garmin, Wahoo, and other devices](#id-3.-gpx-export-to-garmin-wahoo-and-other-devices)
4. [External navigation to points of interest](#id-4.-external-navigation-to-points-of-interest)
5. [Tour-guide mode for guided group tours](#id-5.-tour-guide-mode-for-guided-group-tours)
***
#### 1. Turn-by-turn navigation for curated routes
**The app guides the traveler along the route you designed — it does not generate or suggest alternatives.**
For each route in the Guidebook, the app provides:
* **Directional cues at every turn**\
Icon, short text, and optional voice navigation
* **Off-route alarm**\
A single audible alert when the traveler leaves the route line
* **Live position on a rotating map**\
With distance and time remaining on the *Data* tab
* **POIs along the route**\
Tappable icons with descriptions, without leaving navigation
Navigation works offline once the Guidebook is downloaded. Voice navigation is an optional, pay-per-use feature enabled per Guidebook.
***
#### 2. Dynamic routing: first mile, back-to-route, last mile
**Around the curated route, the app routes the traveler dynamically — to the start, back from a detour, and on to the next accommodation.**
| Moment | What it does |
| ---------------------------- | ------------------------------------------------------------------------------------------------------------------------------------ |
| **First Mile Navigation** | Routes the traveler from their current location to the start of the day's route. |
| **Back-to-route navigation** | When the traveler steps away from the route (for example, a lunch detour) the app routes them back to the nearest point on the line. |
| **Last Mile Navigation** | When the route ends, the app routes the traveler from the finish point to the day's accommodation. |
These three features share the same dynamic-routing engine but address different moments in the traveler's day. **The traveler does not switch apps between them.**
Cross-links:
* [*First Mile Navigation*](/publishing/tour-guide-app/turn-by-turn-navigation/first-mile-navigation)
* [*Last Mile Navigation*](/publishing/tour-guide-app/turn-by-turn-navigation/last-mile-navigation)
***
#### 3. GPX export to Garmin, Wahoo, and other devices
**Travelers who prefer their own bike computer or sports watch can export each route as a GPX file from the app.**
Some travelers — especially experienced cyclists — want to ride with a head unit they already know (Garmin, Wahoo). The app supports this through GPX share:
1. Open the route in the app.
2. Tap the **share icon**.
3. Choose the target device or app from the system share sheet.
The all-in-one principle still applies. The traveler discovers, plans, and reviews **every route in one place** — and then chooses the device they want to ride with. They don't need a second source of truth for the routes.
***
#### 4. External navigation to points of interest
**GUIBO does not provide car navigation. For points of interest, the app hands off to the navigation system the traveler already uses.**
For any POI in the Guidebook — restaurant, viewpoint, parking, hotel — the traveler can tap **Navigate** and the app opens:
* Apple Maps (default on iOS)
* Google Maps
* Any other navigation app the traveler has installed
This way travelers benefit from the navigation system built for car travel — while the curated content (where to go, what to see, why) stays in GUIBO. **Curation in one place. Car navigation by the tools built for it.**
***
#### 5. Tour-guide mode for guided group tours
**For Guidebooks used on guided tours, you can disable turn-by-turn navigation per Guidebook.**
On guided tours, the tour guide is the one navigating. They adjust the route on the spot — for weather, group pace, an unplanned coffee stop. If turn-by-turn navigation is active on every traveler's phone, the app's cues and off-route alarms can contradict the guide.
For these Guidebooks, you can:
* **Disable turn-by-turn navigation** entirely
* Keep all other Guidebook content active — routes visible on the map, POIs, text pages, accommodations, day view
The traveler still gets the full Guidebook experience as part of the trip. They just don't get cues that compete with the person leading them.
**Special case: If no signal is wanted, here are possible options:**
* Deactivate location completely\
In this case, travellers will not see their current position in the app at all.\
To deactivate the location service, go to:\
Release Dashboard → Settings → Positioning → Deactivate\
Note that this setting applies to the entire Guidebook/Release and cannot be configured individually for specific routes.
* Ask travellers not to start the navigation\
You can leave positioning enabled but advise travellers not to start the navigation, for example if GPS reception in the mountains is unreliable for the specific trip.
***
**Related articles**
* [*First Mile Navigation*](/publishing/tour-guide-app/turn-by-turn-navigation/first-mile-navigation)
* [*Last Mile Navigation*](/publishing/tour-guide-app/turn-by-turn-navigation/last-mile-navigation)
* [Navigation Issues](/faq/navigation-issues) — traveler-facing troubleshooting
* [First-Level Support Guide](/publishing/tour-guide-app/first-level-support-guide) — communication templates for operator support teams {% endhint %}
# First Mile Navigation
Guide travelers from their current location to the best entry point of the curated route — at the start of navigation or after leaving the route.
When the traveler is off the curated route — at the start of navigation or after a detour — the app offers to navigate to the best entry point.
Available in the **GUIBO App** and all **white-label app variants**. Always on — no setup required.
#### How it works
1. **Off-route detection** — The app detects that the traveler is not on the curated route.
2. **Join prompt** — A prompt asks whether to join the curated route.
3. **Dynamic routing** — If the traveler accepts, the app routes them to the best entry point from the current GPS position.
{% hint style="info" %}
**Internet connection required.** The route is calculated on demand from the traveler's live position, so the feature does not work offline.
{% endhint %}
***
#### Related
* [Last Mile Navigation](/publishing/tour-guide-app/turn-by-turn-navigation/last-mile-navigation) — Extend the route to the traveler's accommodation
* [Tour Guide App](/publishing/tour-guide-app) — Overview of the traveler-facing app
# Last Mile Navigation
Extend the planned route to the traveler's booked accommodation with on-demand routing in the Tour Guide App.
When the traveler nears their booked accommodation, the app offers to continue navigation directly to the entrance — and lets the traveler decide when to leave the planned route.
Available in the **GUIBO App** and all **white-label app variants**.
#### How it works
1. **Smart detection** — The app monitors progress against the planned route. Proximity is detected as the traveler nears the route end or the hotel.
2. **Accommodation icon appears** — A new icon shows on the map and stays visible from this point on. The traveler can tap it to navigate to the hotel at any time.
3. **Proactive dialog** — A prompt asks whether to continue on the planned route or navigate directly to the hotel.
4. **Dynamic routing** — When the traveler accepts the prompt or taps the icon, the app calculates a new route from the current GPS position to the accommodation entrance.
***
#### Why the traveler is asked
The accommodation may be located **before the end of the planned route** — for example, the route can continue past the hotel to a village or viewpoint that is part of the tour operator's itinerary.
The prompt makes this explicit so the traveler can decide whether to:
* **Continue on the planned route** and navigate to the hotel later
* **Leave the route now** and navigate directly to the hotel
This keeps the traveler in control and prevents them from missing curated content by being routed to the hotel automatically.
***
#### Prerequisites
The following conditions must be met for the feature to trigger.
| Requirement | Description |
| --------------------------------------------------------------------- | ---------------------------------------------------------------------------------------------------------------------------------- |
| [**Personalized Accommodation**](broken://pages/dCpXCx6xVKUTP5vue8ZG) | Must be added to the current release |
| **Proximity** | The accommodation is located within **10 km** of the day's planned route |
| [**Destination POIs**](broken://pages/dCpXCx6xVKUTP5vue8ZG) | Each stage must have a destination POI to link the accommodation |
| **Feature toggle** | `Automatic route calculation to hotel` enabled in account settings |
| Hotels and Stages | Must be configured correctly in the backend |
| App Location Permissions | The Location permission must be set to "Always" |
| Navigation | Navigation is active: either the main route or an already started Last-Mile route (The user is not navigating on an ad hoc route) |
**Troubleshooting: When is no Last-Mile route generated?**
* There is no accommodation with a matching arrival date.
* The accommodation is more than 10 km from the end of the day's route.
* The accommodation is located less than 100 m from the route.
#### Activation
1. Open **Account Settings**
2. Find **Automatic route calculation to hotel**
3. Toggle the setting **on**
Once enabled, the feature triggers automatically for every release that meets the prerequisites.
***
{% hint style="info" %}
**Internet connection required.** The route is calculated on demand from the traveler's live position, so the feature does not work offline.
{% endhint %}
***
#### Related
* [Personalized Accommodation](broken://pages/dCpXCx6xVKUTP5vue8ZG) — Add booking-specific accommodations and stage destinations
* [First Mile Navigation](/publishing/tour-guide-app/turn-by-turn-navigation/first-mile-navigation) — Guide travelers onto the curated route
# First-Level Support Guide
This guide provides ready-to-use assistance for common challenges travelers face when using the Tour Guide App. Use these templates when responding to your travelers' support requests.
### 🔍 Issue Identification
1. The traveler is unable to **install or open the app?** → [1. Device Compatibility](#id-1.-device-compatibility)
2. The traveler cannot **download the guidebook**? → [2. Download Problems](#id-2.-download-problems)
3. The traveler has **navigation issues**? → [3. Navigation Issues](#id-3.-navigation-issues)
4. This guide does not address the traveler's issue? → [4. Escalate to GUIBO](#id-4.-escalate-to-guibo)
### 1. Device Compatibility
Problem: If travelers report they **cannot install the app** or **fail to open it for the first time** (before attempting to download any guidebook) it is likely that the device is too old and does not fulfill the minimum requirements:
> **Minimum smartphone requirements:**
>
> * **iOS:** Requires iOS 16 or newer
> * **Android:** Requires Android 11 or newer\
> (for Huawei devices, please refer to the link "click here" below)
**For detailed information,** [**click here**](/faq/what-are-the-ios-minimum-requirements-for-the-tour-guide-app#communication-template-for-your-travelers)**.**
{% tabs fullWidth="false" %}
{% tab title="Communication Template Installation" %}
Thank you for contacting us about the issues you're experiencing with our Tour Guide App. Based on the information you've provided, we've identified that your device may not meet the minimum system requirements needed to run the app properly.
**Why the travel app may not work on some older smartphones**
We understand that it can be disappointing when a technical solution like our travel app doesn’t work as expected on your device. Please allow us to explain the reason behind this.
To provide you with the best possible experience – including offline maps, up-to-date route guidance, and relevant trip information – the app relies on modern technologies that are regularly updated. Older smartphones or tablets may not be compatible with some of these functions, especially if the operating system is no longer supported by the device manufacturer.
Specifically:
* For Apple devices, the app requires iOS 16 or newer.
* For Android devices, the app requires Android 11 or newer.
We understand that this may cause inconvenience. To ensure that you still have everything you need for your journey, we are pleased to offer the following alternatives:
* A PDF version of your travel documents (roadbook) is available for download and can be used without the app.
* You can also download GPX files of your route, which can be imported into external navigation devices (e.g. Garmin device).
We sincerely appreciate your understanding and are here to support you in making your trip as smooth and enjoyable as possible.
Wishing you a wonderful journey!
{% endtab %}
{% endtabs %}
### 2. Download Problems
Please note that the download may take longer if the Guidebook or map area is large, and if the internet connection is weak.
Problem: The download is never complete.
{% tabs fullWidth="false" %}
{% tab title="Communication Template Download Problems" %}
We understand you're experiencing difficulties downloading your travel guidebook. Please try the following solutions:
1. **Improve your internet connection**\
• Connect to a strong, stable WiFi network\
• Hotel WiFi can be unreliable\
• As an alternative, try using mobile data if you have a good signal
2. **Check your device storage**\
• Guidebooks contain offline maps requiring 500MB-1GB of free space\
• For iOS: Go to Settings → General → iPhone Storage\
• For Android: Go to Settings → Storage\
• Delete unnecessary apps, photos, or videos to free up space
3. **Keep app in the foreground while downloading**\
• Keep the app open in the foreground while downloading\
• Ensure your screen stays on during the download \
• Don't switch to other apps during the download process
4. **Reset the app** (if above steps don't work)\
• Remove the app completely from your device\
• Restart your device\
• Reinstall the app from the App Store/Google Play\
• Try downloading the guidebook again
5. **Restart the phone**
Please reply to this email if you still encounter problems after trying these steps. Include:
* Which steps you've already attempted
* Any error messages you've received
* Your device model and operating system version
We're committed to ensuring you have all the information you need for your journey.
{% hint style="danger" %}
Include this section only for white-label app users
{% endhint %}
5. **Use the GUIBO App from the App store** (last resort)\
If you continue to experience difficulties with our branded app, you can:\
• Download the official "GUIBO" app from the App Store/Google Play\
• This will give you access to identical travel content\
• When prompted, enter:
1. Operator ID: \[YOUR\_OPERATOR\_ID]
2. Download Code: \[DOWNLOAD\_CODE]
{% endtab %}
{% endtabs %}
### 3. Navigation Issues
Problem: If travelers can download the guidebook but experience navigation problems:
{% tabs fullWidth="false" %}
{% tab title="Communication Template Download Problems" %}
We understand you're experiencing difficulties while navigating with our Tour Guide App. Please try the following solutions:
Please check your technical settings:
1. Open your guidebook
2. Scroll down to **"Service" section**
3. Tap on **"Technical Support"**
4. Tap **"Check technical settings"**
5. Carefully follow **the instructions**
Follow the onscreen instructions to ensure all permissions and settings are correctly configured. The most common issues are:
* Location permissions not set to "Always"
* Notification permissions turned off
* Sound/volume levels too low
* Power saving mode interfering with GPS
As a last step, check the advice under **"Further Information".**
{% endtab %}
{% endtabs %}
### 4. Escalate to GUIBO
If the issue persists and you need to escalate to GUIBO support, please provide the following information to help us resolve your issue:
1. Screenshot of the error or problem screen
2. Your device model and operating system version
3. Your download code
4. Steps you've already taken to try resolving the issueYou can find your device information and download code in the app under: Service → Technical Support
# Push Notifications
Send instant messages to travelers through the Tour Guide App during their journey.
{% hint style="warning" %}
**Beta Feature**: Push Notifications are currently in beta testing. While fully functional, we're actively testing and gathering feedback to optimize the feature before general release.
{% endhint %}
**Reach travelers instantly** during their journey without needing phone numbers or email addresses. Send **instant messages** to travelers who have downloaded your release through the Tour Guide App. Especially valuable for **B2B partnerships** where operators often lack direct traveler contact data. All messages are **automatically translated** into the language of the release.
### How It Works
{% hint style="info" %}
**Prerequisite**: Travelers must have downloaded the release in the Tour Guide App first
{% endhint %}
**Send notifications to single releases**
1. Open **Release Dashboard**
2. **Select a release** from the list
3. Use **Message section** on the right side
4. **Compose and send** your message
Send push notification to single release
**Send notifications to multiple releases**
1. Open **Release Dashboard**
2. **Apply filters** to select target releases
3. **Select** target releases
4. **Click the message icon** in next to the search field
5. **Compose and send** message to all filtered releases
6. **Receive an error** when releases do not have downloads and messages cannot be sent
Send push notification to a filtered group of releases
### Message Storage in App
All notifications appear in the **Messages section** (top-right icon in Tour Guide App):
* **Complete history** of all operator communications
* **Persistent access** throughout the journey
### Automatic translation
All messages are automatically translated into the language of the release.
### Advanced Targeting
Send to **multiple releases simultaneously** using filters:
* **Active travelers only** (currently on trips)
* **Specific guidebooks** or destinations
* **Operator-agency combinations** for B2B coordination
* **Particular download codes** for targeted groups
### Use Cases
#### Operational Excellence
* **Weather alerts** and route modifications
* **Service disruptions** and alternative arrangements
* **Last-minute changes** to accommodations or schedules
#### B2B Communication
* **Reach agency customers** without direct contact data
* **Coordinate updates** between operators and resellers
* **Maintain service quality** across distribution channels
#### Customer Experience
* **Welcome messages** upon arrival
* **Local recommendations** and insider tips
* **Service recovery** for unexpected issues
###
# Photo Competition
Enable travelers to share photos of their journeys through an in-app competition that generates engagement and valuable visual content for product marketing.
{% hint style="warning" %}
**The customized texts are not yet available until the upcoming App release.**
{% endhint %}
The Photo Competition allows travel providers to collect authentic, high-quality photos directly from travelers through the GUIBO Tour Guide App. This creates engagement while building a valuable library of real travel imagery for marketing purposes. As AI-driven marketing tools become more prevalent, having a large volume of authentic product images gives travel providers a competitive advantage, as these tools primarily depend on extensive data rather than just individual high-quality images.
Feature
Description
Easy Participation
Simple upload process accessible from the app's home screen
Customizable Messaging
Fully editable instructions, prompts, and terms
Account-wide Toggle
Enable/disable for all releases with one click
Per-Release Control
Override global settings for individual releases
### Traveler Experience
1. A **Photo Competition** tile appears under the **Service** section
2. Upon selecting it, travelers see an overview with contest instructions
3. Travelers can select photos from their gallery or take new ones
4. After clicking **Join Now**, they must agree to the terms and conditions
5. Once submitted, travelers receive confirmation of their entry
6. The contest incentivizes participation with the chance to win a prize
### Configuration for Travel Providers
#### Enabling the Feature
1. In the web portal, select **Photo Competition** from the left navigation menu
2. Use the toggle switch in the top-right corner to activate or deactivate
3. When activated, the contest becomes available for all applicable releases
#### Customizing Contest Messaging
1. Click the **gear icon** (Settings) in the Photo Competition section
2. Customize text for each of the following sections:
* **Select a photo**: Guidelines on what photos to submit
* **Join now**: Call-to-action instructions
* **Accept the terms**: Explanation of consent process
* **Win a great prize**: Prize information to motivate participation
* **Terms and conditions**: Legal framework for photo usage
3. Click **Save** to apply your changes
Customize your photo competition
#### Release-specific Settings
1. Navigate to **Releases** → **Release Dashboard**
2. Select the desired release
3. In the **Features** section, turn the **Photo Contest** toggle on/off
4. This overrides the global account setting for the specific release
Toggle on/off photo competition for individual releases
### Current Limitations
* The Photo Competition feature is **not available for reseller releases** at this time
* This limitation exists due to questions regarding photo ownership and competition responsibility
* A future update will address this with enhanced configuration options for reseller scenarios
### Best Practices for your Photo Competition
* **Clear Guidelines**: Specify what types of photos you're looking for
* **Compelling Prizes**: Offer attractive incentives to maximize participation
* **Legal Protection**: Ensure your terms clearly establish usage rights
# White-label App
{% hint style="info" %}
We publish an App for your company with the look of your brand. But you can use our GUIBO App too.
{% endhint %}
### 1. Color
We use two colors to adapt your App.
* Primary color: all buttons and icons
* Secondary color: headers and active tabs in the footer menu
Primary color
Secondary color
   
###
### 2. App Icons
You can exchange each of those with your own SVG images. Please provide us with your version of the images with
* Identical name
* Identical format and resolution
* Identical file format
Here are the original icons:
{% embed url="" %}
###
### 3. Map Icons
You can replace each map icon with a file of the same filetype, name and resolution. Please provide us with your version of the images with
* Identical name
* Identical format and resolution
* Identical file format
Here are the original map icons:
{% embed url="" %}
###
### 4. App graphics
The following images are required for app design customization:
#### - BACKGROUND.PNG
A background image for the trip download page
#### - DEFAULTASSETIMAGE.PNG
An image that is displayed in the list of POIs and Routes for each POI and Route if there is no image. The icon will be placed on top of it.
#### - ICON.PNG
Start-Icon for the App on the desktop of the phone
PNG format, square, no transparency, at least 1024 × 1024px
#### - SPLASH.PNG
PNG format, square, no transparency, at least 2732 × 2732px
Everything that should be absolutely visible must be in a square in the middle of approx. 1200x1200px. Formats for all common screen formats are cut out of the graphic. Areas outside the center can be cut off. The file splash.psd in the appendix can be used as an aid.
{% embed url="" fullWidth="false" %}
The original images of the GUIBO App as reference
{% endembed %}
**DOWNLOAD FILES**
{% hint style="info" %}
Download all customizable app files [here](https://drive.google.com/drive/folders/109R0fOIww4SeQgvCJIisbETQUVPtwA1F?usp=sharing).
{% endhint %}
# Roadbook PDF
Print-ready PDF travel document with auto-generated mapsheets — when it is generated, how to update it, and how to customize the covers.
The roadbook is a **print-ready PDF travel document**: routes with auto-generated mapsheets, turn-by-turn directions, POIs, and text pages from your guidebook. Travelers download it via the Trip Link — viewable on any device, printable at home, and a reliable fallback when no smartphone is available.
App and roadbook are powered by the same guidebook content — maintain your data once, publish to both.
## Generation & updates
GUIBO generates the PDF automatically **24 hours before the download period** of the release. From that point, it is available via the Trip Link.
{% hint style="info" icon="triangle-exclamation" %}
**The PDF does not update automatically.** Changes to the release or guidebook after generation are not reflected in the existing PDF.
{% endhint %}
To apply changes, re-create the PDF manually: **Release Dashboard** → select the release → `Actions` → `Re-create PDF`.
Note: PDF Roadbooks are based on the **Master** Guidebook and are not updated for customized releases. If you personalize a Guidebook for a specific release, these changes will only appear in the App, not in the PDF. PDFs are intended as a fallback option. GUIBO's preferred channel for personalized traveler information is the App.
## Customization
Every roadbook consists of a **front cover**, **content pages**, and a **back cover**.
Element
Standard (default)
Front cover
Your logo, brand color, guidebook title & cover image
Styling
Custom colors
Back cover
Your own full-page image
Logo and brand color are taken from your **Account Settings**. Content pages are always generated automatically from your guidebook.
## Roadbook in B2B reselling
When you share a release with a reseller, the roadbook covers are automatically rebranded — the content pages always remain from the tour operator's guidebook.
| Release shared with reseller... | Front cover | Back cover |
| ----------------------------------- | ---------------------------------------------- | ---------------------------------------------- |
| **Via GUIBO B2B Network** | Seller's front cover | Seller's back cover |
| **Via self-managed reseller brand** | GUIBO default with seller's logo & brand color | GUIBO default with seller's logo & brand color |
#### Learn more
* [Trip Link](/publishing/trip-link)
* [How to publish](/publishing/how-to-publish)
# TourMaps for Webshop
Interactive tour overview maps for webshop integration with automatic generation, customization, and B2B sharing capabilities
GUIBO generates two types of interactive maps for every guidebook that can be embedded in your webshop via iFrame.
## Getting Your Maps
1. Open your **Guidebook**
2. Go to **Web** tab
3. See the preview for **TourMap Basic** and **TourMap Interactive**
4. Copy the URL to open the TourMap in full screen mode
5. Copy the iFrame code to embed any of the maps in your webshop
{% hint style="success" %}
The TourMaps are optimized for smartphones. Feel free to use the full screen link for mobile optimized webpages.
{% endhint %}
## Customize main color and content
1. Open your **Guidebook**
2. Account ➔ Account Settings ➔ web settings
3. **Activate/Deactivate POI categories**\
Decide what you want to see on your TourMaps
4. **TourMaps Color (available form August 2025)**\
Provide a color code for the main color for the TourMaps Interactive. Provide a high contrast color to ensure good visibility in front of the map.
{% hint style="warning" %}
We recommend to activate destination POIs only. Otherwise the maps can look messy which is bad for users trying to understand the route.
{% endhint %}
## Share TourMaps with resellers
You can share TourMaps with your resellers so that they can embed the maps into their webshop in order to improve their webshop experience / conversion rate.
{% hint style="danger" %}
Please note, that resellers need to have a GUIBO login so that you can share the TourMaps. It is not allowed to share TourMaps via self-managed partner accounts or to share the URLs from your own account.
{% endhint %}
### Share TourMaps with resellers having a GUIBO account
1. Click **Network** in the main menu
2. In case your are not yet connected with the reseller
1. Go to **Extend Network**
2. Click **invite** and **wait for acceptance**
3. Go to **My Network**
4. Select the reseller and click **share guidebook**
5. **Select the guidebook** for which you want to share the TourMaps
6. Click **Send**
7. **The reseller can now see the TourMaps** for your shared guidebooks as follows
1. Reseller **logs in to GUIBO**
2. Clicks **Guidebooks**
3. **Select the owner** for which he wants to see the shared guidebooks
4. **Clicks on the shared guidebook**
5. The reseller can now see the TourMaps for this guidebook\
*Note: The reseller is not able to see anything else. The reseller cannot change any data.*
### Share TourMaps with resellers with no GUIBO account
* Ask your reseller to create a free GUIBO account here:\
* Follow the steps here: Share TourMaps with resellers having a GUIBO account
## Best Practices using TourMaps
* ✅ Display destination POIs only
* ✅ Include transfer routes within stages
* ✅ Add destinations to arrival stages
* ✅ Use high-contrast colors for visibility
* ✅ Provide a full-screen access link for mobile pages
* ✅ Include transfer routes for complete journey view
# B2B Network
How tour operators and resellers collaborate at scale through automated sharing of travel documents and trip data in the GUIBO B2B Network.
In bike, hike & boat travel, tour operators sell through many resellers — and resellers source from many tour operators. Every partnership means coordinating **pre-season product data** as well as **in-season booking related travel documents**. Without automation, each new partner adds manual work — and neither side can scale.
The GUIBO B2B Network solves this for both sides:
Role
GUIBO B2B Network Benefit
For Tour Operators
One solution to automatically provide pre-season product data as well as in-season booking related travel documents to any reseller.
For Resellers
One solution to access more than 7,000+ bike, hike & boat products, ready for automated reselling under your brand.
{% hint style="info" %}
The GUIBO B2B Network is not a closed system. Tour operators can work with any reseller. When both sides are on GUIBO, additional workflows become fully automated.
{% endhint %}
### B2B Network roles and principles
#### Tour Operator
The **product owner**. Creates and maintains the product, owns the content, and is responsible for operations. In the B2B Network, the tour operator decides what to share with which reseller — from booking related travel documents to pre-seasonal product data like GPX files and demo bookings.
#### Resellers
The **traveler relationship owner**. Typically a travel agency, OTA, or hybrid operator. In the B2B Network, the reseller controls the traveler communication under their own brand — [from booking related travel documents to pre-seasonal trip data like GPX files and demo bookings.](#user-content-fn-1)[^1]
### Pre-season Product Data and In-season Booking Data Sharing
Phase
What happens
Pre-season
Operators share product data with resellers — so resellers can prepare sales channels and support teams before the first booking arrives.
In-season
Operators share bookings — GUIBO delivers a re-branded Trip Link with all travel documents under the reseller's brand.
### How it works for each side
{% columns %}
{% column %}
**Tour Operator**
Share travel docs and trip data with my reselling partners
B2B Network for Tour Operators
{% endcolumn %}
{% column %}
**Reseller / Travel Agency**
Receive travel docs and trip data from my tour operator partners
B2B Network for Resellers
{% endcolumn %}
{% endcolumns %}
[^1]: This is wrong, fix!
# For Tour Operators
The GUIBO B2B Network for tour operators is one solution to automatically provide pre-season product data as well as in-season booking related travel documents to any reseller.
### How the B2B Network works for tour operators
| Use Case | What you'll learn |
| ----------------------------------------------------------------------------------------- | ---------------------------------------------------------------- |
| [**Share bookings**](/publishing/b2b-network/for-tour-operators/share-bookings) | How to share booking related travel documents with any reseller? |
| [**Share demo bookings**](/publishing/b2b-network/for-tour-operators/share-demo-bookings) | How to share a demo booking with a reseller? |
| [**Share GPX files**](/publishing/b2b-network/for-tour-operators/share-gpx-files) | How to share GPX files with resellers? |
| [**Share B2B comments**](/publishing/b2b-network/for-tour-operators/share-gpx-files) | How to share any B2B related comment with resellers? |
# Connect with resellers
This page covers how to connect with resellers on the GUIBO platform. Are you looking to share auto re-branded trip links with resellers not on GUIBO? [Click here!](/publishing/b2b-network/for-tour-operators/work-with-resellers-not-on-guibo)
### What does it mean to connect with a reseller?
Connecting with resellers is a precondition to share any data. Nothing is shared by default. Sharing is always a deliberate choice:
1. **Connection** — Both sides agree to connect within the GUIBO B2B Network
2. **Trip-level** — Tour Operators choose which trips to share with which reseller
3. **Asset-level** — Tour Operators choose which trip assets to share with which reseller
### How to connect with resellers on GUIBO?
How to connect with resellers already on GUIBO?
1. Click on "**B2B Network**" in the left menu bar
2. "**Extend Network**" is selected as default
3. Click "**Connect**" for the partner you want to connect with
4. Type in your **e-mail address** and a message if you want
5. Click on "**send**"
6. Track your invitation state under the tab "**invitations**"
7. All partners with accepted invitations are listed under "**My network**"
How to connect with partners
How to connect with resellers not yet on GUIBO?
1. Click **GUIBO Network** in the left menu
2. Click the orange **Invite Partner** button at the top
3. Copy your **personal invitation** link
1. Open it to see what your reseller is receiving!
4. Send the link to your reseller
# Work with resellers not on GUIBO
When you want to share data with resellers not on GUIBO, you have two options:
1. **Invite reseller for free GUIBO account** (recommended)\
Invite resellers to create a free GUIBO account to benefit from all sharing options and make trip data sharing as easy as possible for you and your reseller.
2. **Create self-managed reseller brand**\
You create and manage the reseller's brand on your own. Once this is setup, you can set this brand for any booking in order to receive a Trip Link under this brand's look and feel.
### Compare sharing options with resellers on GUIBO vs not on GUIBO
Use Case
Reseller on GUIBO
Reseller not on GUIBO
Brand management
The reseller manages their own brand settings in their GUIBO account.
You manage and maintain the reseller’s brand manually, for example logo and color updates.
Share live bookings
Once connected, you can assign the reseller as the seller for any booking. The booking is shared automatically, and the reseller receives an email notification with the booking details.
You assign the reseller’s brand as the seller for the booking. The Trip Link is then rebranded to match the reseller’s look and feel, and you send it to the reseller manually.
Share demo bookings
Share any trip with any reseller and enable demo booking.
Create demo bookings and send the Trip Link by email.
Share GPX files
Share any trip with any reseller and enable GPX access. The reseller can always access the latest GPX files.
Send GPX files by email.
Share B2B Comments
Add B2B comments to any trip to share partner-relevant updates. Resellers are notified by email.
Share updates manually by email.
### How to invite resellers to GUIBO
If your reseller doesn't have a GUIBO account yet, you can invite them with a personal invitation link:
1. Click **GUIBO Network** in the left menu
2. Click the orange **Invite Partner** button at the top
3. Copy your personal invitation link
4. Send the link to your reseller
Your reseller opens the link and sees an overview of the free GUIBO account benefits. They can book a short intro call (about 15 minutes) with the GUIBO team to set up their free account.
{% hint style="info" %}
**Optional:** Join the intro call together with your reseller if you'd like to be part of the onboarding.
{% endhint %}
### How to create a self-managed reseller brand
1. Click **GUIBO Network** in the left menu
2. Click the **+ button**
3. **Fill out the form**
1. Reseller name as company name
2. Your GUIBO mail address
4. **Logout & login again**
5. **Choose your reseller**
6. Go to **account → settings**
7. **Upload the reseller logo**
8. **Change colors**
From now on, when creating a release, you can set this reseller as a seller for any specific release. This will ensure that the generated TripLink is under this reseller's look and feel.
# Share bookings
Before sharing bookings with resellers you need either
* be connected with the reseller on GUIBO ([read more](/publishing/b2b-network/for-tour-operators/connect-with-resellers)), or
* you must have created a brand for this reseller within your account ([read more](/publishing/b2b-network/for-tour-operators/work-with-resellers-not-on-guibo)).
### How to share bookings with resellers
In GUIBO, each release has an operator and a seller role.
Release Roles
Description
Operator role
This is always the creator of the release.
Seller role
By default, this is also the creator of the release. However, when creating a release, you can set either any of your connected B2B Resellers or any of you self-managed brands.
#### **Share bookings with resellers on GUIBO**
Once you assign any of your [connected resellers](/publishing/b2b-network/for-tour-operators/connect-with-resellers) to a release, this release is automatically shared into this reseller's release dashboard. Additionally, a notification mail is sent to the reseller with all booking facts.
{% tabs %}
{% tab title="Share releases via Webportal" %}
1. Make sure you are already connected with the reseller
2. Create a release
3. At step 6 **"Define seller"**, select the respective reseller
4. You and your reseller can see the release in the release dashboard
How to share releases with resellers
{% endtab %}
{% tab title="Share releases via API" %}
1. Make sure you are already connected with the reseller
2. Get the reseller's account ID from the B2B Network
3. Assign this id as the "*resllerOid*" to the release
4. Optionally assign any "*sellerDownloadCode*" to the release. The seller download code can be used for the reseller booking number in order to make it easy for both sides to match the correct release with internal booking numbers.
5. You and your reseller can see the release in the release dashboard.
6. For more details, see developer documentation [here](/developers/releases-api/release-or-create-guidebook-release).
{% endtab %}
{% endtabs %}
#### **Share bookings with resellers not on GUIBO**
When your reseller is not on GUIBO, you can either invite this reseller to GUIBO with a free account or create a self-managed brand. [Click here to compage both options.](/publishing/b2b-network/for-tour-operators/work-with-resellers-not-on-guibo#compare-sharing-options-with-resellers-on-guibo-vs-not-on-guibo)
See here, how to assign a self-managed brand to a release in order to receive a re-branded Trip Link you can send to the reseller:
{% tabs %}
{% tab title="Share releases via Webportal" %}
1. Make sure you are created a self-managed brand for the reseller ([more details](#share-bookings-with-resellers-not-on-guibo))
2. Create a release
3. At step 6 **"Define seller"**, select the respective reseller
4. Copy the resulting Trip Link and send it to your reseller
{% endtab %}
{% tab title="Share releases via API" %}
1. Make sure you are created a self-managed brand for the reseller ([more details](#share-bookings-with-resellers-not-on-guibo))
2. Get the reseller's account ID from the B2B Network
3. Assign this id as the "*resllerOid*" to the release
4. Optionally assign any "*sellerDownloadCode*" to the release. The seller download code can be used for the reseller booking number in order to make it easy for both sides to match the correct release with internal booking numbers.
5. For more details, see developer documentation [here](/developers/releases-api/release-or-create-guidebook-release).
6. Send the resulting Trip Link via mail.
{% endtab %}
{% endtabs %}
# Auto re-branding
When an reseller is assigned to a release, GUIBO automatically adapts all travel documents to match the reseller's brand identity. Here's what gets re-branded:
Channel
Re-branding
Trip Link
Reseller logo + reseller brand colors
Tour Guide App
Reseller app linked on trip link. Reseller logo displayed for downloaded guidebooks. Operator indicated as trip organizer
Roadbook PDF
Reseller cover on first and last page
### Re-branded trip link example
* Reseller logo (see*Travel King*logo below)
* Reseller main color (see*Travel King*color below)
* Linked reseller tour guide app (GUIBO app or white-label app based on reseller setup)
Re-branded trip link for Travel King as a reseller
### Re-branded tour guide app example
* Shows reseller logo (see*Travel King*logo below)
* Shows tour operator who is operating the trip (see*Hiking Holidays*as operator below)
Re-branded app for Travel Kin as a reseller
### Re-branded roadbook pdf example
* Applies the reseller's cover for the roadbook's first and last page (see*Travel King*logo below)
Re-branded roadbook cover page
# Seller download codes
In GUIBO, each release needs to have a unique download code. This code is presented within the Trip Link travelers use to download their personalized travel documents into the app.
Typically the download code matches the tour operator's booking reference number to make it easy to match booking related GUIBO releases (including Trip Links) with bookings in the tour operator's booking system.
For shared releases, tour operators can set an additional seller download code. Typically the seller download code matches the seller's booking reference number. This way, both sides (tour operator and reseller) can easily match GUIBO releases with related bookings in their booking systems.
### How to set the seller download code
#### Set the seller download code when the release is created
The first option to provide a specific seller download code is when the release is created. At this point in time, the operator is typically aware of his own booking reference number as well as the booking reference number from the reseller who provided the booking request initially. This way, the reseller can easily match the GUIBO release with its related booking.
If there is no seller download code provided, GUIBO creates a random number.
#### Change the seller download code in the release dashboad
In the release dashboard, the operator as well as the reseller can change the seller download code.
# Share demo bookings
Before sharing demo bookings with resellers you need either be connected with the reseller on GUIBO ([read more](/publishing/b2b-network/for-tour-operators/connect-with-resellers)).
### Why do you want to share demo bookings?
* Showcase your trip to resellers
* Provide detailed trip infos for reseller sales and/or support teams
* Pre-season quality assurance by resellers
### How to share demo bookings with resellers
1. Navigate to **B2B Network** → **My Partners**
2. **Select the partner** you want to share a demo booking with
3. Click **plus button** next to **Guidebooks I've shared**
4. **Select the guidebook** you want to share
5. Active **Booking Preview** sharing option
# Share GPX files
Before sharing gpx files with resellers you need either be connected with the reseller on GUIBO ([read more](/publishing/b2b-network/for-tour-operators/connect-with-resellers)).
### How to share GPX files with resellers
1. Navigate to **B2B Network** → **My Partners**
2. **Select the partner** you want to share a demo booking with
3. Click **plus button** next to **Guidebooks I've shared**
4. **Select the guidebook** you want to share
5. Active **GPX files** sharing option
# Share B2B product updates
Before sharing B2B product updates with resellers you need either be connected with the reseller on GUIBO ([read more](/publishing/b2b-network/for-tour-operators/connect-with-resellers)).
### Why do you want to share B2B product updates?
* Publish any trip update relevant for your resellers without sending multiple mails
* Resellers are notified via mail to not miss important updates
* Resellers can deactivate mail notifications so you do not have to worry about spam
### How to share B2B B2B product updates with resellers
1. Navigate to any **Guidebook**
2. Scroll down to **Comments** section
3. Click **Add B2B Comment** button
4. Add any comment
# For Resellers
The GUIBO B2B Network for resellers is one solution to access more than 7,000+ bike, hike & boat products, ready for automated reselling under your brand.
### How the B2B Network works for resellers
| Use Case | What you'll learn |
| ---------------------------------------------------------------------------------------------------------------------------------------------------------------------------------------------------------- | -------------------------------------------------------------------------- |
| [**Setup and configuration**](/publishing/b2b-network/for-resellers/setup-and-configuration) | How to setup your branding and configure your app settings as a reseller? |
| [**Connect with tour operators**](/publishing/b2b-network/for-resellers/connect-with-tour-operators) | How to connect with tour operators as a precondition to exchange data? |
|
| How to configure an in-app welcome letter visible to travelers? |
| [**Access bookings from partners**](/publishing/b2b-network/for-resellers/access-bookings-from-partners) | How to access bookings from tour operators? |
| [**Access demo bookings**](/publishing/b2b-network/for-resellers/access-demo-bookings-from-partners) | How to access demo bookings from tour operators? |
| [**Access GPX files**](/publishing/b2b-network/for-resellers/access-gpx-files-from-partners) | How to access GPX files from tour operators? |
| [**Access B2B product updates**](/publishing/b2b-network/for-resellers/access-b2b-product-updates-from-partners) | How to access B2B trip updates from tour operators? |
| [**Receive partner bookings via webhook API**](/publishing/b2b-network/for-resellers/receive-partner-bookings-via-webhook-api) | How to receive partner bookings automatically in your own systems? |
# Setup and configuration
Here’s what you need to setup and configure so travel documents supplied by tour operators appear under your brand for your travelers.
| Use Case | What you'll learn |
| ---------------------------------------------------------------------------------------------------------------------------------------------------------------------------------------------------------- | ------------------------------------------------------------------------------------------------------- |
| [**Configure your branding**](/publishing/b2b-network/for-resellers/setup-and-configuration/configure-your-branding) | How to set up your branding so the Trip Link, PDF Roadbook, and Tour Guide App appear under your brand. |
| [**Configure your app**](/publishing/b2b-network/for-resellers/setup-and-configuration/configure-your-app) | How to switch from white-label app to GUIBO app for specific tour operators? |
|
| How to provide an in-app welcome letter in your brand voice, visible to travelers? |
# Configure your branding
How resellers within the GUIBO B2B Network configure their branding so that in-season booking related travel documents are delivered under the reseller's brand.
When operators are sharing bookings with you, GUIBO automatically adapts all travel documents to match your brand identity. Here's how to setup your branding:
Asset
How to change
Logo
Account →Account Settings → General Settings → Logo upload
Main color
Account →Account Settings → General Settings → Colors
### Here's what gets re-branded:
Channel
Re-branding
Trip Link
Reseller logo + reseller brand colors
Tour Guide App
Reseller app linked on trip link. Reseller logo displayed for downloaded guidebooks. Operator indicated as trip organizer
Roadbook PDF
Reseller cover on first and last page
### Re-branded trip link example
* Your logo (see*Travel King*logo below)
* Your main color (see*Travel King*color below)
* None-branded GUIBO app or your white-label app (depends on reseller plan)
Re-branded trip link for Travel King as a reseller
### Re-branded tour guide app example
* Shows your logo (see*Travel King*logo below)
* Shows tour operator who is operating the trip (see*Hiking Holidays*as operator below)
Re-branded app for Travel Kin as a reseller
### Re-branded roadbook pdf example
* Applies the your logo to the roadbook pdf cover (see*Travel King*logo below)
Re-branded roadbook cover page
# Configure your app
How resellers within the GUIBO B2B Network configure app settings that are applied to the tour guide app when supplying tour operators share booking related releases.
### Setup your branding
Make sure your branding is setup so your logo is displayed correctly within the tour guide app. [See here how so setup your brand.](/publishing/b2b-network/for-resellers/setup-and-configuration/configure-your-branding)
### White label tour guide app vs GUIBO app
As a reseller, you have to option to subscribe for your own white-label tour guide app published in the Google Play Store as well as Apple's App Store. In this case, you have two options to choose from when supplying tour operators share booking related travel documents with you for your travelers:
1. **Option**: Apply your own white-label app to make your brand stay in front of the traveler
2. **Option:** Apply the GUIBO app
When you do not have a white-label app, the GUIBO app is applied automatically.
#### How to configure which app to apply
1. Click on "**B2B Network**" in the left menu bar
2. Select "**My Partners**"
3. Select the **supplying tour operator** for which you want to configure
4. Next to the operator's title, select the toggle
1. **GUIBO App:** To apply the GUIBO app to your travelers for bookings operated by this tour operator
2. **My App:** To apply your white-label app to your travelers for bookings operated by this tour operator
# Welcome letter
Available from season 2026
# Connect with tour operators
How resellers can connect with tour operators from the GUIBO B2B Network in order to access shared pre-season product data as well as in-season booking data from supplying tour operators.
### What does it mean to connect with a tour operator?
Connecting with tour operators is a precondition to access pre-season product data and in-season booking data. Once both sides agreed to connect, tour operators are enabled to share any data with you.
### How to accept new open invitations
1. Click on "**B2B Network**" in the left menu bar
2. Select "**Partner Invitations**"
3. **Accept open invitations** as desired
### How to connect with new tour operators on GUIBO
1. Click on "**B2B Network**" in the left menu bar
2. "**Extend Network**" is selected as default
3. Click "**Connect**" for the partner you want to connect with
4. Type in your **e-mail address** and a message if you want
5. Click on "**send**"
6. Track your invitation state under the tab "**invitations**"
7. All partners with accepted invitations are listed under "**My network**"
How to connect with partners
# Access bookings from partners
Before being able to access bookings from supplying tour operators you need to be connected with this tour operator on GUIBO ([read more](/publishing/b2b-network/for-resellers/connect-with-tour-operators)).
### How to access bookings from partners
1. Click on "**Releases**" in the left menu bar
2. All shared releases are visible here in the **release dashbaord**
1. See **all bookings from all GUIBO partners** in one place
2. **Filter by partner** and **search by download code** (booking reference number)
3. Access the **Trip Link** for all bookings in order to send it to your travelers
# Receive partner bookings via webhook API
Get notified automatically in your own systems whenever a tour operator partner shares a new booking with you.
## Precondition
Before being able to access bookings from supplying tour operators you need to be connected with this tour operator on GUIBO ([read more](/publishing/b2b-network/for-resellers/connect-with-tour-operators)).
## Why use the webhook?
You likely already have a traveler communication standard for your own products. Reusing those processes for partner bookings normally means a separate integration per partner.
**The webhook is one integration point for all your tour operator partners on GUIBO.** Integrate once — every connected partner delivers bookings to the same endpoint, ready to flow into your existing traveler communication.
## What you receive
When a connected tour operator shares a release with you, GUIBO sends a `POST` request with the release metadata to your endpoint.
Use the **Trip Link** as the access point for your travelers. It gives travelers access to the Tour Guide App, Roadbook PDF, GPX files, and any booking attachments — and stays up to date if your partner has to change booking data later.
{% hint style="info" %}
The webhook complements the [Release Dashboard](https://claude.ai/chat/access-bookings-from-partners.md) and email notification — it does not replace them.
{% endhint %}
## How to set up the webhook
See [developer documentation on B2B Webhook](/developers/releases-api/release-or-b2b-webhook).
# Access demo bookings from partners
Before accessing demo bookings from supplying tour operators you need to be connected with this tour operator on GUIBO ([read more](/publishing/b2b-network/for-resellers/connect-with-tour-operators)).
### How to access demo bookings from partner products
1. Navigate to **B2B Network** → **My Partners**
2. **Select the partner** who owns the product
3. Under **Guidebooks shared with me** select the right product
4. See the demo trip link under the section **booking preview**
# Access GPX files from partners
Before accessing GPX files from supplying tour operators you need to be connected with this tour operator on GUIBO ([read more](/publishing/b2b-network/for-resellers/connect-with-tour-operators)).
### How to access GPX files from partner products
1. Navigate to **B2B Network** → **My Partners**
2. **Select the partner** who owns the product
3. Under **Guidebooks shared with me** select the right product
4. See the GPX files under the section **GPX files**
# Access TourMaps from partners
Before accessing TourMaps from supplying tour operators you need to be connected with this tour operator on GUIBO ([read more](/publishing/b2b-network/for-resellers/connect-with-tour-operators)).
### How to access TourMaps from partner products
1. Navigate to **B2B Network** → **My Partners**
2. **Select the partner** who owns the product
3. Under **Guidebooks shared with me** select the right product
4. See the TourMaps under the section **TourMaps**
# Access B2B product updates from partners
Before accessing B2B prodcut updates from supplying tour operators you need to be connected with this tour operator on GUIBO ([read more](/publishing/b2b-network/for-resellers/connect-with-tour-operators)).
### How to access B2B product updates from partner products
1. Navigate to **B2B Network** → **My Partners**
2. **Select the partner** who owns the product
3. Under **Guidebooks shared with me** select the right product
4. See **update comments** from the supplying tour operator at the bottom of the screen
# Overview
Sync content from third-party systems to GUIBO via the Content API. Automate booking-specific Trip Links with travel documents via the Releases API.
## Overview
GUIBO distinguishes two types of data — each with its own API:
| | Booking data | Content data |
| ---------------------------- | ---------------------------------------------------------------------------------------------------------------------------------- | ----------------------------------------------------------------------------------------------------------------------------------------------------------------------------------- |
| **API** | [Releases API](/developers/releases-api) | [Content API](/developers/content-api) |
| **What** | Accommodations, dates, traveler documents | Routes, POIs, text pages |
| **Changes** | Booking to booking | Season to season |
| **Same for every traveler?** | No | Yes |
| **Typical use case** | Automatically create a booking-specific Trip Link as a single point of traveler access, with all booking-related content included. | Sync content from third-party systems to GUIBO so your current system remains the single source of truth — while re-using the data across all guidebooks and personalized bookings. |
#### Prerequisites
| Requirement | Where to find it |
| -------------- | ------------------------------------------------ |
| **Account ID** | Account Settings → General Settings → Account ID |
| **API Key** | Account Settings → General Settings → API Key |
# Releases API
Automate booking-specific Trip Links with personalized travel documents, re-branded for resellers, directly from your booking system.
## Releases API
The Releases API handles **booking data** — everything unique to a specific booking.
Your booking system creates a release → GUIBO generates a personalized Trip Link → the traveler gets all travel docs in one place.
#### What you can do
***
#### How it connects
Releases reference **content data** (guidebooks, libraries) managed in GUIBO or synced via the [Content API](/developers/content-api). The Releases API adds the booking-specific layer on top.
# Release | Create guidebook release
This article describes how to publish guidebook by connecting to another software. Software systems communicate with Application-Programming-Intefaces (API).
{% hint style="info" %}
**GUIBOs APIs are all REST services, exchanging JSON through HTTP**
{% endhint %}
### A) Create download permission without customization.
**Prerequisite**:\
You have created a guidebook. Every guidebook has a unique ID. This ID is needed to identify the guidebook when starting a release. The external system that triggers the release must know this ID.
Creation of the download permission can be done by calling our REST/https service. This example create downloadpermissions for two devices for the trip "234"
* Replace CCCCCC with the customer ID, you can find this under Account Settings > General Settings > Account ID
* Replace xxxxxx-xxxxxx-xxxxxx-xxxxxx with the API key, you can find this under Account Settings > General Settings > API Key
A release requires a `startdate` and `enddate`, defining the period during which the guidebook can be downloaded and accessed in the app.
Additionally, the `arrivaldate` and `departuredate` are optional but recommended. These dates must fall within the specified start and end dates. When provided, they allow the app to display day-specific content throughout the journey.
Optional parameter `positioning` determines whether the app utilizes positioning features, such as displaying the user's current location on the map and enabling navigation. The default value is set to **true**.
```json
curl --location --request POST 'https://services.schneidergeo.com/content/release/
--header 'Content-Type: application/json' \
--header 'Authorization: xxxxxx-xxxxxx-xxxxxx-xxxxxx' \
--data-raw '
{
"account": "CCCCCC",
"downloadCode": 556677,
"guidebookExternalId": "234",
"startdate": "2024-11-19",
"enddate": "2024-12-26",
"arrivaldate":"2024-11-22",
"departuredate": "2024-12-25",
"lang": "en",
"devices": 2,
"positioning":true
}
'
```
### B) Create download permission with customization.
**Prerequisite:**
You have previously created the content to be added to the itinerary in a library. In the following example, content from the geodata library with the ID "HOTELS" and from the textlibrary with the ID "TEXTINFO" is used
In the following example, the hotel "Zur Post" with the external ID "HPO1" is added to the trip "234" for the customer with the booking number/download code "556678".
* Replace CCCCCC with the customer ID, you can find this under Account Settings > General Settings > Account ID
* Replace xxxxxx-xxxxxx-xxxxxx-xxxxxx with the API key, you can find this under Account Settings > General Settings > API Key
* (Optional) Include the email address as a query parameter. As the customization operates in the background, it duplicates the entire guidebook and integrates additional assets. As a result, the API response doesn't contain details about any errors that may occur during this process. However, if you provide an email address, you'll receive notifications regarding any errors encountered.
```json
curl --location --request POST 'https://services.schneidergeo.com/content/release?email=info%40touroperator.eu' \
--header 'Content-Type: application/json' \
--header 'Authorization: xxxxxx-xxxxxx-xxxxxx-xxxxxx' \
--data-raw '
{
"account": "CCCCCC",
"downloadCode": 556678,
"guidebookExternalId": "234",
"startdate": "2025-08-19",
"enddate": "2025-09-05",
"arrivaldate":"2024-11-22",
"departuredate": "2024-12-25",
"lang": "en",
"devices": 2,
"accommodation": [
{
"externalId":"HPO1",
"libraryExternalId":"HOTELS",
"arrivalDate":"2025-09-05",
"departureDate":"2025-09-06",
"comment":"A generous breakfast buffet is included"
}
],
"text": [
{
"externalId":"COUNTRY_INFO_IT",
"libraryExternalId":"TEXTINFO"
}
]
}
'
```
### C) Create download permission for resellers
For more information how to use GUIBO's reseller capabilities to automate the publishing of travel docs from operators to resellers, click [here](/publishing/b2b-network).
To create a download permission for a reseller per API, you need the Operator ID of the partner account. The operator ID is a three character unique identifier of each GUIBO account. Please pick the Operator ID from the partner list. You find it in the culumn **OID**.
Add the parameter `resellerOid` to you API request.
Optionally, you can include the `sellerDownloadCode` parameter to specify a custom code under which the release will be downloadable via the reseller’s account. **Note:** Download codes must be unique within each account. To avoid conflicts, ensure the chosen code is not likely to be reused by the reseller in the future. If you don't set sellerDownloadCode, GUIBO will create a unique code.
```json
curl --location --request POST 'https://services.schneidergeo.com/content/release/
--header 'Content-Type: application/json' \
--header 'Authorization: xxxxxx-xxxxxx-xxxxxx-xxxxxx' \
--data-raw '
{
"account": "CCCCCC",
"downloadCode": 556677,
"guidebookExternalId": "234",
"startdate": "2024-11-19",
"enddate": "2024-12-31",
"arrivaldate":"2024-11-22",
"departuredate": "2024-12-25",
"lang": "en",
"devices": 2,
"resellerOid":"HID",
"sellerDownloadCode":3344221
}
'
```
What happens then?
1\) The release link for the traveller will be styled with the color from the reseller's partner account. This is configures in Account Settings > General Settings > Primary color
2\) The logo of the booklet is replaced with the logo of the partner account (please note that this feature is still under development).
### D) Create guidebook release via CSV
1. **Create a Professional service ticket**\
This step initiates the process by signaling GUIBO about your interest in utilizing the CSV import feature for automatic release creation via your csv files. [https://schneidergeo.atlassian.net/servicedesk/customer/portal/1](https://schneidergeo.atlassian.net/servicedesk/customer/portal/1/group/1/create/79)\
\
Please add the following information to the ticket:
1. **Submit Your Email Address**\
Send us the email address from which you will be sending the CSV files in the future. This is necessary to ensure that the CSV files come from a trusted source.
2. **Add a Sample CSV File**\
Provide a sample CSV file that includes the following columns.
1. downloadcode
2. Guidebook ID
3. Language
4. Arrival date
5. Departure date
6. Number of Devices
2. **Configuration of the Importer for Your Account**\
GUIBO will configure the importer specifically for your account, ensuring that it can correctly process your CSV files.
3. **Test Import**\
Send your CSV file to for a test import. This step is crucial to verify that the importer is set up correctly for your account and that your CSV files are formatted correctly.
### E) Create guidebook release via CSV with personalization
**E) Create guidebook release via CSV with personalization**
To personalize releases, your content (e.g. hotels) must be stored in a [library in GUIBO](https://docs.guibo.travel/get-started/getting-started/prepare-library#why-libraries-matter). To identify a hotel during import, you can use one of two options:
* **Option 1:** Enter the **internal GUIBO ID** of the hotel directly in the CSV column.
* **Option 2:** If your CSV is generated by an external system (e.g. a booking system), you can enter the **external ID from that system** in the CSV column. In this case, make sure the same external ID is also saved in the corresponding hotel entry in GUIBO so the mapping works correctly.
**1. Create a Professional Service Ticket** \
Use the title: *"Personalized Release via CSV for COMPANYNAME."*
**2. Update Your CSV File** \
Add one or more extra columns to your CSV — one for each Hotel/POI you want to include. Each column should contain the ID of the corresponding POI (either the internal GUIBO ID or the external system ID).
**3. Import the CSV** \
Import the CSV into GUIBO as usual. The process is the same as before.
**4. Test the Release** \
Download the release on your [test device](https://docs.guibo.travel/faq/how-can-i-test-my-guidebooks-on-the-smarthone) to check the import result.
# Create on-demand release
Generate complete guidebook structure and release in a single API call using flexible JSON payload with inline content or library references.
### On-demand releases vs guidebook releases
#### **Guidebook Release**
Creates a personalized release for a specific booking based on an existing guidebook. Use this if your trip structure is the same for all bookings. Note that you still have the possibility to personalize the release to add content specific for a booking (e.g., additional content, accommodations).
#### **On-demand Release**
Creates a guidebook and release simultaneously via JSON payload. Use this if the trip structure differs from booking to booking and you need to create highly individual releases (e.g., tailor-made trips created in a third-party system).
On-demand releases are created in two phases:
1. **Validation (synchronous)** – All library references (if present) are validated immediately. Missing references return an error in the HTTP response.
2. **Creation (asynchronous)** – After validation, the complete release is generated in the background. Any errors during this phase are logged in the **Audit Logs** (visible in the Release Dashboard for this release).
### Create/Update on-demand release
Creating and Updating Entities Use the same object schema for both creation and updates.
* To Create: Use `POST`.
* To Update: Use `PUT`.
Update Requirements:
* Identity: Updates are targeted using a composite key: `metadata.operator` and `metadata.operatorCode`.
* Deadline: Entities can only be modified until the day before the `publish.startDate`. After this window, the entity is locked.
{% code lineNumbers="true" fullWidth="true" %}
```json
curl --location --request POST 'https://services.schneidergeo.com/content/release/ondemand' \
--header 'Content-Type: application/json' \
--header 'Authorization: xxxxxx-xxxxxx-xxxxxx-xxxxxx' \
--data-raw '
{
"metadata":{
"operator":"HID", // Operator ID in GUIBO of organizing organization
"seller":"HID", // Operator ID in GUIBO of seller organization (optional for B2B)
"operatorCode":22244086, // Operator download code (typically booking reference)
"sellerCode":22244086, // Seller download code (optional, auto-generated if not provided)
"lang":"de", // Language for PDF roadbook and release page interface
"guidebookTemplateCustomId":"TRIP_355" //Optional. Custom ID of an existing guidebook. Analytics data will be accessible in this guidebook and title image will used...
"translate" : true //Optional. Translate guidebook from defaultLanguage of account to language of parameter "lang". Apllies only if text in target language is empty and not translated previously. Costs for translation may apply.
},
"publish":{
"startDate":"2025-08-01", // Release period start - when content becomes downloadable
"endDate":"2025-08-10", // Release period end - when access expires
"devices":4, // Number of smartphone devices that can download this release
"app":true, // Enable Tour Guide App access (default: true)
"gpx": true // Enable GPX file downloads (default: true)
},
"booking":{
"arrivalDate":"2025-08-03", // Trip start date (must be within publish period)
"departureDate":"2025-08-08", // Trip end date (enables day-specific content in app)
"accommodation":[ // Personalized accommodation details
{
// Example 1: Inline hotel definition - for custom or one-off accommodations
"arrivalDate":"2025-08-03", // Hotel check-in date
"departureDate":"2025-08-04", // Hotel check-out date
"stageNumber": 1, // The stage in which to add this accommodation
"content":{ // Inline hotel definition - complete hotel data in JSON
"name":"Hotel Post",
"description":"Im Zentrum von Passau gelegen, ist dieses traditionelle Hotel eine der besten Adressen",
"imageBase64":"acafaeer", // Base64 encoded image (PNG/JPEG, max 5MB)
"lat":47.1235, // Latitude coordinate
"lon":12.3425 // Longitude coordinate
},
"comment":"Der umfangreiche SPA-Bereich ist in Ihrer Gebühr enthalten." // Booking-specific notes
},
{
// Example 2: Library reference - for hotels managed in GUIBO libraries
"arrivalDate":"2025-08-04", // Hotel check-in date
"departureDate":"2025-08-05", // Hotel check-out date
"stageNumber": 1, // The stage in which to add this accommodation
"libraryReference":{ // Reference existing hotel POI from library - reuses centrally managed hotel data
"libraryCustomId":"HOTELS", // Your custom library identifier
"customId":"HTL_LINZ_01" // Your custom hotel identifier
},
"comment":"Frühstück ist inklusive" // Booking-specific notes (arrival/departure dates and comments are always booking-specific)
}
]
},
"guidebook":{
"title":"In vier Tagen von Passau nach Wien", // If not provided, but metadata.guidebookTemplateExternalId is specified, the title from the referenced guidebook will be used.
"imageBase64": "data:image/...", // Optional guidebook cover image as Base64 string. If not provided but metadata.guidebookTemplateExternalId is provided, then image from the referenced guidebook will be used.
"stages":[ // Day/stage structure for multi-day tours
{
"number":1, // Stage number for ordering
"title":"From Passau to Linz", // Stage title
"routes":[ // Routes for this stage
{
// Example 1: Inline route definition - for custom routes or route data generated by external systems
"content":{ // Inline route definition
"type":"CYCLING", // Route type: CYCLING, HIKING, WALKING, DRIVING
"name":"Passau - Linz",
"description":"Eine traumhafte Route
Von der Ortsspitze geniesen sie morgens noch den Blick flussabwärts wo sie kurz darauf radeln werden.", // HTML supported
"imageBase64":"...", // String of Base64 encoded route image
"waypoints":[ // GPS coordinates defining the route
{
"lat":48.57534915287589,
"lon":13.477583926637873
},
{
"lat":48.57559,
"lon":13.49137
},
{
"lat":48.57976,
"lon":13.49840
}
]
}
},
{
// Example 2: Library reference via GUIBO internal ID - when you store GUIBO's internal identifiers
"libraryReference":{ // Reference existing route via GUIBO internal ID
"link":"k8JB2e" // GUIBO's internal unique identifier
}
},
{
// Example 3: Library reference via external IDs - when you maintain your own ID system
"libraryReference":{ // Reference existing route via external IDs
"libraryCustomId":"ROUTEN", // Your custom library identifier
"customId":"RT_233" // Your custom route identifier
}
},
{
// Example 4: Route grouping - combine multiple existing routes into one continuous route
"group": { // Combine multiple routes into one continuous route
"name":"Von Passau nach Engelhartszell", // Name for the combined route
"parts": [ // Array of route references to combine
{
"libraryCustomId":"ROUTEN",
"customId":"RT_234"
},
{
"libraryCustomId":"ROUTEN",
"customId":"RT_235"
},
{
"libraryCustomId":"ROUTEN",
"customId":"RT_236"
}
]
}
}
],
"pois":[ // Points of Interest for this stage
{
// Example 1: Inline POI definition - for custom POIs or POI data generated by external systems
"content":{ // Inline POI definition
"name":"Passau Ortsspitze",
"description":"
Hier vereinen sich drei Flüsse: Donau, Inn und Ilz
", // HTML supported
"imageBase64":"acafaeer", // Base64 encoded POI image
"lat":48.57369, // Latitude coordinate
"lon":13.47673, // Longitude coordinate
"web":"https://guibo.travel", // Website URL (optional)
"phone":"+4911231213", // Phone number (optional)
"type":"SIGHT" // POI type: SIGHT, HOTEL, RESTAURANT, etc.
}
},
{
// Example 2: Library reference via GUIBO internal ID - when you store GUIBO's internal identifiers
"libraryReference":{ // Reference existing POI via GUIBO internal ID
"link":"eJQk6Z"
}
},
{
// Example 3: Library reference via external IDs - when you maintain your own ID system
"libraryReference":{ // Reference existing POI via external IDs
"libraryCustomId":"SIGHTS",
"customId":"POI_111"
}
}
],
"texts":[ // Text pages for this stage
{
// Example 1: Inline text definition - for custom text content generated by external systems
"content":{ // Inline text page definition
"name":"Superroute",
"description":"
Eine traumhafte Route
" // HTML content supported
}
},
{
// Example 2: Library reference via GUIBO internal ID - when you store GUIBO's internal identifiers
"libraryReference":{ // Reference existing text page via GUIBO internal ID
"link":"MflI3L"
}
}
]
}
],
"generalInfo":[ // Trip-wide information pages
{
// Example 1: Inline text definition - for custom general information generated by external systems
"content":{ // Inline general info definition
"name":"Hinweise zur Anreise",
"description":"
Bitte passen Sie auf sich auf
" // HTML content supported
}
},
{
// Example 2: Library reference via GUIBO internal ID - when you store GUIBO's internal identifiers
"libraryReference":{ // Reference existing text page via GUIBO internal ID
"link":"rtrtrt"
}
},
{
// Example 3: Library reference via external IDs - when you maintain your own ID system
"libraryReference":{ // Reference existing text page via external IDs
"libraryCustomId":"INFOPAGES",
"customId":"PG_2343"
}
}
]
}
}
'
```
{% endcode %}
# Release | Read release details
You can fetch the details of the release by the download cod
`GET` `https://services.schneidergeo.com/content/release/{account}/{downloadCode}`
#### Path Parameters
| Name | Type | Description |
| ---------------------------------------------- | ------ | ----------------------------------------------------------------------------------------- |
| account\* | String | Your account ID, you can find this under Account Settings > General Settings > Account ID |
| downloadCode\* | String | The downloadCode for the release |
#### Headers
| Name | Type | Description |
| ----------------------------------------------- | ------ | ----------------------------------------------------------------------------------- |
| Authorization\* | String | Your API key, you can find this under Account Settings > General Settings > API Key |
{% tabs %}
{% tab title="200: OK " %}
```javascript
{
"downloadCode": 6546,
"startdate": "2022-12-23",
"enddate": "2023-03-12",
"devices": 3,
"guidebookInternalId": "13BkPf",
"lang": "de",
"additionalAssets": [],
"link": "QtvgtI",
"bundleName": "Salzkammergut-Rundfahrt",
"creation": "2022-12-30T13:31:39.000+00:00"
}
```
{% endtab %}
{% tab title="404: Not Found " %}
```javascript
{
// Response
}
```
{% endtab %}
{% endtabs %}
# Release | Update release details
After creating a guidebook release, you can update attributes of the release.
You need GUIBO's internal unique identifier of the release to update it. It is the parameter "link" when fetching the release details:
{% content-ref url="/pages/NE4weTto23Bymct3OmKl" %}
[Release | Read release details](/developers/releases-api/release-or-read-release-details)
{% endcontent-ref %}
### a) Update the number of devices
`PATCH` `https://services.schneidergeo.com/content/release/{account}/{release}/devices/{devices}Change numer of devices`
Change the number of devices the guidebook can be downloaded to.
#### Path Parameters
| Name | Type | Description |
| ----------------------------------------- | ------ | ----------------------------------------------------------------------------------------- |
| account\* | String | Your account ID, you can find this under Account Settings > General Settings > Account ID |
| release\* | String | Unique identifier of the release |
| devices\* | String | The number of devices or users |
{% tabs %}
{% tab title="200: OK " %}
```javascript
{
// Response
}
```
{% endtab %}
{% endtabs %}
### b) Update the release period
`PATCH` `https://services.schneidergeo.com/content/release/{account}/{release}/period`
Change start- and enddate for the release period. During this period the App can be downloaded, the Booklet is accessable and the GPX files.
#### Path Parameters
| Name | Type | Description |
| ----------------------------------------- | ------ | ----------------------------------------------------------------------------------------- |
| account\* | String | Your account ID, you can find this under Account Settings > General Settings > Account ID |
| release\* | String | Unique identifier of the release |
#### Request body
```json
{
"start":"2024-05-01",
"end":"2024-05-02"
}
```
{% tabs %}
{% tab title="200: OK " %}
```javascript
{
// Response
}
```
{% endtab %}
{% endtabs %}
### c) Update arrival and departure dates
`PATCH` `https://services.schneidergeo.com/content/release/{account}/{release}/tripperiod`
Change arrival and departure date of the trip. This helps the App to provide the relevant content on each day
#### Path Parameters
| Name | Type | Description |
| ----------------------------------------- | ------ | ----------------------------------------------------------------------------------------- |
| account\* | String | Your account ID, you can find this under Account Settings > General Settings > Account ID |
| release\* | String | Unique identifier of the release |
#### Request Body
```json
{
"start":"2024-05-01",
"end":"2024-05-02"
}
```
{% tabs %}
{% tab title="200: OK " %}
```javascript
{
// Response
}
```
{% endtab %}
{% endtabs %}
### d) Update Accommodation
`PUT` `https://services.schneidergeo.com/content/release/{account}/{release}/accommodation`
Replace all accommodations in a release
**Path Parameters**
| Name | Type | Description |
| ----------------------------------------- | ------ | ----------------------------------------------------------------------------------------- |
| account\* | String | Your account ID, you can find this under Account Settings > General Settings > Account ID |
| release\* | String | Unique identifier of the release |
#### Request Body
```json
{ "assets":
[
{
"externalId":"HPO1",
"libraryExternalId":"HOTELS",
"arrivalDate":"2025-09-05",
"departureDate":"2025-09-06",
"comment":"A generous breakfast buffet is included"
}
]
}
```
### e) Update Language
`PATCH` `https://services.schneidergeo.com/content/release/{account}/{release}/lang/{language}`
Update language for release
| Name | Type | Description |
| ----------------------------------------- | ------ | ----------------------------------------------------------------------------------------- |
| account\* | String | Your account ID, you can find this under Account Settings > General Settings > Account ID |
| release\* | String | Unique identifier of the release |
| language | String | two characters for the language |
### f) Update Channels
Enable App: `PATCH` `https://services.schneidergeo.com/content/release/{account}/{release}/app/1`
Disable App: `PATCH` `https://services.schneidergeo.com/content/release/{account}/{release}/app/0`
Enable Pdf: `PATCH` `https://services.schneidergeo.com/content/release/{account}/{release}/pdf/1`
Disable Pdf: `PATCH` `https://services.schneidergeo.com/content/release/{account}/{release}/pdf/0`
Enable Gpx: `PATCH` `https://services.schneidergeo.com/content/release/{account}/{release}/gpx/1`
Disable Gpx: `PATCH` `https://services.schneidergeo.com/content/release/{account}/{release}/gpx/0`
| Name | Type | Description |
| ----------------------------------------- | ------ | ----------------------------------------------------------------------------------------- |
| account\* | String | Your account ID, you can find this under Account Settings > General Settings > Account ID |
| release\* | String | Unique identifier of the release |
# Release | Revoke guidebook release
This article describes how to cancel a guidebook release through the GUIBO API. Travellers will not be able to download the guidebook with the given download code any more.
{% hint style="info" %}
You can only revoke releases before the first day of the download period
{% endhint %}
Revokation of the download permissions can be done by calling our REST/https service. This example revokes a downloadpermission for the downloadcode "234"
* Replace CCCCCC with the customer ID, you can find this under Account Settings > General Settings > Account ID
* Replace xxxxxx-xxxxxx-xxxxxx-xxxxxx with the API key, you can find this under Account Settings > General Settings > API Key
```
curl --location --request DELETE 'https://services.schneidergeo.com/content/release/CCCCCC/2234' \
--header 'Content-Type: application/json' \
--header 'Authorization: xxxxxx-xxxxxx-xxxxxx-xxxxxx'
```
###
# Release | Add document to release
When you add PDF documents to a release, they will be offine available in the App and they will be accessible under the private release link for your customer.
Adressed by operator account and operator's downloadcode:
`POST` `https://services.schneidergeo.com/content/release/{account}/{downloadCode}/document/v2?description=Hotelvoucher`
Addressed by Release ID:
`POST` `https://services.schneidergeo.com/content/release/{id}/document?description=Hotelvoucher`
Adding one PDF document to guidebook release. For multiple documents, please call this endpoint multiple times
#### Path Parameters
Name
Type
Description
account*
String
Your account ID, you can find this under Account Settings > General Settings > Account ID
downloadCode*
String
The downloadCode for the release
#### Query Parameters
| Name | Type | Description |
| --------------------------------------------- | ------ | ---------------------------------------- |
| description\* | String | The title or description of the document |
#### Headers
| Name | Type | Description |
| ----------------------------------------------- | ------ | ----------------------------------------------------------------------------------- |
| Authorization\* | String | Your API key, you can find this under Account Settings > General Settings > API Key |
#### Request Body
| Name | Type | Description |
| -------------------------------------- | ------ | ------------------------------- |
| file\* | String | The PDF document to be uploaded |
Example:
```
curl --location --request POST 'https://services.schneidergeo.com/content/release/{account}/{downloadCode}/document?description=Train Ticket' \
--header 'Authorization: aiose9-98erjsd-0a9s8duj-ds8sss' \
--form 'file=@"/home/fritz/Documents/7HTUUL.pdf"'
```
# Release | Update document in release
Replace PDF document and its description in a release
Adressed by operator account and operator's downloadcode:
`PUT` `https://services.schneidergeo.com/content/release/{account}/{downloadCode}/document/{filename}?description=Hotelvoucher`
Addressed by Release ID:
`PUT` `https://services.schneidergeo.com/content/release/{id}/document/{filename}?description=Hotelvoucher`
Adding one PDF document to guidebook release. For multiple documents, please call this endpoint multiple times
#### Path Parameters
Name
Type
Description
account*
String
Your account ID, you can find this under Account Settings > General Settings > Account ID
downloadCode*
String
The downloadCode for the release
filename
String
The filename in GUIBO from the response of the document creation
#### Query Parameters
| Name | Type | Description |
| --------------------------------------------- | ------ | ---------------------------------------- |
| description\* | String | The title or description of the document |
#### Headers
| Name | Type | Description |
| ----------------------------------------------- | ------ | ----------------------------------------------------------------------------------- |
| Authorization\* | String | Your API key, you can find this under Account Settings > General Settings > API Key |
#### Request Body
| Name | Type | Description |
| -------------------------------------- | ------ | ------------------------------- |
| file\* | String | The PDF document to be uploaded |
Example:
```
curl --location --request PUT 'https://services.schneidergeo.com/content/release/{account}/{downloadCode}/document/2dcade73-abc2-4fc6-9f3a-9e92efeabcfe.png?description=Train Ticket' \
--header 'Authorization: aiose9-98erjsd-0a9s8duj-ds8sss' \
--form 'file=@"/home/fritz/Documents/7HTUUL.pdf"'
```
# Release | Delete documents in release
Remove all documents that have been added to the release
Adressed by operator account and operator's downloadcode:
`DELETE` `https://services.schneidergeo.com/content/release/{account}/{downloadCode}/documents`
Addressed by Release ID
`DELETE` `https://services.schneidergeo.com/content/release/{id}/documents`
#### Path Parameters
Name
Type
Description
account*
String
Your account ID, you can find this under Account Settings > General Settings > Account ID
downloadCode*
String
The downloadCode for the release
#### Headers
| Name | Type | Description |
| ----------------------------------------------- | ------ | ----------------------------------------------------------------------------------- |
| Authorization\* | String | Your API key, you can find this under Account Settings > General Settings > API Key |
#### Request Body
Example:
```
curl --location --request DELETE 'https://services.schneidergeo.com/content/release/{account}/{downloadCode}/documents
--header 'Authorization: aiose9-98erjsd-0a9s8duj-ds8sss'
```
# Release | B2B Webhook
Receive a POST notification with release metadata when a connected B2B partner shares a new release with your account.
When a tour operator on GUIBO shares a new release with your account, GUIBO sends a `POST` request with the release metadata to a single webhook URL configured for your account.
The webhook fires for every shared release from any of your connected B2B partners — one endpoint covers all partners.
#### Setup
The webhook URL must be configured by GUIBO support — it cannot be set via the API or webportal.
1. Open a support ticket titled "Set up B2B Webhook"
2. Provide your HTTPS endpoint URL
3. GUIBO confirms once the webhook is active
#### Webhook call
`POST` \
``
Sent each time a connected tour operator shares a release with your account.
{% hint style="info" %}
**Recommended:** Use the `url` field (Trip Link) as the central link in your traveler communication. It gives travelers access to the Tour Guide App, Roadbook PDF, GPX files, and any booking attachments — and stays up to date if your partner changes booking data later.
{% endhint %}
**Headers**
| Name | Type | Description |
| -------------- | ------ | ------------------ |
| `Content-Type` | String | `application/json` |
**Request Body**
JSON object containing the release metadata.
| Field | Type | Description |
| ---------------------- | ------- | --------------------------------------------------------------------------- |
| `id` | Number | Internal release ID |
| `key` | String | Unique release key (UUID) |
| `link` | String | Trip Link slug |
| `url` | String | Full Trip Link URL - **central access link for travelers** |
| `bundleName` | String | Release name |
| `guidebookInternalId` | String | Internal guidebook ID |
| `downloadCode` | Number | Tour operator's booking reference |
| `operatorDownloadCode` | Number | Tour operator's booking reference |
| `sellerDownloadCode` | Number | Seller's booking reference (when applied by operator) |
| `arrivaldate` | String | Traveler arrival date (`YYYY-MM-DD`) |
| `departuredate` | String | Traveler departure date (`YYYY-MM-DD`) |
| `startdate` | String | Trip Link validity start (`YYYY-MM-DD`) |
| `enddate` | String | Trip Link validity end (`YYYY-MM-DD`) |
| `startDatetime` | Number | `startdate` in epoch milliseconds |
| `endDatetime` | Number | `enddate` in epoch milliseconds |
| `creation` | String | Release creation timestamp (ISO 8601) |
| `lang` | String | Language code (e.g. `de`, `en`) |
| `devices` | Number | Number of devices booked |
| `appEnabled` | Boolean | Tour Guide App is enabled |
| `appAvailable` | Boolean | Tour Guide App is available |
| `pdfEnabled` | Boolean | Roadbook PDF is enabled |
| `pdfAvailable` | Boolean | Roadbook PDF is available |
| `gpxEnabled` | Boolean | GPX files available for download |
| `positioning` | Boolean | In-app positioning feature enabled |
| `navigation` | Boolean | In-app navigation feature enabled |
| `tourguide` | Boolean | Group tourguide |
| `travelgroup` | Boolean | Travel group |
| `photocontest` | Boolean | Photo contest feature |
| `attributes` | Object | Same feature flags as `"0"`/`"1"` string values |
| `customized` | Boolean | Release has been customized |
| `disabled` | Boolean | Release is disabled |
| `locked` | Boolean | Release is locked |
| `primaryColor` | String | Seller brand primary color (hex) |
| `secondaryColor` | String | Seller brand secondary color (hex) |
| `androidUrl` | String | Tour Guide App Android store URL |
| `iosUrl` | String | Tour Guide App iOS store URL |
| `provider` | Object | Tour operator details (`id`, `oid`, `name`, `logo`, `type`, `color`, `app`) |
| `seller` | Object | Seller details (`id`, `oid`, `name`, `logo`, `type`, `color`, `app`) |
| `additionalAssets` | Array | Additional assets attached to the release |
| `accommodation` | Array | Accommodation entries |
| `text` | Array | Custom text pages |
**Example payload**
```json
{
"downloadCode": 23425,
"operatorDownloadCode": 23425,
"sellerDownloadCode": 23425,
"startdate": "2026-04-21",
"enddate": "2026-05-12",
"arrivaldate": "2026-04-23",
"departuredate": "2026-04-26",
"devices": 20,
"guidebookInternalId": "PfI58q",
"lang": "de",
"positioning": true,
"navigation": true,
"tourguide": false,
"travelgroup": false,
"photocontest": true,
"attributes": {
"navigation": "1",
"positioning": "1",
"travelgroup": "0",
"tourguide": "0"
},
"additionalAssets": [],
"accommodation": [],
"text": [],
"id": 557595,
"link": "aCTCuf",
"bundleName": "Bodensee Cycling Tour",
"creation": "2026-04-21T15:34:38.000+00:00",
"appEnabled": true,
"appAvailable": false,
"pdfEnabled": false,
"pdfAvailable": false,
"gpxEnabled": true,
"customized": false,
"disabled": false,
"locked": false,
"androidUrl": "https://play.google.com/store/apps/details?id=com.schneidergeo.guibo",
"iosUrl": "https://itunes.apple.com/us/app/guibo/id1375069250?ls=1&mt=8",
"primaryColor": "#f17a32",
"secondaryColor": "#ffffff",
"key": "178ca7a4-f3b8-41c9-8d72-35cd381de407",
"startDatetime": 1776722400000,
"endDatetime": 1778619600000,
"url": "https://trip-tst.guibo.travel/aCTCuf",
"provider": {
"id": "cpdqG3",
"oid": "HID",
"name": "GUIBO Travel",
"logo": "https://storage.googleapis.com/cloud.schneidergeo.com/graphics/logos/tst/cpdqG3_1759243805983.png",
"type": "GUIBO_STA",
"color": "#f17a32",
"app": {
"iosUrl": "https://itunes.apple.com/us/app/guibo/id1375069250?ls=1&mt=8",
"androidUrl": "https://play.google.com/store/apps/details?id=com.schneidergeo.guibo"
}
},
"seller": {
"id": "cpdqG3",
"oid": "HID",
"name": "GUIBO Travel",
"logo": "https://storage.googleapis.com/cloud.schneidergeo.com/graphics/logos/tst/cpdqG3_1759243805983.png",
"type": "GUIBO_STA",
"color": "#f17a32",
"app": {
"iosUrl": "https://itunes.apple.com/us/app/guibo/id1375069250?ls=1&mt=8",
"androidUrl": "https://play.google.com/store/apps/details?id=com.schneidergeo.guibo"
}
}
}
```
**Expected response**
GUIBO expects an HTTP `2xx` response from your endpoint to acknowledge successful receipt.
# Content API
Create and update routes, POIs, text pages, and libraries in GUIBO from external systems — mirror your content data without manual maintenance.
## Content API
The Content API handles **content data** — the reusable building blocks of your travel products: routes, POIs, text pages, libraries, and guidebooks. This data is static and maintained season to season, not per booking.
#### When to use the Content API
You already manage geo data or text content in a third-party system and want to **mirror it into GUIBO libraries** — so you maintain it in one place only, with no copies that drift out of sync.
For the full integration workflow, see [Data Integration](/content-management/integrate-external-content).
#### Endpoints
| Endpoint | Purpose |
| ------------------------------------------------------------------------------------------------------ | -------------------------------------------- |
| [Create library or guidebook](/developers/content-api/content-or-create-library-or-guidebook-1) | Create the containers that hold your content |
| [Create day/stage](/developers/content-api/content-or-create-category) | Add day/stage categories to guidebooks |
| [Create and update POIs](/developers/content-api/content-or-create-and-update-point-of-interests-pois) | Sync hotels, sights, restaurants, services |
| [Create and update routes](/developers/content-api/content-or-create-and-update-routes) | Sync cycling, hiking, or transfer routes |
| [Create text page](/developers/content-api/content-or-create-text-page) | Sync info pages, FAQs, arrival instructions |
#### How it connects
Content created via this API is used in two ways:
1. **Imported into guidebooks** — manually or dynamically (auto-import POIs near routes)
2. **Referenced in releases** — the Releases API adds booking-specific data on top of this content
# Content | How to create Guidebooks per API
**Prerequisites**
We recommend completing these initial setup steps manually in the GUI, as they only need to be performed once:
1. Create a POI Library: Set up at least one library dedicated to POIs. ([manually](/get-started/getting-started#prepare-library) / [API](/developers/content-api/content-or-create-library-or-guidebook#a-create-geodata-library))
2. Create a Route Library: Set up at least one library dedicated to Routes. ([manually](/get-started/getting-started#prepare-library) / [API](/developers/content-api/content-or-create-library-or-guidebook#a-create-geodata-library))
3. Set the Default Accommodation Library: Create a Geodata library, then navigate to Account Settings to set it as your default accommodation library.
4. Set the Default Destination Library: Create a Geodata library, dedicated for destinations only
### Recommended Workflow: Automated Guidebook Creation via API
**Follow this sequence to fully automate your guidebook creation process:**
1. Populate Libraries *(Perform as needed)*
* [Add POIs to your POI library](/developers/content-api/content-or-create-and-update-point-of-interests-pois).
* [Add Routes to your Route library.](/developers/content-api/content-or-create-and-update-routes)
* Add hotels to your accommodation library using the same process as adding POIs.
2. Structure the Guidebook
* [Create the Guidebook.](/developers/content-api/content-or-create-library-or-guidebook-1#a-create-guidebook)
* [Create the Stages within the Guidebook.](/developers/content-api/content-or-create-category)
3. Assemble the Content
* [Add Routes to their respective Stages.](/developers/content-api/content-or-8.-assembling-the-guidebook)
* Add POIs to Stages using one of two methods:
* Option A: [Programmatically add each POI individually](/developers/content-api/content-or-8.-assembling-the-guidebook#a-add-route-or-poi-to-stage).
* Option B: [Link the library directly to the Guidebook](/developers/content-api/content-or-8.-assembling-the-guidebook#b-connect-library-to-guidebook)—GUIBO will automatically match and attach all POIs along the routes.
* [Add Textpages to complete the itinerary.](/developers/content-api/content-or-8.-assembling-the-guidebook#c-add-textpage)
# Content | 1. Library
Libraries are the central hubs where you manage your POIs, Routes, and Textpages. Any asset stored in a library can be reused across multiple guidebooks—allowing you to update content in one place and
### A) Create Geodata Library
Geodata libraries store both Routes and POIs, though we recommend maintaining separate libraries for each. Assigning a `customId` to a library makes it easy to reference during a Release—simply pass this value into the `externalGuidebookId` parameter, as detailed below.
{% content-ref url="/pages/40QPpCsGn5x7cntYyrUM" %}
[Release | Create guidebook release](/developers/releases-api/release-or-create-guidebook-release)
{% endcontent-ref %}
* Replace CCCCC with the Account ID, you can find this under Account Settings > General Settings > Account ID
* You can find the API key under Account Settings > General Settings > API Key
```javascript
curl --location -X POST 'https://services.schneidergeo.com/content/library/geodata' \
--header 'Authorization: xxxxxxx-xxxx-xxxx-xxxx-xxxxxxxxx' \
--header 'Content-Type: application/json' \
--data '{
"account":"CCCCCC",
"customId":"ABCABC",
"names":{
"de":"Transalp mit dem Gravelbike",
"en":"TRANS-ALP ON GRAVEL BIKE"
}
}'
```
#### Headers
| Name | Type | Description |
| ----------------------------------------------- | ------ | ----------- |
| Authorization\* | String | API key |
### B) Create Text Library
Text libraries store Textpages and Weblinks. Assigning a `customId` to a library makes it easy to reference during a Release—simply pass this value into the `externalGuidebookId` parameter, as detailed below.
* Replace CCCCC with the Account ID, you can find this under Account Settings > General Settings > Account ID
* You can find the API key under Account Settings > General Settings > API Key
```javascript
curl --location -X POST 'https://services.schneidergeo.com/content/library/text' \
--header 'Authorization: xxxxxxx-xxxx-xxxx-xxxx-xxxxxxxxx' \
--header 'Content-Type: application/json' \
--data '{
"account":"CCCCCC",
"customId":"ABCABC",
"names":{
"de":"Regioneninfos",
"en":"Regional information"
}
}'
```
### B) Delete Library
* Replace GGGGGG with the Guidebook ID,
* You can find the API key under Account Settings > General Settings > API Key
```javascript
curl --location -X DELETE 'https://services.schneidergeo.com/content/library/GGGGGG' \
--header 'Authorization: xxxxxxx-xxxx-xxxx-xxxx-xxxxxxxxx'
```
#### Headers
| Name | Type | Description |
| ----------------------------------------------- | ------ | ----------- |
| Authorization\* | String | API key |
# Content | 2. Routes
### A) Create route
**Prerequisite**:
Routes must be contained within either a library or a guidebook. This example creates a new route within a library that has the internal ID `"MY_ROUTES_LIB"`. To create the route in a guidebook instead, replace the `"library"` object with a `"guidebook"` object.
* Replace CCCCCC with your Account-ID, you can find this under Account Settings > General Settings > Account ID
* Replace MY\_ROUTES\_LIB with the Custom ID you have set for the
* Replace xxxxxx-xxxxxx-xxxxxx-xxxxxx with the API key, you can find this under Account Settings > General Settings > API Key
```json
curl --location --request POST 'https://services.schneidergeo.com/content/geodata/route'
--header 'Authorization: xxxxxx-xxxxxx-xxxxxx-xxxxxx' \
--header 'Content-Type: text/plain;charset=UTF-8' \
--data-raw '{
"account":"CCCCCC",
"library": {
"customId":"MY_ROUTES_LIB"
},
"customId":"CYCLE_23143534",
"remark":"This is a test route",
"names": {
"en": "Testroute in Arnhem",
"de": ""
},
"descriptions": {
"en": "",
"de": ""
},
"color": "1c21e1",
"icon": {
"name": "hiking"
},
"attributes": {
//Obligatory. Overwrite calculated values from GUIBO
"altitudeUp":"210", //value in meters
"altitudeDown":"300", //value in meters
"routeDistance":"12.5",//value in kilometers
"time":"2.5" // value in hours
},
"waypoints": [
{
"lat": 51.96252,
"lon": 5.88772,
"ele": 13
},
{
"lat": 51.96253,
"lon": 5.88772,
"ele": 13
},
{
"lat": 51.9628,
"lon": 5.88796,
"ele": 13
},
{
"lat": 51.96359,
"lon": 5.88833,
"ele": 14
},
{
"lat": 51.96438,
"lon": 5.88871,
"ele": 11
},
{
"lat": 51.96495,
"lon": 5.88885,
"ele": 9
},
{
"lat": 51.96552,
"lon": 5.889,
"ele": 9
}
]
}'
```
### Supported Icon Names for routes:
* Motorbike
* Sledding
* Ski touring
* Hiking
* Cycling
* Ferry route
* Bus tour
* Canoeing
* Mountaineering
* Snowshoeing
* Cross-country skiing
* Running
* Driving
* Transfer
* Walking
* Segment
* E-bike
* Nordic walking
* Mountain biking
### B) Update route
This example updates the route with internal ID "rrrrrr" .
* Replace rrrrrr with the ID, you can find it in the Edit Route > Metadata section.
* Replace xxxxxx-xxxxxx-xxxxxx-xxxxxx with the API key, you can find this in Account Settings > General Settings > API Key
```json
curl --location --request PUT 'https://services.schneidergeo.com/content/geodata/route/rrrrrr' \
--header 'Authorization: xxxxxx-xxxxxx-xxxxxx-xxxxxx' \
--header 'Content-Type: text/plain;charset=UTF-8' \
--data-raw '{
"account":"DpRPNF",
"library": {
"customId":"RWR_ROUTES"
},
"customId": "CYCLE_23143534",
"remark":"This is a test route",
"names": {
"en": "Testroute in Arnhem",
"de": ""
},
"descriptions": {
"en": "",
"de": ""
},
"color": "1c21e1",
"icon": {
"name": "hiking"
},
"waypoints": [
{
"lat": 51.96252,
"lon": 5.88772,
"ele": 13
},
{
"lat": 51.96253,
"lon": 5.88772,
"ele": 13
},
{
"lat": 51.9628,
"lon": 5.88796,
"ele": 13
},
{
"lat": 51.96359,
"lon": 5.88833,
"ele": 14
},
{
"lat": 51.96438,
"lon": 5.88871,
"ele": 11
},
{
"lat": 51.96495,
"lon": 5.88885,
"ele": 9
},
{
"lat": 51.96552,
"lon": 5.889,
"ele": 9
}
]
}'
```
### C) Update Custom ID
To set or update the customID you need the GUIBO ID of the POI.
This example updates the route with GUIBO ID "rrrrrr" .
* Replace rrrrrr with the ID, you can find it in the Edit Route > Metadata section.
* Replace xxxxxx-xxxxxx-xxxxxx-xxxxxx with the API key, you can find this in Account Settings > General Settings > API Key
```json
curl --location --request PATCH 'https://services.schneidergeo.com/content/geodata/rrrrrr/externalid' \
--header 'Authorization: xxxxxx-xxxxxx-xxxxxx-xxxxxx' \
--header 'Content-Type: application/json' \
--data-raw '
{"value":"ROUTEX242"}
'
```
To update other properties of POIs, please have a look at page
{% content-ref url="/pages/g25A808EZoNY0pniumwG" %}
[Content | 4. Geodata properties](/developers/content-api/content-or-4.-geodata-properties)
{% endcontent-ref %}
# Content | 3. Point-Of-Interests (POIs)
Hotels and other POIs can be imported into GUIBO automatically via API. A common use case is syncing hotels from a booking system to automatically attach booked accommodations to a guest's guidebook.
{% hint style="info" %}
Hotels are one kind of POIs in GUIBO. They can be created manually in GUIBO, also with the help of Google search and automatic import of data from Google.
{% endhint %}
### 1) Create POI
Prerequisite: You have created a library into which the hotels are to be imported. You have given the library a unique ID. In the following example it is the ID "HOTELS".

* Replace CCCCCC with the customer ID, you can find this under Account Settings > General Settings > Account ID
* Replace xxxxxx-xxxxxx-xxxxxx-xxxxxx with the API key, you can find this under Account Settings > General Settings > API Key
* HTL21344 is an exemplaric custom ID of this hotel. With this ID it is easier to update the hotel via the interface.
```json
curl --location --request POST 'https://services.schneidergeo.com/content/geodata/poi' \
--header 'Content-Type: application/json' \
--header 'Authorization: xxxxxx-xxxxxx-xxxxxx-xxxxxx' \
--data-raw '
{
"account":"CCCCCC",
"library":{
"customId":"MY_HOTELS_LIB"
},
"customId":"HTL21344",
"names": {
"de": "Alpenhotel Kronprinz",
"en": "Alpenhotel Kronprinz"
},
"descriptions": {
"de": "Unser Partnerhotel in Berchtesgaden",
"en": "Our partner hotel in Berchtesgaden"
},
"lat": 47.62893,
"lng": 12.99443,
"icon": "hotel",
"category": {
"names": {
"de": "Unterkunft",
"en": "Accomodation"
}
},
"attributes": {
"phone": "+49 8652 6070",
"web": "https://www.alpenhotel-kronprinz.de/"
},
"tags": [
{
"names": {
"de": "Unterkunft",
"en": "Accomodation"
}
}
]
}
'
```
#### Supported Icon Names for POIS:
attention\
fork\
hut\
info\
location\_large\
parking\
town\
water\
ballsports\
cablecar\_sports\
climbing\
crosscountryskiing\
cycling\
diving\_snorkeling\
fishing\
golfing\
hiking\
horseriding\
kitesurfing\
mountainbiking\
rowboat\
sailing\
skiing\
surfing\
swimming\
windsurfing\
festival\
movie\
museum\
music\
theater\
beach\
swimming\_indoor\
swimming\_outdoor\
apartment\
bed\_breakfast\
hotel\
doctor\
hospital\
pharmacy\
police\
cablecar\_poi\
castle\
church\
generic\
lake\
panoramicview\
peak\
ruins\
sight\
star\
tosee\
tourist\_info\
waterfall\
zoo\
text\
destination\
interimstep\
stagetown\
bar\
coffee\
deli\
distillery\_winery\
icecream\
pub\
restaurant\
conveniencestore\
mall\
supermarket\
airport\
bikerental\
busstop\
cablecar\_trans\
camping\
car\
carrental\
ferry\
parking\
parkinggarage\
taxi\
trainstation\
vespa
### B) Update POI
The update operation uses the same object as the create operation. Just some attributes are ignored and you can leave away:
* Change of category is ignored. Please use the apropriate endpoint
* Change of tags is ignored. Please use the apropriate endpoint
* Change of customId is ignored.
```json
curl --location --request PUT 'https://services.schneidergeo.com/content/geodata/poi' \
--header 'Authorization: xxxxxx-xxxxxx-xxxxxx-xxxxxx' \
--header 'Content-Type: application/json' \
--data-raw '
{
"account":"CCCCCC",
"library":{
"customId":"MY_HOTELS_LIB"
},
"customId":"HTL21344",
"names": {
"de": "Hotel Post",
"en": "Hotel Post"
},
"descriptions": {
"de": "Unser Partnerhotel in Salzburg",
"en": "Our partner hotel in Salzburg"
},
"lat": 47.9455079,
"lng": 12.9364846,
"icon": "hotel",
"attributes": {
"phone": "+43 6272 4422",
"web": "https://hotelpost.at"
}
}
'
```
To update other properties of POIs, please have a look at page
{% content-ref url="/pages/g25A808EZoNY0pniumwG" %}
[Content | 4. Geodata properties](/developers/content-api/content-or-4.-geodata-properties)
{% endcontent-ref %}
# Content | 4. Geodata properties
Updating properties for Routes and POIs
The following properties are identical for Routes and POIs
### A) Update Custom ID
To set or update the customID you need the GUIBO ID of the Asset.
This example updates the POI with GUIBO ID "pppppp" .
* Replace pppppp with the ID, you can find it in the Edit Route/Edit POI > Metadata section.
* Replace xxxxxx-xxxxxx-xxxxxx-xxxxxx with the API key, you can find this in Account Settings > General Settings > API Key
```json
curl --location --request PATCH 'https://services.schneidergeo.com/content/geodata/pppppp/customid' \
--header 'Authorization: xxxxxx-xxxxxx-xxxxxx-xxxxxx' \
--header 'Content-Type: application/json' \
--data-raw '
{"value":"PALI242"}
'
```
### B) Updating Tags
To add or remove a tag you need the GUIBO ID of the Asset and the ID of the tag.
This example updates the POI with GUIBO ID "pppppp" .
* Replace pppppp with the ID, you can find it in the Edit Route/Edit POI > Metadata section.
* Replace aaaaaa with the Account ID
* Replace tttttt with the ID of the tag
* Replace xxxxxx-xxxxxx-xxxxxx-xxxxxx with the API key, you can find this in Account Settings > General Settings > API Key
**List Tags**
```json
curl --location 'https://services.schneidergeo.com/content/account/aaaaaa/tags' \
--header 'Authorization: xxxxxx-xxxxxx-xxxxxx-xxxxxx'
```
**Create Tag**
```json
curl --location --request POST 'https://services.schneidergeo.com/content/tag/aaaaaa' \
--header 'Content-Type: application/json' \
--header 'Authorization: xxxxxx-xxxxxx-xxxxxx-xxxxxx' \
--data-raw '
{"names":{"de":"Historisches","en":"Historic"},"sorting":0}
'
```
**Add Tag to Geoasset**
```json
curl --location --request PATCH 'https://services.schneidergeo.com/content/geodata/pppppp/tag' \
--header 'Authorization: xxxxxx-xxxxxx-xxxxxx-xxxxxx' \
--header 'Content-Type: application/json' \
--data-raw '
{"value":"tttttt"}
'
```
**Remove Tag from Geoasset**
```json
curl --location --request DELETE 'https://services.schneidergeo.com/content/geodata/pppppp/tag/tttttt' \
--header 'Authorization: xxxxxx-xxxxxx-xxxxxx-xxxxxx' \
--header 'Content-Type: application/json'
```
### C) Move asset to new category
To move Route or POI to a different category/stage you need the GUIBO ID of the Asset
This example moves the POI with GUIBO ID "pppppp" to the category with GUIBO ID "cccccc"
* Replace pppppp with the ID, you can find it in the Edit Route/Edit POI > Metadata section.
* Replace cccccc with the ID of the category
* Replace xxxxxx-xxxxxx-xxxxxx-xxxxxx with the API key, you can find this in Account Settings > General Settings > API Key
```
curl --location --request PATCH 'https://services.schneidergeo.com/content/geodata/asset/pppppp/category/cccccc' \
--header 'Authorization: xxxxxx-xxxxxx-xxxxxx-xxxxxx' \
--header 'Content-Type: application/json'
```
# Content | 5. Text page
There are three ways to create a textpage:
**a)** With the GUIBO Bundle Link inside the request body and optionally the GUIBO Category ID inside the request body. Depending on wheather the textpage should be at the root level of a guidebook (provide bundle link only) or inside a category (provide bundle link and category id).
If you do not have the GUIBO Bundle Link of the guidebook or library, you can use your customId if you set it.
**b1)** With your custom ID of the bundle (=guidebook or library) as request parameter, together with the account ID . You can then leave the bundle ID and the category ID in the request body empty. This places the textpage at the root level of the guidebook.
**b2)** With your custom ID of the category plus the custom ID of the bundle, together with the account ID.You can then leave the bundle ID and the category ID in the request body empty. This places the textpage inside the category.
* You can find the Account ID under Account Settings > General Settings > Account ID
* You can find the API key under Account Settings > General Settings > API Key
```json
curl --location 'https://services-tst.schneidergeo.com/content/text' \
--header 'Authorization: xxxx-xxxxxxxx-xxxxx-xxxxxxxx' \
--header 'Content-Type: application/json' \
--data '{
"account": "CCCCCC",
"library": {
"customId": "MY_TEXT_LIB"
},
"customId":"TEXT_564",
"titles": {
"de": "Fragen & Antworten",
"en": "Frequently asked questions"
},
"descriptions": {
"de": "
Antworten auf die häufigsten Fragen
Was ist eine pauschale Radreise? Was mache ich, wenn es den ganzen Tag regnet? Und wie geht es nach der Online-Buchung weiter?",
"en": "
Answers to frequently asked questions
What is a flat-rate cycling tour? What do I do if it rains all day? And what happens after I book online?"
},
"appEnabled": true,
"pdfEnabled": true
}'
```
#### Query Parameters
| Name | Type | Description |
| ---------------- | ------ | ------------------------------------------- |
| account | String | Your account ID |
| library.customId | String | The custom ID which you set for the library |
| customId | String | The custom ID for this textpage |
#### Headers
| Name | Type | Description |
| ----------------------------------------------- | ------ | ----------- |
| Authorization\* | String | API key |
# Content | 6. Guidebook
Guidebooks contain the complete itinerary for your travel products, giving travelers everything they need to know throughout their journey.
### A) Create Guidebook
Create a guidebook with a customID helps to reference it when creating a Release. The attribute "customId" can be referenced by the parameter "externalGuidebookId" as explained in this article:
{% content-ref url="/pages/40QPpCsGn5x7cntYyrUM" %}
[Release | Create guidebook release](/developers/releases-api/release-or-create-guidebook-release)
{% endcontent-ref %}
* Replace CCCCC with the Account ID, you can find this under Account Settings > General Settings > Account ID
* You can find the API key under Account Settings > General Settings > API Key
```javascript
curl --location -X POST 'https://services.schneidergeo.com/content/guidebook' \
--header 'Authorization: xxxxxxx-xxxx-xxxx-xxxx-xxxxxxxxx' \
--header 'Content-Type: application/json' \
--data '{
"account":"CCCCCC",
"customId":"ABCABC",
"names":{
"de":"Transalp mit dem Gravelbike",
"en":"TRANS-ALP ON GRAVEL BIKE"
}
}'
```
#### Headers
| Name | Type | Description |
| ----------------------------------------------- | ------ | ----------- |
| Authorization\* | String | API key |
### B) Delete Guidebook
* Replace GGGGGG with the Guidebook ID,
* You can find the API key under Account Settings > General Settings > API Key
```javascript
curl --location -X DELETE 'https://services.schneidergeo.com/content/guidebook/GGGGGG' \
--header 'Authorization: xxxxxxx-xxxx-xxxx-xxxx-xxxxxxxxx'
```
#### Headers
| Name | Type | Description |
| ----------------------------------------------- | ------ | ----------- |
| Authorization\* | String | API key |
# Content | 7. Stage
Stages form the top-level structure of your guidebooks. Set up a stage for the arrival day as well as each distinct segment or day of the trip.
There are two ways to create a stage and assign it to a guidebook. A stage can only exist inside a guidebook.
Assign to guidebook with
**a)** The GUIBO Guidebook Link inside the request body in attribute "bundle" or
**b)** The custom ID of the guidebook as request parameter, together with the account ID . You can then leave the guidebook ID in the request body empty.
* You can find the Account ID under Account Settings > General Settings > Account ID
* You can find the API key under Account Settings > General Settings > API Key
## Body
```json
curl --location -X POST 'https://services.schneidergeo.com/content/category' \
--header 'Authorization: xxxx-xxxxxx-xxxxx-xxxxxx' \
--header 'Content-Type: application/json' \
--data '{
"bundle":"XUwfwA",
"names": {
"de":"Day 14",
"en":"Day 14"
},
"sorting":2
}'
```
#### Query Parameters
| Name | Type | Description |
| -------------- | ------ | ----------- |
| bundleCustomId | String | |
#### Headers
| Name | Type | Description |
| ----------------------------------------------- | ------ | ----------- |
| Authorization\* | String | API key |
# Content | 8. Assembling the guidebook
After setting up the guidebook stages, add your library assets—including routes, POIs, and textpages—to complete the itinerary.
#### **A) Add Route or POI to Stage**
Replace GGGGGG with the guidebook ID
Replace CCCCCC with the category ID where the asset should be placed
You can use either the GUIBO ID (link) to identify the geoasset or the external ID
```bash
curl --location 'https://services.schneidergeo.com/content/guidebook/GGGGGG/import/manual/geoasset' \
--header 'Authorization: xxxx-xxxxx-xxxxx-xxxx' \
--header 'Content-Type: application/json' \
--data '{links: ["3QT3sM"], category: "CCCCCC"}'
curl --location 'https://services.schneidergeo.com/content/guidebook/GGGGGG/import/manual/geoasset' \
--header 'Authorization: xxxx-xxxxx-xxxxx-xxxx' \
--header 'Content-Type: application/json' \
--data '{customIDs: ["ROUTE_1","ROUTE_2"], category: "CCCCCC"}'
```
#### B) Connect library to guidebook
Once a library is linked to a guidebook, GUIBO automatically identifies all POIs located along the guidebook’s routes and assigns them to the appropriate stages.
Any subsequent changes to your routes or POIs—including additions, updates, or deletions—will automatically trigger a real-time sync to update the guidebook's POI selection.
To create a connection, you currently need the internal IDs of guidebook and library
Replace GGGGGG with the guidebook ID
Replace LLLLLL with the library ID
```shellscript
curl --url 'https://services.schneidergeo.com/content/guidebook/GGGGGG/connect/library/LLLLLL' \
--header 'Content-Type: application/json' \
--header 'Authorization: xxxx-xxxxx-xxxxx-xxxx' \
```
#### **C) Add Textpage**
Replace GGGGGG with the guidebook ID
Replace CCCCCC with the category ID where the asset should be placed
You can use either the GUIBO ID (link) to identify the geoasset or the external ID
You can set a category ID to place it in a stage, otherwise it will be placed in "Good To know"
```shellscript
curl --location 'https://services.schneidergeo.com/content/guidebook/GGGGGG/import/manual/text' \
--header 'Authorization: xxxx-xxxxx-xxxxx-xxxx' \
--header 'Content-Type: application/json' \
--data '{links: ["3QT3sM"], category: "CCCCCC"}'
curl --location 'https://services.schneidergeo.com/content/guidebook/GGGGGG/import/manual/text' \
--header 'Authorization: xxxx-xxxxx-xxxxx-xxxx' \
--header 'Content-Type: application/json' \
--data '{customIDs: ["TXT_1","TXT2"], category: "CCCCCC"}'
```
# Users & groups
### User Management
This video focuses on user management, providing you with insights into adding team members and granting them various permissions to collaborate effectively on your product.
\#team #member #account #user #management #rights #product #admin #publisher #viewer #adduser
{% embed url="" %}
### Group Management
Gain comprehensive knowledge regarding group management, including the creation of groups, the addition of members, and the valuable utility they offer.
\#groupmanagement #team #addmember #accountsettings #usermanagment #guidebook #libary #admin #groupname #permission
{% embed url="\_\_" %}
# Data backup
GUIBO can export all data of your account to a Google Cloud Storage bucket on a weekly basis.
### Storage Legacy Bucket OwnerBacking up to Google Cloud Storage
* [Create a Google Cloud storage bucket](https://cloud.google.com/storage/docs/creating-buckets) :
Make sure to select the **Fine-grained** access control method when creating the bucket.
* [Grant full access permissions](https://cloud.google.com/storage/docs/access-control/using-iam-permissions) to Guibo by adding `guibo-export@schneidergeo-platform.iam.gserviceaccount.com` as a member with the **Storage Object Admin** role and **Storage Legacy Bucket Owner.**

* In your GUIBO account settings, go to the Backup tab. Enter the name of your Google Cloud bucket in the **Google Cloud Storage Bucket** field and click **Save**.

# Which image types does GUIBO support?
### **File format**
GUIBO supports these file formats for images:
1\) PNG files\
2\) JPEG files
### Resolution
The maximum file size is 5MB. The images are then reduced to a maximum resolution of 2000 pixels in width or height.
For use in the app, they are reduced again to a maximum resolution in width of 500 pixels. In the PDF, the full resolution is used.
# How can I test my guidebooks on the smarthone?
This article explains how GUIBO users can download and test guidebooks and releases.
## **Set up your device as a test device**
To register your device as a test device, you need to enter your [device ID](https://docs.guibo.travel/faq/where-to-find-my-device-id) in the account settings. Follow these steps:
1. In the Backend navigation on the left hand side, click on the icon **App → Select the Tab Configuration**
2. Click on **"Add test device"** and enter your name and [device ID](https://docs.guibo.travel/faq/where-to-find-my-device-id)
When you download a guidebook using a test release code (starting with 77), **all features** of the **guidebook** will be visible – including, for example, the option to share the GPX file.
If you want to test a **traveler release** with its customized features, you can download the guidebook using the customer release code on a test device. This download will not count toward the maximum number of devices and will not be charged.\
\
Please note:
* This works only with test device from operator account, not seller account.
* A download outside of start and end date is possible.
* Test devices and their downloads are visible in the release dashboard.
* Test devices are marked accordingly in the device list of a release. The device name is also displayed as configured in the account settings.
# Where to find my Device ID
You can find your device ID by following these steps:
1. Go to your release dashboard
2. Create a new release with the code **9991**
3. Download the guidebook on your test device
4. Go back to the release dashboard, search for release **9991**, and open it
5. Navigate to **"Devices"**
6. Here you will find your device ID
# Support System: How do I create an "App Issue"
Creating a ticket in the support system for issued regarding the smartphone app
*Please select your terminal device to use the app.*

*Now we need your "Device operating system version" i.e. your device info e.g. iOS 15.3.1 ', which should be entered into the free field as follows 1531*
* *You can find this information in the app under the library view "Technical help".*

*We also need your "Download Code" also called Trip ID. You can find this under "Technical Help" in the library view. ou are also welcome to attach a screenshot to the error here.*
# Support System: How to create a ticket?
When you are facing an unexpected behaviour in GUIBO or the GUIBO App, the best way to notify us is by creating a ticket in the support system.
Open the page[ https://schneidergeo.atlassian.net/servicedesk](https://schneidergeo.atlassian.net/servicedesk)
1. **Select your issue type**\
Select whether the error is in the "GUIBO ISSUE" system or on your "APP ISSUE" app.
2. **Send your documetation via text or video**\
Now add all relevant information. This can be done via text description or video-screenrecording.
1. **Text:** Please make sure that you describe the problem as precisely as possible. This means a step-by-step explanation of the previous steps until the problem occurs.
2. **Screenrecording:** \
In the ticket form, you will find the "click here" screen recording button at the bottom of the screen, above the "send" button. Click on it to start the screen recording. Select the GUIBO tab for the recording and demonstrate the problem behavior.
"click here"-Button for screenrecording
3. **Send us all required information**\
Make sure you have filled out all the form fields. If information is missing, we cannot process your request.
4. **Attach screenshots**\
For illustration you have the option to insert a picture (screenshot) here. Info: You must have created this before creating the ticket.

# Support System: How do I assign the correct priority to a ticket?
Here you'll find a prioritization guide. This will help you to determine the correct priority for your request.
To ensure you receive the best possible support and to guarantee that your issues are handled efficiently, we kindly ask you to consider our priority system when submitting support tickets. This system helps us to respond to problems in a manner that best matches their urgency and impact on your business. Below, you will find an explanation of the different priority levels and examples to help you select the appropriate priority for your ticket.
### Priority Levels
#### Highest: Critical Bugs Without Workaround
* **Description**: This concerns errors in GUIBO that affect critical functions and for which there is **no possible workaround.** These types of issues can have a significant impact on your business operations.
* **Example**: An error that prevents the completion of releases for your bookings. This blocks the deployment of travel documents to your guests.
#### High: Bugs with Complicated Workaround
* **Description**: This category includes serious errors for which a **workaround exists, but it is time or resource-intensive.** Such problems may affect important functions, but temporary solutions are available to use the functions nonetheless.
* **Example**: An error that makes the use of a core function difficult, but can be bypassed by performing several additional steps. For example, when updating an existing release via API, the content to be updated is not adjusted. Here, you would be able to perform an update via our user interface as a workaround until the error is corrected.
#### Medium: Bugs with Feasible Workaround
* **Description**: In this category, you will find errors that cause inconvenience but can be resolved through a **workaround, the effort of which is similar to or the same as the original procedure.**
* **Example**: An error that affects a specific function but can be easily bypassed by using an alternative method that is similarly effective. For example, you cannot create releases via our UI. Importing your bookings via our API works seamlessly, and you are able to use the API. The workaround does not require additional time effort.
#### Low: Typos and Minor Flaws
* **Description**: This includes minor issues such as typos or small inconsistencies that do not impact functionality or the overall user experience.
* **Example**: A typo in a notification or help documentation.
#### Lowest: Cosmetic Errors Without Functional Loss
* **Description**: This level applies to cosmetic errors that do not affect the functionality of our software. Such errors do not directly impact business operations.
* **Example**: A layout issue that does not affect the readability of the text.
### How to Choose the Right Priority
When selecting the priority for your ticket, we ask you to consider the descriptions above. Appropriate prioritization helps us to quickly identify urgent concerns and respond accordingly, while less critical problems are addressed in a suitable order.
We understand that all issues are important to you, and we assure you that every ticket is treated with the utmost care and attention. Your cooperation in proper prioritization helps us to optimize the support process for all our customers.
If you have any further questions or uncertainties regarding the prioritization of tickets, please do not hesitate to contact our support.
We thank you for your support and understanding.
# Support System: How to make a screenshot?
Screenshots are helpful for our developers to understand the issue and make it easier for you to describe the symptoms of your issue. This helps us to resolve your issue faster.
1. Press the \[Windows] and \[Print] keys on your keyboard.
2. In your Pictures folder you will find a folder called Screenshots. The screenshot is stored here.
3. For older operating systems the following key combinations work:
* Windows 7: STRG + DRUCK *Windows 7: CTRL + PRINT*
* Windows 8: STRG + DRUCK / WINDOWS + DRUCK *Windows 8: CTRL + PRINT / WINDOWS + PRINT*
* Windows 10: WINDOWS + DRUCK *Windows 10: WINDOWS + PRINT*
4. Alternatively, you can also take a screenshot using the pre-installed "Snipping Tool", but here you also have the option of selecting only a specific area.\*
5. You can enter the program in the search bar at the bottom left or search for it in the Start menu under "All Programs" and in the "Accessories" folder (WINDOWS 7).
6. The key combination for newer operating systems to open the program are as follows:
* Windows 10: WINDOWS + S
* Windows 8: WINDOWS + Q
For a detailed description of how to use Snipping tool, see: How to create a screenshot with Snipping Tool.\
\
\* Application "Snipping Tool"
1. Open the "Snipping Tool" program either via the search bar at the bottom left of the desktop or via a keyboard shortcut:
* Windows 10: WINDOWS + S
* Windows 8: WINDOWS + Q
The following window opens:

2\. Now press the "New" icon and select the area you want to cut.
3\. In the toolbar you can now choose whether you prefer to save the image or copy it directly and paste it into your email / ticket, etc.

# How are the towns on guidebook overview maps selected?
Overview maps are included in the guidebook booklets and can be used in websites and printed material.
A short description of the algorithm that chooses the localities which are printed on the overview maps.

1. Find all cities/towns/villages which are not more than 2.5 km away from any route in guidebook
2. Reduce amount of cities/towns/villages per route to not compromise the clarity of the map. Reduce to
\- maximum of 3 per route for walking routes
\- maximum of 4 per route for cycling routes
\- maximum of 5 per route for dirving routes.
Select by highest population
# Navigation Issues
An overview of possible issues during your route navigation and how you can fix them.
If your app stops to function during route navigation, it's typically due to incorrect settings on your phone. Here are steps to take if navigation is not working for you:
### 1. Check your app permissions
* ✅ **Location permission**\
Location Permission must be set to **Always**. If prompted, first select **Allow while using app**, then change to **Always** in the app settings. If you decline the location permission, navigation will not work.
* ✅ **Notification permission**\
Navigation Permission must be **ON** to get notified about navigation turns when your screen is off. If you decline the notification permission, you will not receive any updates during navigation.
* ✅ **Motion & Fitness permisson**\
Motion & Fitness permission is recommended to be **ON**. It allows for a smoother navigation experience.
The easiest way to verify that your app permissions are correct is to click on **Technical Support** in the app and there on the button **Check technical settings**. It should look like this:
Correct technical settings
### 2. Check your phone’s sound volume
Is your sound volume on and loud enough? If you mute the sound on your phone, you will not hear voice navigation and turn notifications.
iPhone:
* Set **Ringtone and Alert volume** to **MAX**. You’ll find it under Settings → Sounds & Haptics.
* Make sure that the **silent switch** on the left side of the device (above the volume buttons) is **OFF**.
Android:
* **Volume for Notifications** must be **MAX**. And **volume for Media** (Music, Videos, Games) must be **MAX**. You’ll find it under Settings → Sounds & Vibration → Volume.
### 3. Check your phone’s GPS access
iPhone:
* **Location services** must be **ON**. You’ll find it under Settings → Privacy & Security → Location Services.
Android:
* **Location** must be **ON**. You’ll find it under Settings → Location.
### 4. Check your phone’s power settings
iPhone:
* **Low Power Mode** must be **OFF**. You’ll find it under Settings → Battery.
Android:
* **Power Saving Mode** must be **OFF.** You’ll find it under Settings → Battery.
### 5. Don't carry your phone in a bag or pocket
If you are on a bicycle tour, please use a smartphone holder on the handlebars and always leave your screen on. Do not store the phone in a bag or pocket while driving. If you are hiking and the phone in the pocket of your jacket, open the app regularly.
# What are the smartphone requirements for the Tour Guide App?
Minimum smartphone requirements for using the GUIBO Tour Guide App.
## Why older smartphones and operating systems are no longer supported
At GUIBO, we aim to offer your travelers a modern, reliable, and secure app experience – including digital travel documents, navigation, offline content, and live updates.
To continuously improve these features, we depend on up-to-date technology. Older smartphones and outdated operating systems often lack the compatibility needed to support modern app frameworks. While basic navigation may still work on these devices, many newer app features rely on system capabilities that are no longer available or supported.
Another important factor is security: Apple and Google no longer provide security updates for many older operating system versions. This makes it impossible for us to guarantee a safe and functional experience on these devices.
### Minimum requirements:
* **iOS:** The app requires at least iOS 16.
* **Android:** Due to the wide variety of Android devices and manufacturer-specific changes, we cannot define a precise minimum Android version. As a guideline, you can refer to the Android versions currently supported by Google:\
👉
\
To help you communicate this clearly to travelers, we’ve prepared a simple explanation below that you can share directly.
## Worldwide Android and iOS (Apple) version distribution
| Android (April 2025) | Apple iOS (April 2025) |
| -------------------------------------------------------------------------------------------------------------------------------------------------------------------------------- | ----------------------------------------------------------------------------------------------------------------------------------------------------------------- |
|
Android 15: 10,01 %
Android 14: 33,49 %
Android 13: 16,94 %
Android 12: 12,11 %
Android 11: 10,42 %
Android 10: 5,57 %
|
iOS 18.3: 53,61 %
iOS 18.4: 11,69 %
iOS 17.6: 4,66 %
iOS 18.1: 4,17 %
iOS 16.7: 3,25 %
iOS 15.8: 2,64 %
|
| Source: [Statcounter Global Stats](https://gs.statcounter.com/android-version-market-share) | Source: [Statcounter Global Stats](https://gs.statcounter.com/ios-version-market-share/) |
## Communication template for your travelers
See our [First Level Support Guide (click)](/publishing/tour-guide-app/first-level-support-guide) for a ready to use communication template you can use for your travelers.
## Note for Huawei Devices:
The GUIBO Tour Guide App requires Android 11 or higher. Many Huawei devices (especially older models like the P30 series) are capped at Android 10, making them incompatible. Whether a Huawei device works depends on its Android version — if it runs Android 11+ and has access to the Google Play Store, the app should work. Huawei devices that use only AppGallery (without Google Play) cannot access the app.
# New Knowledge Pipeline
### Submitted: 2026-01-08 22:30:06 | By: Support User
## How to Hide a Route in TourMaps
**Question/Problem:** How to hide a route in TourMaps?
**Answer/Solution:**
1. Go to your guidebook
2. Select the TourMaps channel at the top
3. Right-click on the route you want to hide
4. Select "Hide" from the context menu
**Additional Context:** This is the correct method for hiding routes in TourMaps, accessed directly through the guidebook interface.
**Keywords:** TourMaps, hide route, guidebook, right-click, context menu
***
### Submitted: 2026-01-08 23:36:38 | By: Support User
## App White Screen Issue - Smartphone Restart and Reinstall Solution
**Question/Problem:** How to fix white screen issue when opening the app?
**Answer/Solution:**
1. First, restart the smartphone. This simple troubleshooting step often resolves the app white screen problem.
2. If restarting the smartphone does not help, re-install the app.
**Source:** USER
**Keywords:** white screen, app crash, restart phone, smartphone restart, reinstall app, troubleshooting, mobile app fix
***
### Submitted: 2026-01-09 10:23:10 | By: Support User
## Map Sheet Generation for PDF Hangs
**Question/Problem:** What should I do when map sheet generation for PDF hangs or gets stuck?
**Answer/Solution:** Map sheet generation for PDF can take up to 15 minutes to complete. If the generation is not finished after this time, restart the process by clicking the small reload icon.
**Source:** USER
**Keywords:** map sheet generation, PDF hangs, 15 minutes, reload icon, restart generation
***
### Submitted: 2026-01-13 09:54:12 | By: Support User
## Setting Destination Points - Current Best Practice
**Question/Problem:** How to set destination points in guidebooks using current best practices?
**Answer/Solution:** The current best practice for setting destination points is:
1. **Create a dedicated destination library** to maintain unique destination points across all guidebooks
2. **Open your guidebook** and click "Edit Content" to access the content builder
3. **Use the map icon** to view all existing destination points from your libraries
4. **Import existing destination points** by clicking on the relevant map icon
5. **To create new destination points:**
* Click on the respective stage on the left
* Click "Add Item" → "Add Markers"
* Set the destination point on the map
* Save it in your destination library
This approach ensures you maintain unique destination points across all guidebooks and can reuse them efficiently when importing to different guidebooks.
**Source:** USER
**Keywords:** destination points, guidebook, content builder, destination library, map icon, add markers, stage, best practice
***
### Submitted: 2026-01-14 07:56:44 | By: Support User
## Transfers: Controlling visibility of Transfers and metrics in the different channels
**Question/Problem:** How can you control the visibility of transfers and their metrics (distance, elevation, duration) across different channels?
**Answer/Solution:** The metrics of a transfer are displayed in the content builder and the visibility can be configured by channel. Here are the current configurations:
**Channel 1: App:** Transfers are not displayed in the App, hence, no elevation and distances are shown
**Channel 2: PDF:** Transfers are not displayed in the PDF, hence, no elevation and distances are shown
**Channel 3: TourMaps:** Elevation and Distance visibility can be configured in: Account > Account Settings > Web Settings > Route Hover Metrics Configuration
Here you can select your route type and configure the visibility of Distance, Duration, Elevation gain and Elevation loss
**Source:** USER
**Keywords:** transfers visibility metrics channels app pdf tourmaps route hover metrics configuration account settings web settings distance elevation duration
***
### Submitted: 2026-01-21 08:14:48 | By: Support User
## Hotel Assignment to Destination Points and Map Display
**Question/Problem:** How is Guibo assigning hotels on navigation maps and stages?
**Answer/Solution:** Hotels are always assigned to the stage containing the Destination Point with the smallest distance to the hotel. There are actually no distance markers or limits that prevent hotels from being displayed. The assignment is purely based on proximity to the nearest Destination Point, regardless of actual distance. Additionally, the hotel is displayed at the start of the following day. That means each stage/day includes a hotel at the start and at the end of a respective day.
**Source:** USER
**Keywords:** hotel assignment, destination point, map display, route, stage mapping, distance, hotel visibility, no distance limit, Guibo, navigation maps, stages
***
### Submitted: 2026-01-27 16:11:37 | By: Support User
## How to change the route colour
**Question/Problem:** How can I customize the colors of routes, including both the regular display color and hover color?
**Answer/Solution:** Default route colours can be customised at account level.
Steps:
1. Go to Account
2. Open General Settings
3. Navigate to Colours
4. Set your preferred colour under Colours for TourMaps
Important: The colour shown when hovering over a route is system-defined and cannot be customised.
**Source:** USER / JIRA ticket CIR-8677
**Keywords:** route color, route colour, TourMaps, account settings, colors, hover color, customization, general settings
***
### Submitted: 2026-02-02 12:00:44 | By: Support User
## Guidebook Deletion and Restoration
**Question/Problem:** How can I delete a guidebook and can I restore a deleted guidebook?
**Answer/Solution:** You can delete a guidebook using the **Delete** button in the guidebook settings.
When you click the button, you will be asked to confirm: **"Are you sure you want to delete '(Guidebook Name)'? This action cannot be undone."**
Please note:
* A deleted **guidebook cannot be restored**.
* Individual assets such as **POIs, routes, and texts** are moved to the **Trash Bin** and may be restored from there.
* If a guidebook is deleted, you can create a new one and **re-import the required assets**.
**Source:** USER
**Keywords:** delete guidebook, restore guidebook, trash bin, guidebook settings, cannot be undone, re-import assets
***